During 2019 I was experimenting with Shadergraph (Unity) quite often. I began trying to create various effects, such as objects impersonating humans, quite inspired by the japanese anime Paprika. Once discovered, I tried on creating a shader which can kind of imitate such a wobbly movement.
I began with the basics, doing a "Step-like" Shader.
Step-like Shader / Bending
For that to happen, I created a Vertex Offset in Y-Position (Object Space). But it needs a two layered mask. Firstly, I needed to seperate the Legs from the Torso - which was done over a Mask in Y-Position (Object Space) (2). Secondly, I needed to seperate both legs from another. For that I took X-Position (Object Space) and the OneMinus version of that multiplied over a Sine, so both will started to "flicker". Now one of both timings only needed a offset, so that its not like jumping (1).
In the end I Lerped from the basic Value to the new Offset Value over the two layered Mask via a lerp in Y-Position(3).
In the end I Lerped from the basic Value to the new Offset Value over the two layered Mask via a lerp in Y-Position(3).

StepShader in Shadergraph
For the second experiment i was thinking about rotation. As I saw in the Paprika scene, Rotation adds quite something to this wobbly effect. So i began trying on something nearly similar, first and foremost on only one axis.

Rotation over Axis,Time, RotationValue
It was quite similar from the patch i made earlier: There had to be some sort of seperation from the upper and the lower body. (1)
From there it was only trying to figure out how rotation works. So I once again Lerped the Basic Object Position to the new one (with the Rotation) over the Mask in Y-Position of the Object. (3)
The Rotation Value is basically the Time * (my Multiplier named) Speed, which will go through a Sine. So the values will be always between -1 and 1. From there is another Multiplier (named Rotation), which will affect how much degrees the object will turn. (3)
The Rotation Value is basically the Time * (my Multiplier named) Speed, which will go through a Sine. So the values will be always between -1 and 1. From there is another Multiplier (named Rotation), which will affect how much degrees the object will turn. (3)

RotationShader in Shadergraph
I went on creating Bending Sidesways, since i wanted the upper Body and later on the Hips to shake seperately from another, but also on very little Values, just to get the impression of movement.

HipShake Shader
For that Hipshake / Bending Sideways i created a Mask in Y-Position which can be be made thicker and change its Position over two different values - MaskYPos and MaskThickness (1). From there its again the process of adding some time over Sine and the Lerp at the end once again to make it happen testwise (2 and 3).

HipShake Shader in Shadergraph
After having that, I copied the idea to another position so that the upper body will Bend as well. From that point I began adding these seperated Shaders into a final one, having all those features i described earlier. This is what happened:

Combined Shader
There is a higher resolution of the Shader itself below, so you can have a better look at the details if you want to. What I added furthermore, is a multiplier (slider from 0...1) for me to handle the movement. So in the Material I can easily slide over this Value and the Object will move or not.
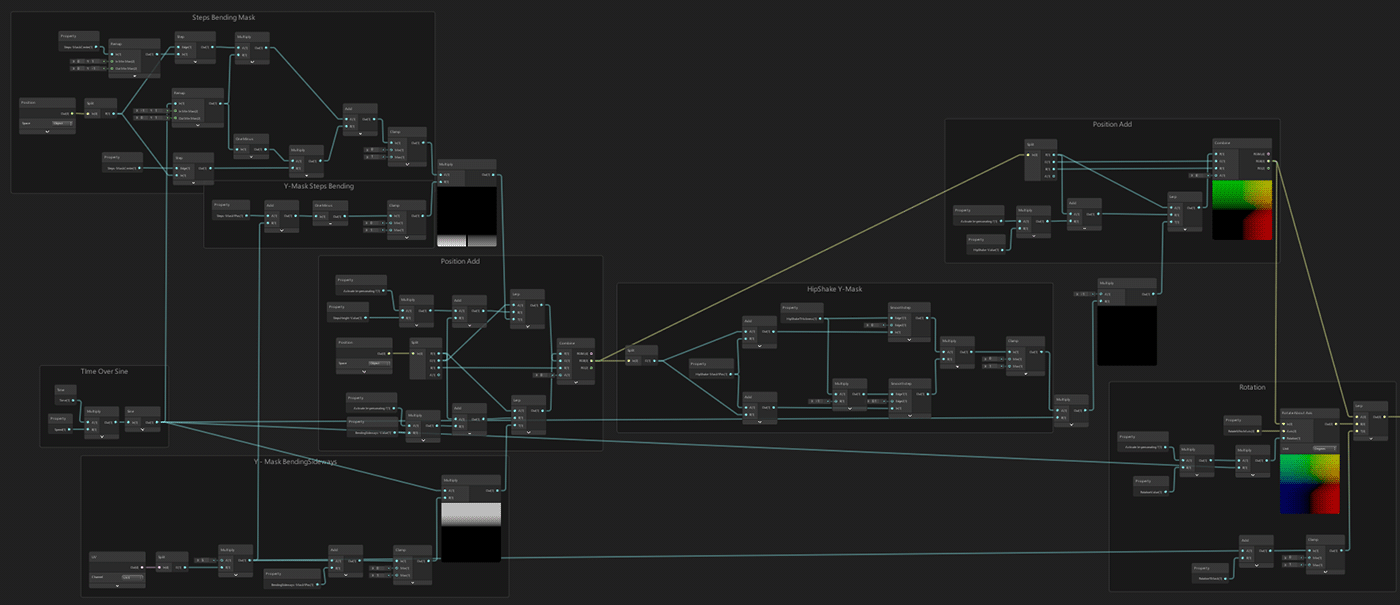
Combined Shader - Bending, Steps, HipShake, Rotation - in Shadergraph
... and here are some non-humanoid Objects which gotten impersonated by this Shader. Looks like they kind of started a Party together. Thank you, if you've been reading that far.

Starting a Party
Having a Party

