

AVIATECHMASS
Location: Nizhny Novgorod
Year: 2018
3D creating & visualisation: Nisha Studio
Location: Nizhny Novgorod
Year: 2018
3D creating & visualisation: Nisha Studio
Subscribe us:


MAKING OF
Общая информация \ Overview
Приветствую тебя, коллега. Если ты читаешь это, значит тебе интересен процесс создания больших экстерьерных сцен.
Начну с того, что работа над сценой в 3Д велась в Maxon Cinema4D, для отрисовки текстур и постпродакшена - Adobe Photoshop, рендеринг выполнялся с помощью Octane render for Cinema4D.
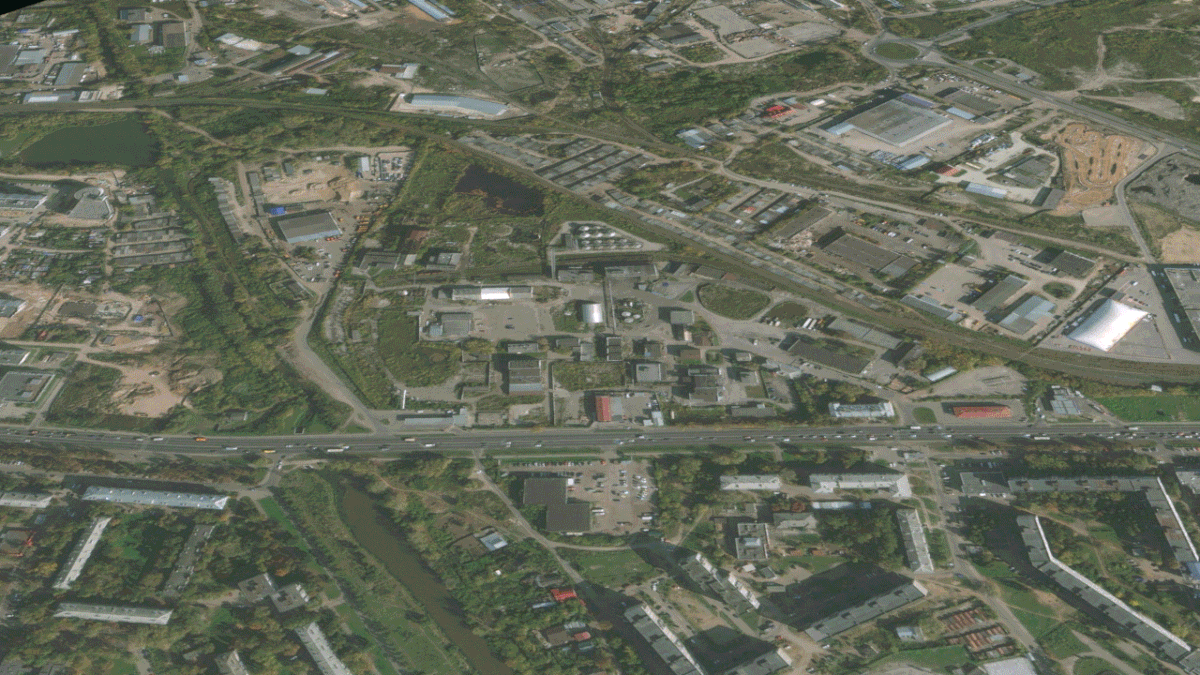
Проект, представленный здесь - концепция торгово-развлекательного комплекса, спроектированного на месте старой промышленно-складской территории. На примере данного проекта показана работа с большой сценой: как с технологической стороны, так и с художественной.
[EN]
Hello you, colleague. If you read this, then you are interested in the process of creating large exterior scenes.
To begin with, the work on the scene in 3D was done in Maxon Cinema4D, for drawing textures and post-production - Adobe Photoshop, rendering was done using Octane render for Cinema4D.
The project presented here is the concept of a shopping and entertainment complex designed on the site of an
old industrial warehouse area. The example of this project shows work with a big scene: both from the technological side and from the art.
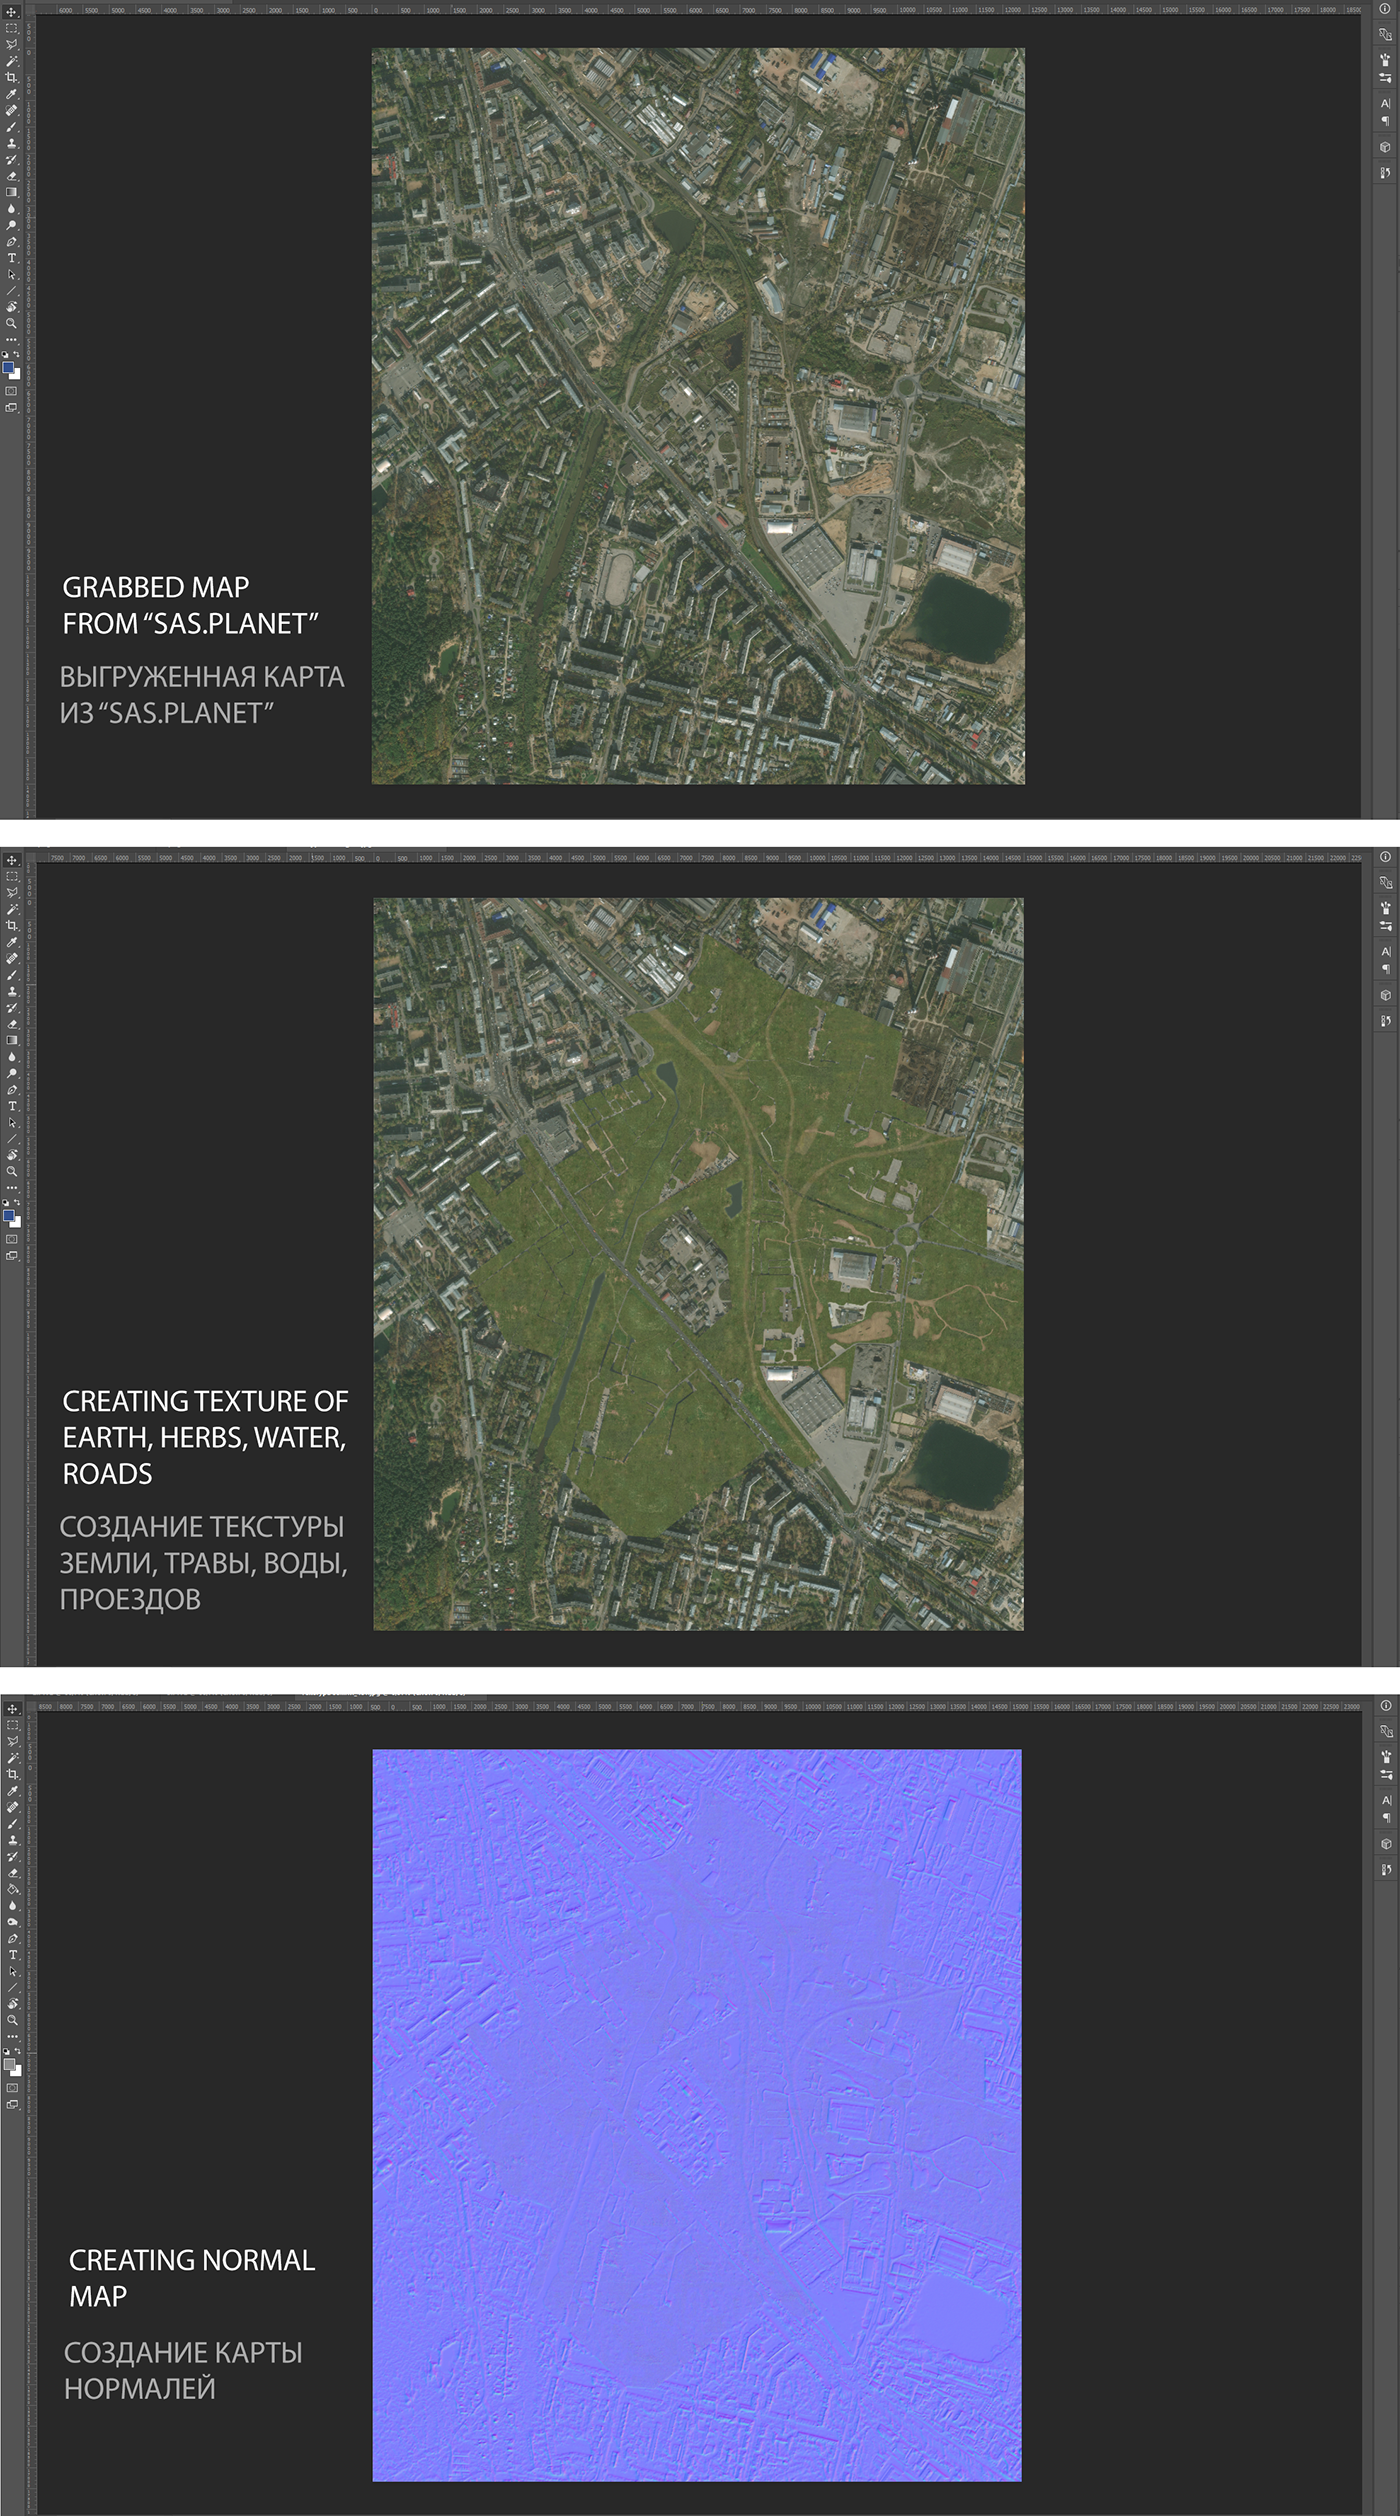
Шаг 1. Подготовка подосновы
Step 1. Creating base information
Step 1. Creating base information
[RU]
Находим интересующий нас участок с окружающей застройкой в SAS.Planet. Выгружаем карту в нужном масштабе в виде изображения. Важно получить информацию о количестве и этажности окружающей застройки. Сделать это можно с помощью OSM.
[EN]
Find an area that interests us with the surrounding buildings in SAS.PIanet. We grabbed the map at the desired scale as an image.
It is important to obtain information on the number of buildings around and their floors. You can do this with OSM.


Шаг 2. Создание текстуры земли
Step 2. Creating ground texture
Step 2. Creating ground texture
[RU]
Рисуем текстуру земли в Adobe Photoshop. Создаем тропинки, газоны, поляны, просёлочные дороги, обочины. Конечный размер нарисованной текстуры в этом проекте - 15000 х 15000 пикселей.
[EN]
We draw the texture of the ground in Adobe Photoshop. We create footpaths, lawns, meadows, track roads, roadsides. Final size of the drawn texture in this project is 15000 x 15000 pixels.
_____________________________________________________________________
_____________________________________________________________________
Для использования в больших проектах или для рисования собственной текстуры вы также можете использовать эту текстуру земли:
Aerial Birdeye Ground Texture [16K]
Aerial Birdeye Ground Texture [16K]
For use in large projects or to draw your own texture, you can also use this ground texture:
Шаг 3. Моделирование окружения
Step 3. Modeling environment
Step 3. Modeling environment
[RU]
Важно при выполнении моделирования работать со слоями. То есть на каждый вид объектов - свой слой. После завершения работы со слоем - его можно отключить, чтобы процесс работы над сценой был быстрее и комфортнее. Немаловажную роль в больших экстерьерных сценах играют низкополигональные модели.
Начинаем с моделирования дорог, проспектов, проездов и тротуаров. В данном проекте это выполнено в виде создания сплайна по контору существующих дорог. После чего с помощью сплайна выполняем "выдавливание" модификатором Extrude. Проспекты и шоссе легче выполнять с помощью модификатора Sweep (шоссе и проспекты имеют фиксированную ширину и почти не имеют изгибов, что делает логичным использование модификатора Sweep вместо Extrude). После завершения создания дорог, тротуаров и проездов - создаем слой "Roads".
Далее располагаем подготовленные заранее низкополигональные модели зданий и сооружений. Каждое должно быть на своем месте,согласно существующей реальности.
После завершения расположения зданий - создаем слой "Builds".
Следующий немаловажный этап моделирования окружения - создание и размещение объектов уличной фурнитуры, инфраструктуры, траффика:
- Создание объектов уличного освещения: Используем созданный нами ранее сплайн дорог для размещения на нем опор уличного освещения с помощью клонера Mograph.
- Создаем сплайны для размещения уличного автомобильного траффика. Используем клонер Mograph для размещения подготовленных низкополигональных моделей автотранспорта по созданным сплайнам.
- Создание бордюров и поребриков с помощью созданного нами ранее сплайна дорог. С помощью этого сплайна и модификатора Sweep создаем сеть бордюров.
- Оживляем нашу сцену с помощью пешеходов: создаем плоскости в тех местах, где важна активность людей - тротуары, пешеходные переходы, внутридворовые площадки. С помощью клонера Mograph размещаем по созданным нам плоскостям подготовленные низкополигональные модели людей.
После завершения моделирования этапа - создаем слой "Street equipment".
[EN]
It is important to work with layers when performing modeling. That is, for each type of objects - its own layer. After completing work with the layers, it can be turned off so that the process of working on the scene is faster and more comfortable. An important role in large exterior scenes is played by low-poly models.
We start by modeling roads, avenues, walkways, and sidewalks. In this project, this is done in the form of creating a spline in the form of existing roads. Then, using the spline, we perform "extrusion" with the Extrude modifier. Prospectuses and highways easier to perform using the Sweap modifier (avenues have a fixed width and almost no bends, which makes it logical to use the Sweap modifier instead of Extrude).After completing the creation of roads, sidewalks and passages - create a layer "Roads".
Then we prepared low poly models of buildings and structures. Each must be in his place, according to the existing reality.
After completing the placement of buildings - creates a layer "Builds".
The next important step in modeling the environment is the creation and placement of outdoor furniture, infrastructure and vehicles:
- Creating objects of street lighting: we use the spline of roads that we created earlier to place on it supports for street lighting using cloner Mograph.
- Create splines to accommodate car traffic. We use Mograph cloning to place the prepared low-polygon models on the created splines.
- Creating borders and borders using the road spline we created earlier. Using this spline and the Sweep modifier, we create a network of borders.
- We create a plane in those places where people's actions are important - sidewalks, pedestrian crossings, courtyards.
- Creating borders and borders using the road spline we created earlier. Using this spline and the Sweep modifier, we create a network of borders.
- We create a plane in those places where people's actions are important - sidewalks, pedestrian crossings, courtyards.
Using Mograph cloning. Publication of prepared low poly models placed on the planes created by us.
After completion of the simulation phase - create a layer "Street equipment".


Шаг 4. Создание озеленения
Step 4. Creating vegetation
Step 4. Creating vegetation
[RU]
Озеленение создавалось с помощью плагина Octane Scatter. Технология создания карты размещения происходит таким образом:
- Создание Vertex map с помощью кисти на плоскости земли. Таким образом рисуем места, где хотим видеть озеленение в нашей сцене. Важно при создании Vertex Мар удостовериться,что ваша плоскость имеет правильную топологию и имеет достаточное количество полигонов.
- Добавление в клонер моделей растительности (Деревья, кустарники). Важно - для оптимальной работы в больших сценах, количество полигонов у моделей растительности < 50 000 polygons.
[EN]
Vegetation was created using the Octane Scatter plugin. The technology for creating maps of placement is as follows:
- Create a map of vertices with a brush on the ground plane. Thus we draw places where we want to see vegetation in our scene.
It is important when creating a Vertex Map to make sure that your plane has the correct topology and has a sufficient number of polygons.
- Adding vegetation models to the cloner (Trees, shrubs). It is important - for optimal performance in large scenes, the number of polygons for vegetation models is <50,000 polygons.


FINALLY


Visit our website: nishaviz.com Follow us: Nisha Studio
Thanks for watching and your appreciation!
You can help me with my creativity: DONATE


