

1. Discover
With research begins the most extensive part of design process, we seek to see the world in a different way to generate new insights.
We started with a panel that was modified throughout the process, adding information, statistical data, images, moods. Linking concepts together, moving pieces from one place to another. Working freely but always inside our framework.
A good concept is the one that is well grounded in its research.
Ending the research stage is just the beginning, now is the time for massive brainstorming.
We should never hold on to the first idea we come up with, because it was surely also someone else's first idea.
This is the most difficult and enjoyable part for me
2. Define
Now we could start generating our insights, how might we's and analogies.
It's time to land all the outflows generated in the previous phase.
For this it is necessary to identify which are our strongest concepts, the most valuable and of course the most original. The goal here is to develop a clear creative brief that frames the fundamental design challenge.

about 96 crazy ideas were sketched out for this project


Of all these ideas we concentrated on 5 proposals, they were born from combining and rethinking our previous concepts. Until we finally choose one to work on.
PROBLEM DEFINITION / DESIGN BRIEF
Now that we had an idea, it needed to be recharged and given more value. We returned to our research panels to highlight the main findings that allowed us to defend our design, and to seek new information useful to our cause.
"Two steps forward and one step back"


Now our design has landed, but it is not yet free of changes. Our main actor comes on stage: our user. He will validate our conceptual proposal and guide us towards the changes that must be made.
3. Develop
During this stage the concepts we create will be prototypes (in the form of study models) and tested by our user. Basically it is a trial and error process that helps us to redefine our ideas.
The concept could change a lot or very little. You never know, so you need to validate it with the potential user. He's the only one who can tell us until we get there.


Until we finally get our final concept
4. Deliver
Now that our concept can't be improved any more (it can always be improved, but every day that passes we are closer to the final date of our project) the time has come to prototype it.
The idea will take shape and volume. Resulting in a product with which we can interact.


In this case, we were looking for a semi-translucent material with elastic properties that would be able to mimic the cracks of the container in which it was embedded.
We improvise the moulds using MDF plates with the required thickness and use knives to mark cracks in the material.
We carried out around 12 tests with different commercial silicones and fillers until one worked for us.


Once we obtained the ideal material, laser cut the moulds in MDF, marked a pattern of veins that simulated the texture of human skin, hoping that the material would copy this pattern.
So we proceeded to empty the first silicone test, which was a success.
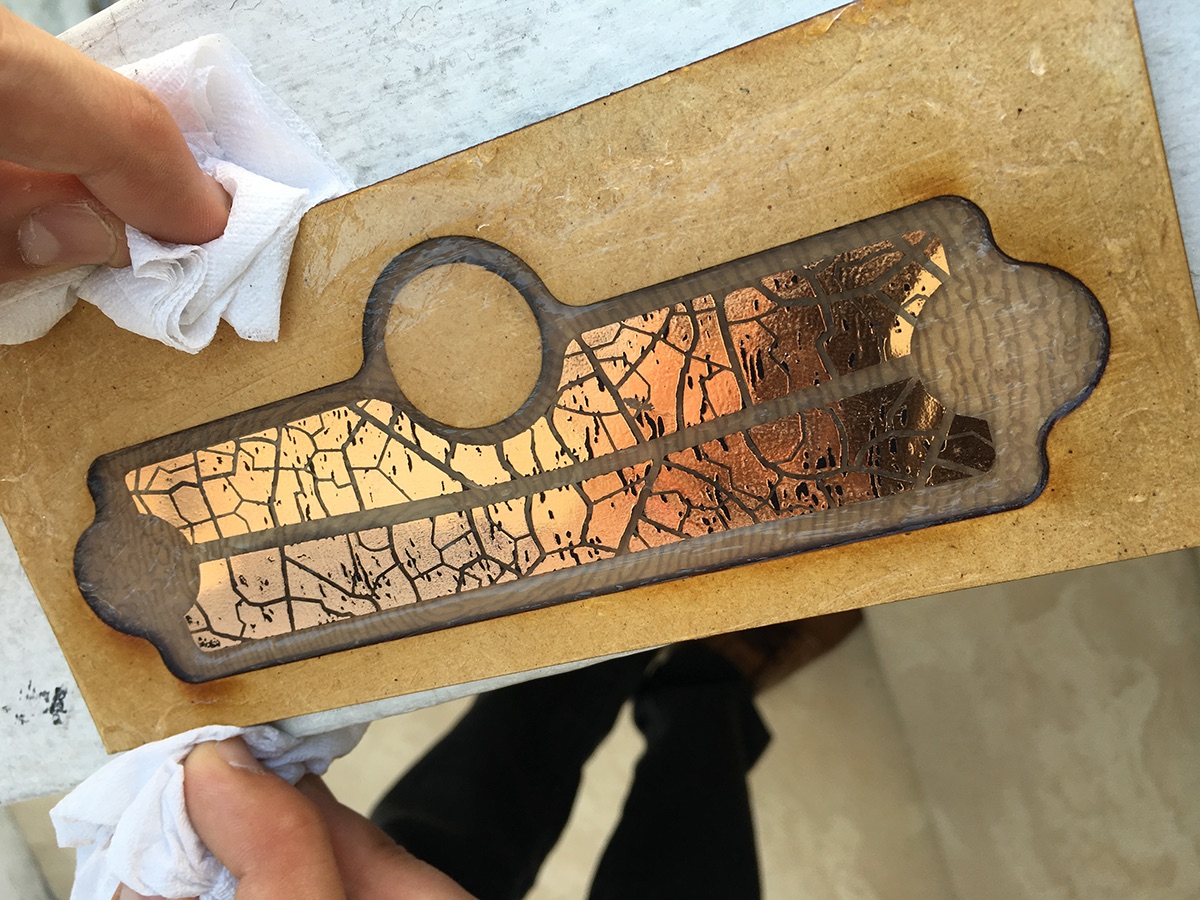
One less problem, now we needed to find an effective way to apply heat-sensitive foil on a thin sheet of acetate.


The first tests were not very promising... But you learn from mistakes
We controlled the intensity of the hot plate with which we pressed the paper and calculated the time needed to get the foil to adhere to the acetate without deforming it by heat.
Until we finally got what we were looking for.


Now it was only necessary to mount the sheet of acetate and foil on the model, while the silicone was still fresh. And let the model set in a ventilated space for a few hours.


We already had our model almost ready to show off. But we were still missing a very important stage when we finished the development of a speculative/conceptual design: The post production.
Since our product could not reach everyone physically, it needed to look really good in digital media and be fully explained.


We did a photo shoot in our university's lab to get into context and to add realism we created a light box that could highlight our model.
Since we wanted to tell a story, we decided to make a video for which it was necessary to draw a storybook on which to base it.


