

Greece is full of creative talent that spreads it's mainland and island haunts alike. Among the masses are three such artists, who all share one thing in common; they all enjoy and work in the area of caricature illustration. As a joint project, the three caricaturists who live and work in Greece (Stavros Damos, Costis Papatheodorou and Rob Snow) joined forces to create a project to see how they would render each other out as caricatures.
The project's aim was set to deliver a photograph of each caricaturist to the respected other caricaturists and then for those artists to then develop a caricature in their unique style of the caricaturist in question. In the case of all three artists, they usually like to render out a sketch first (either digital or pencil) and then scan or render this into photoshop/procreate and then work up the digital artwork.
All three caricaturists are recognised by their individual and unique styles, and so the project aimed to give flavour to the whole process of rendering out caricatures. Each section has a little insight into the preliminary and rendering processes. Hope you enjoy!

I was born in Thessaloniki in 1977, where I also studied graphic design at AAS College of Art & Design. In recent years, my main professional activities and specialization are focused on illustration. My clients are primarily advertising agencies, publishing houses and magazines, in Greece and abroad. I spend my free time in a continued creative quest for new ideas and techniques. My love for the arts in general is what gives me strength and fuels my optimism for the future. I live and work in Thessaloniki.

I have illustrated the basic skin tones of the face first, without too many details. Then I start building the facial characteristics with line strokes and custom made textures. Final I make some colour adjustments with colour highlights and overlays.

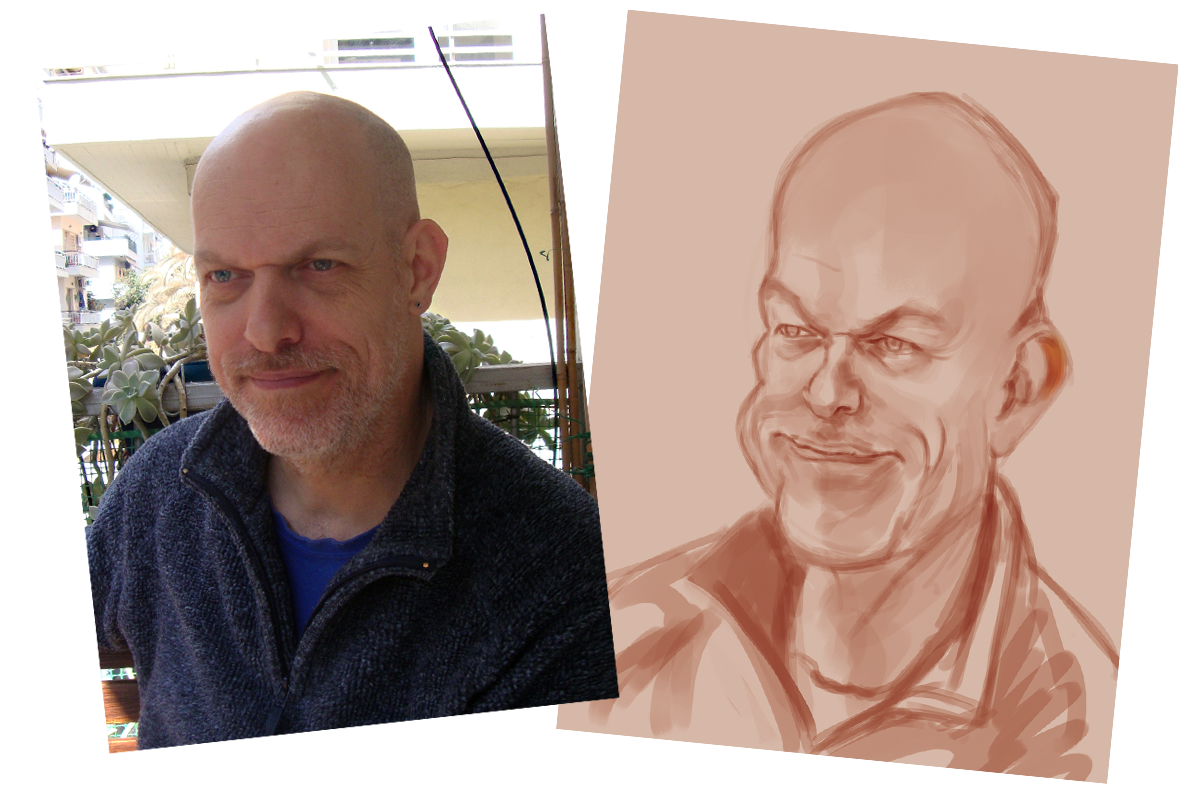
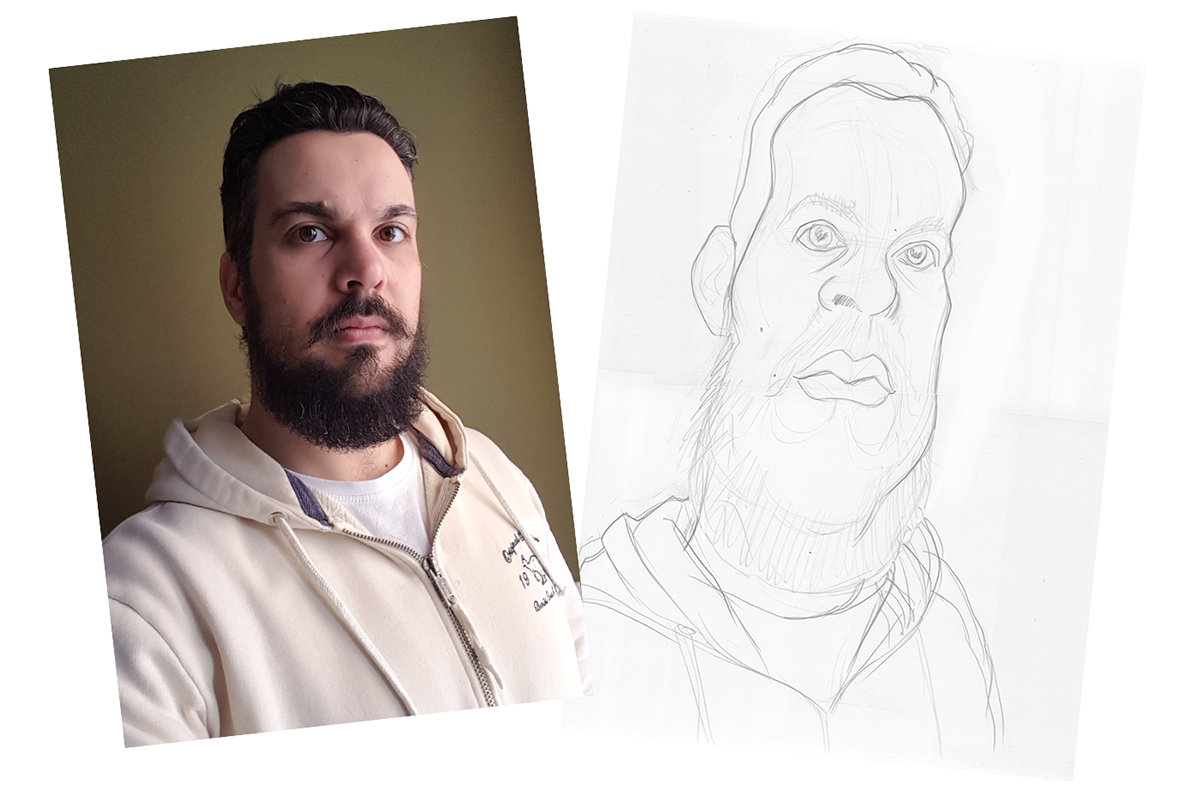
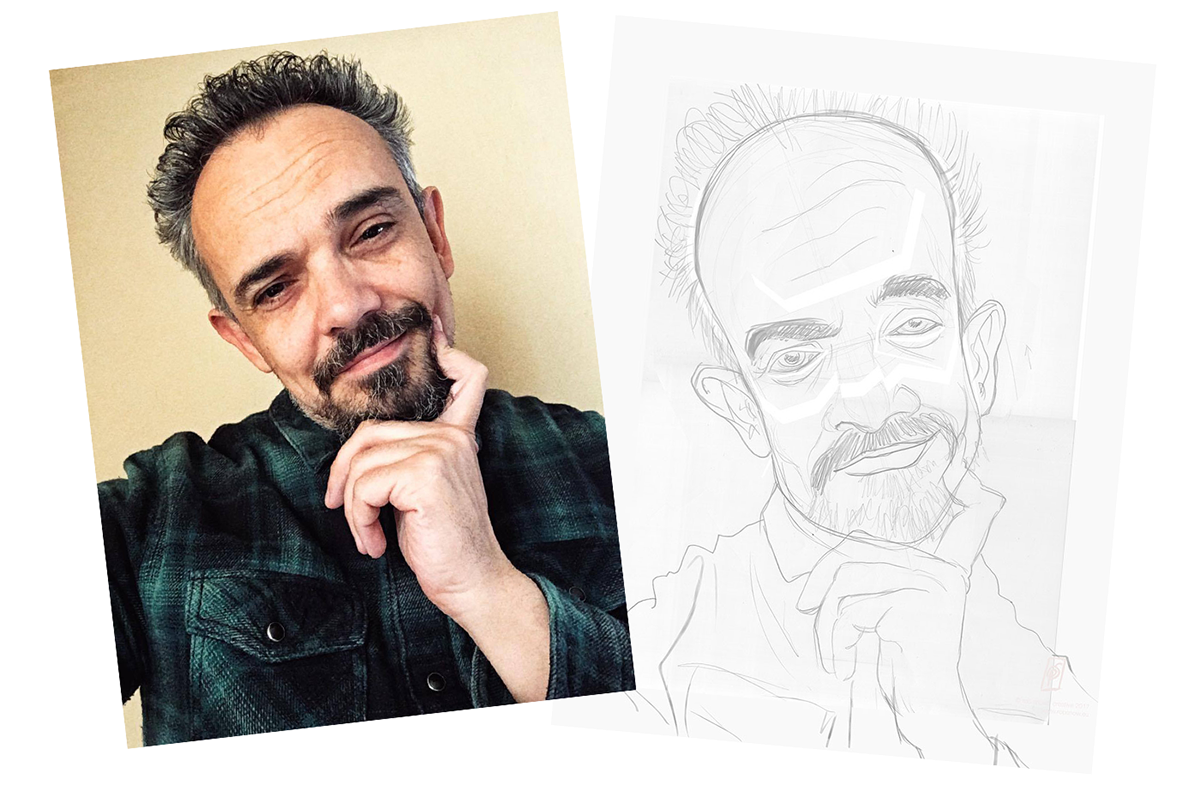
This is the stages of development all the artists took. From the photograph provided by each other they drew a pencil or digital sketch.
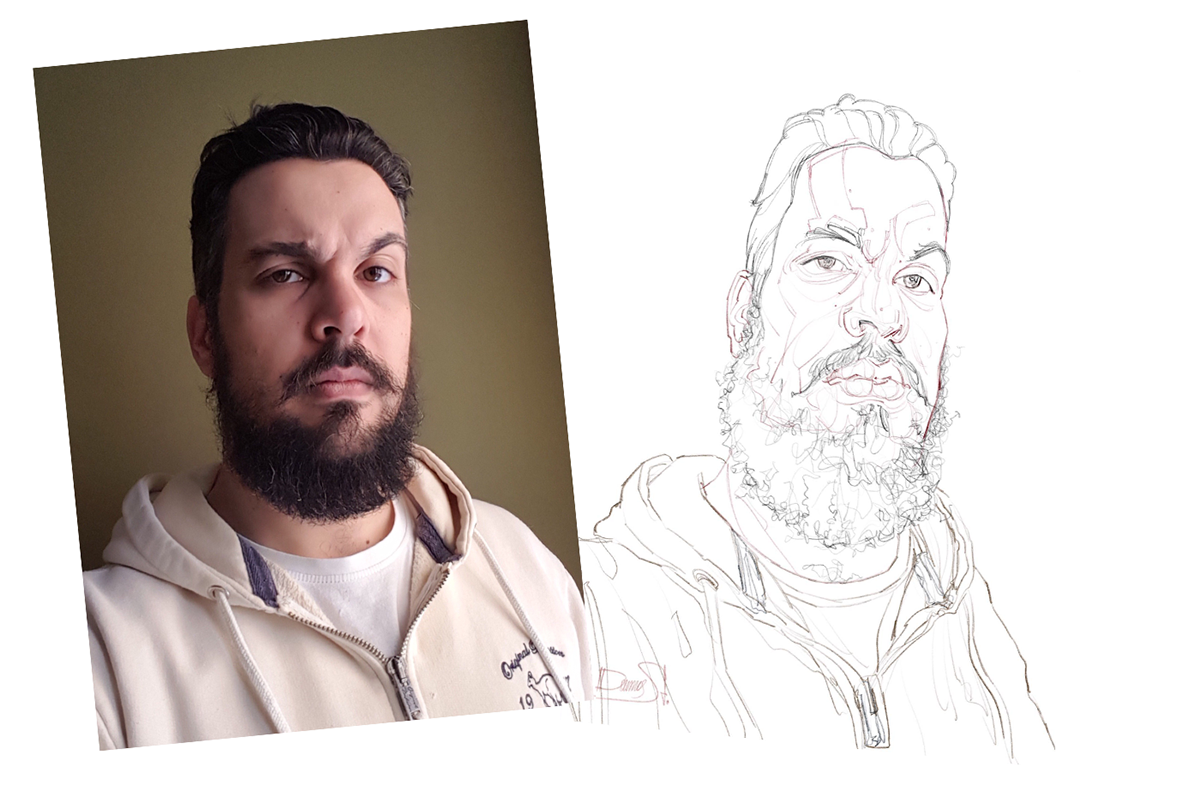

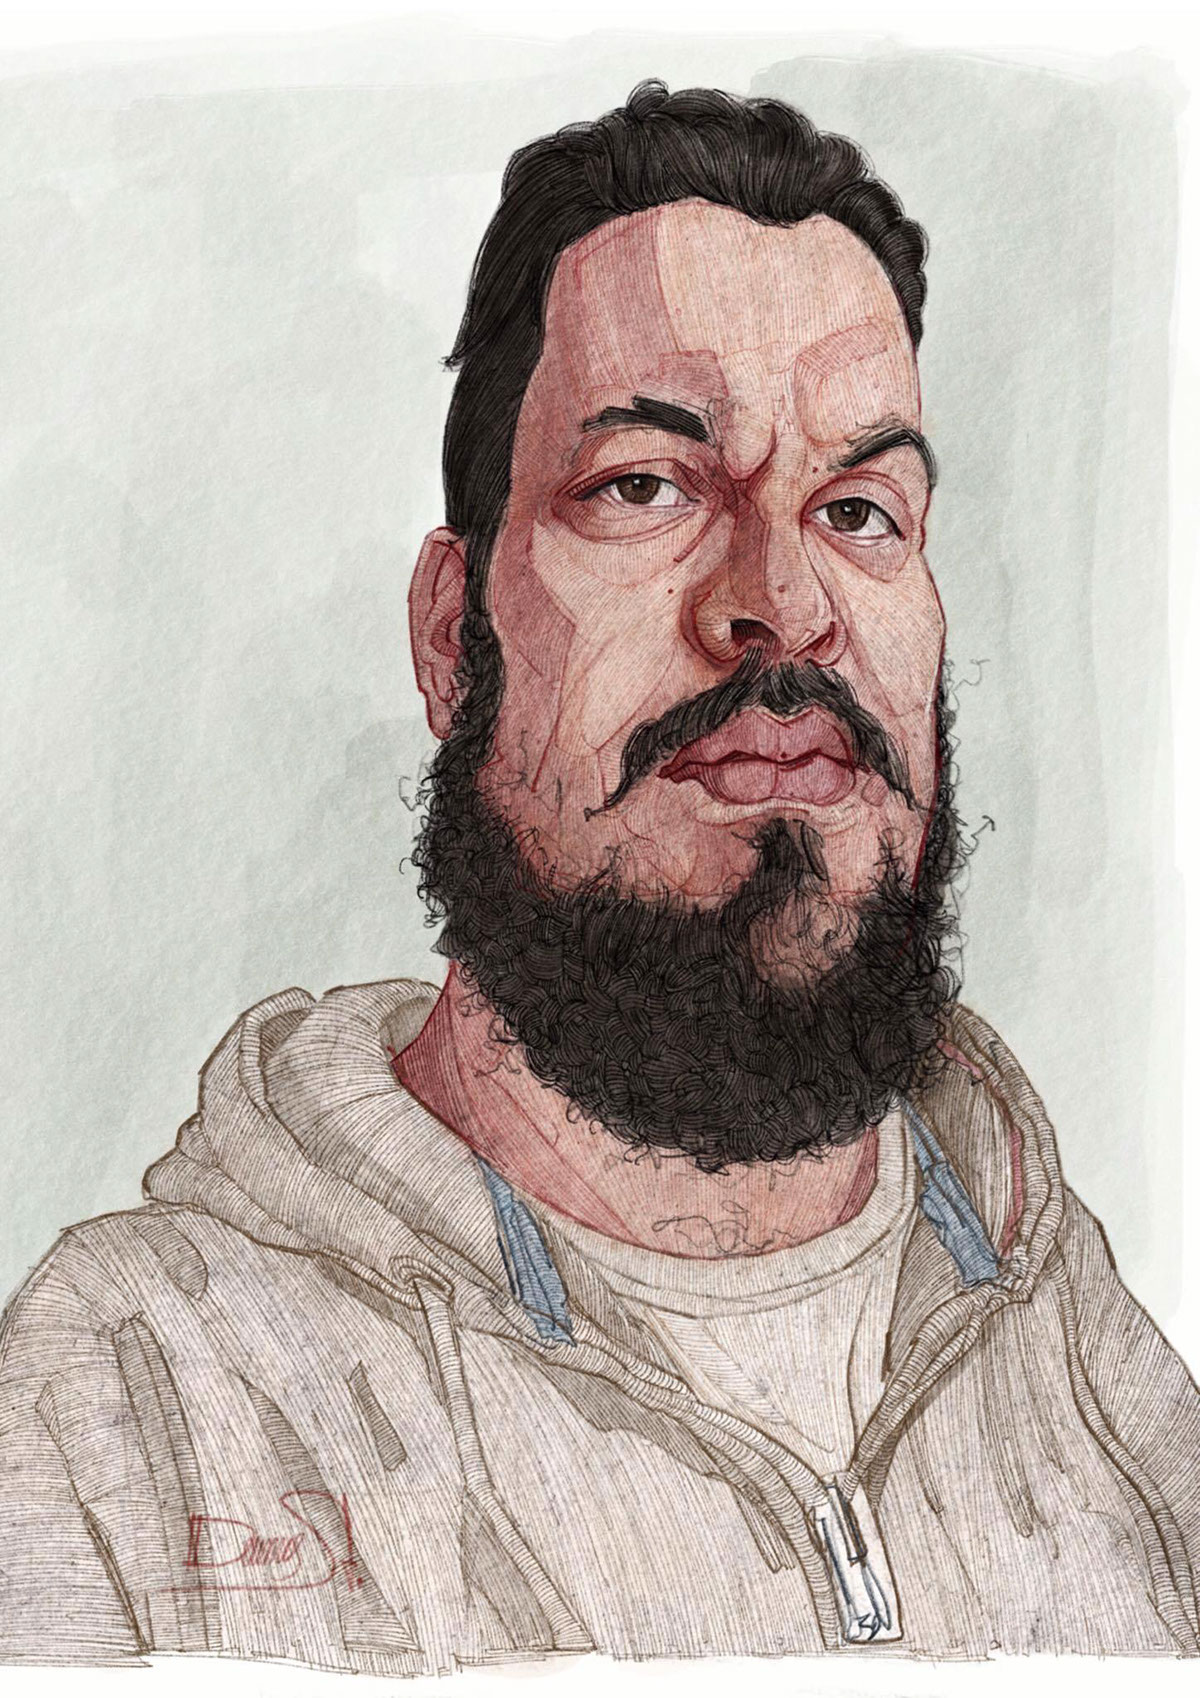
copyright © Stavros Damos 2017, all rights reserved • www.behance.net/stdamos
Layers: 16 uncompressed
Digital rendering: 10 hrs
Digital rendering: 10 hrs
Render Tool: Procreate


I have illustrated the basic skin tones of the face first, without too many details. Then I start building the facial characteristics with line strokes and custom made textures. Final I make some colour adjustments with colour highlights and overlays.

This is the stages of development all the artists took. From the photograph provided by each other they drew a pencil or digital sketch.
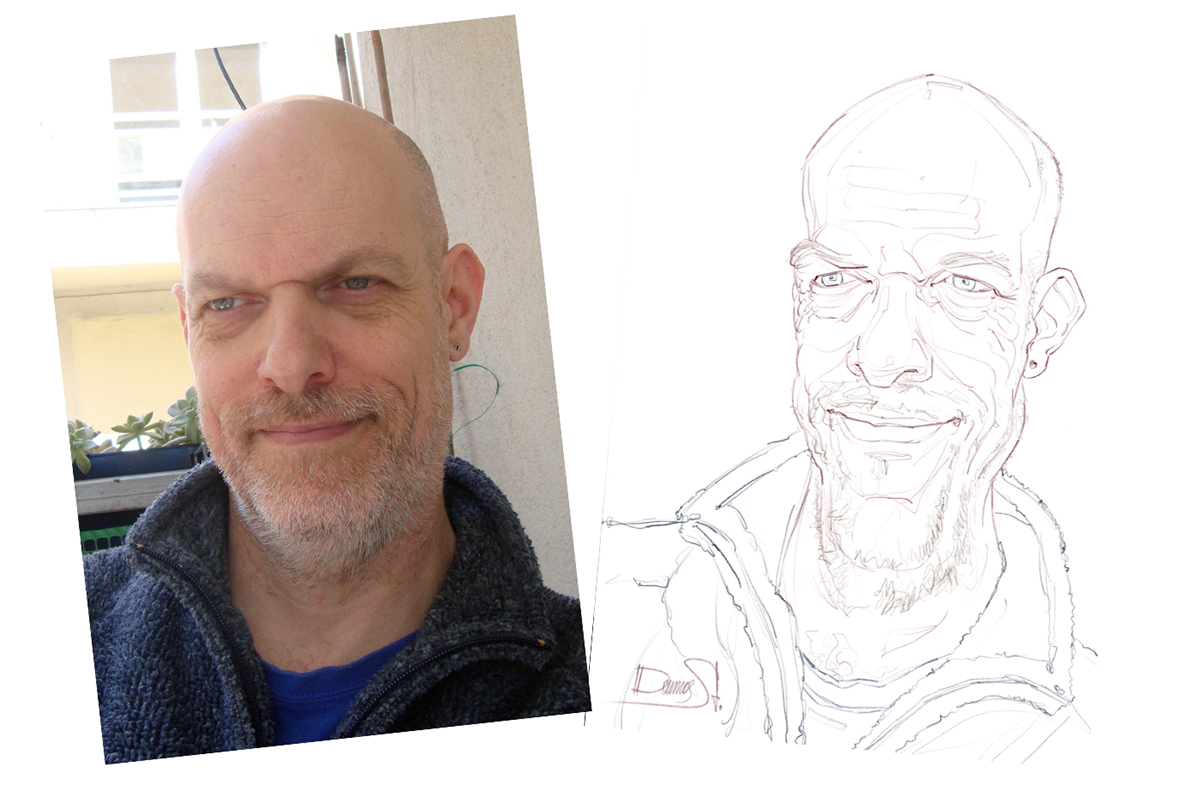


copyright © Stavros Damos 2017, all rights reserved • www.behance.net/stdamos
Layers: 15 uncompressed
Digital rendering: 9 hrs
Digital rendering: 9 hrs
Render Tool: Procreate


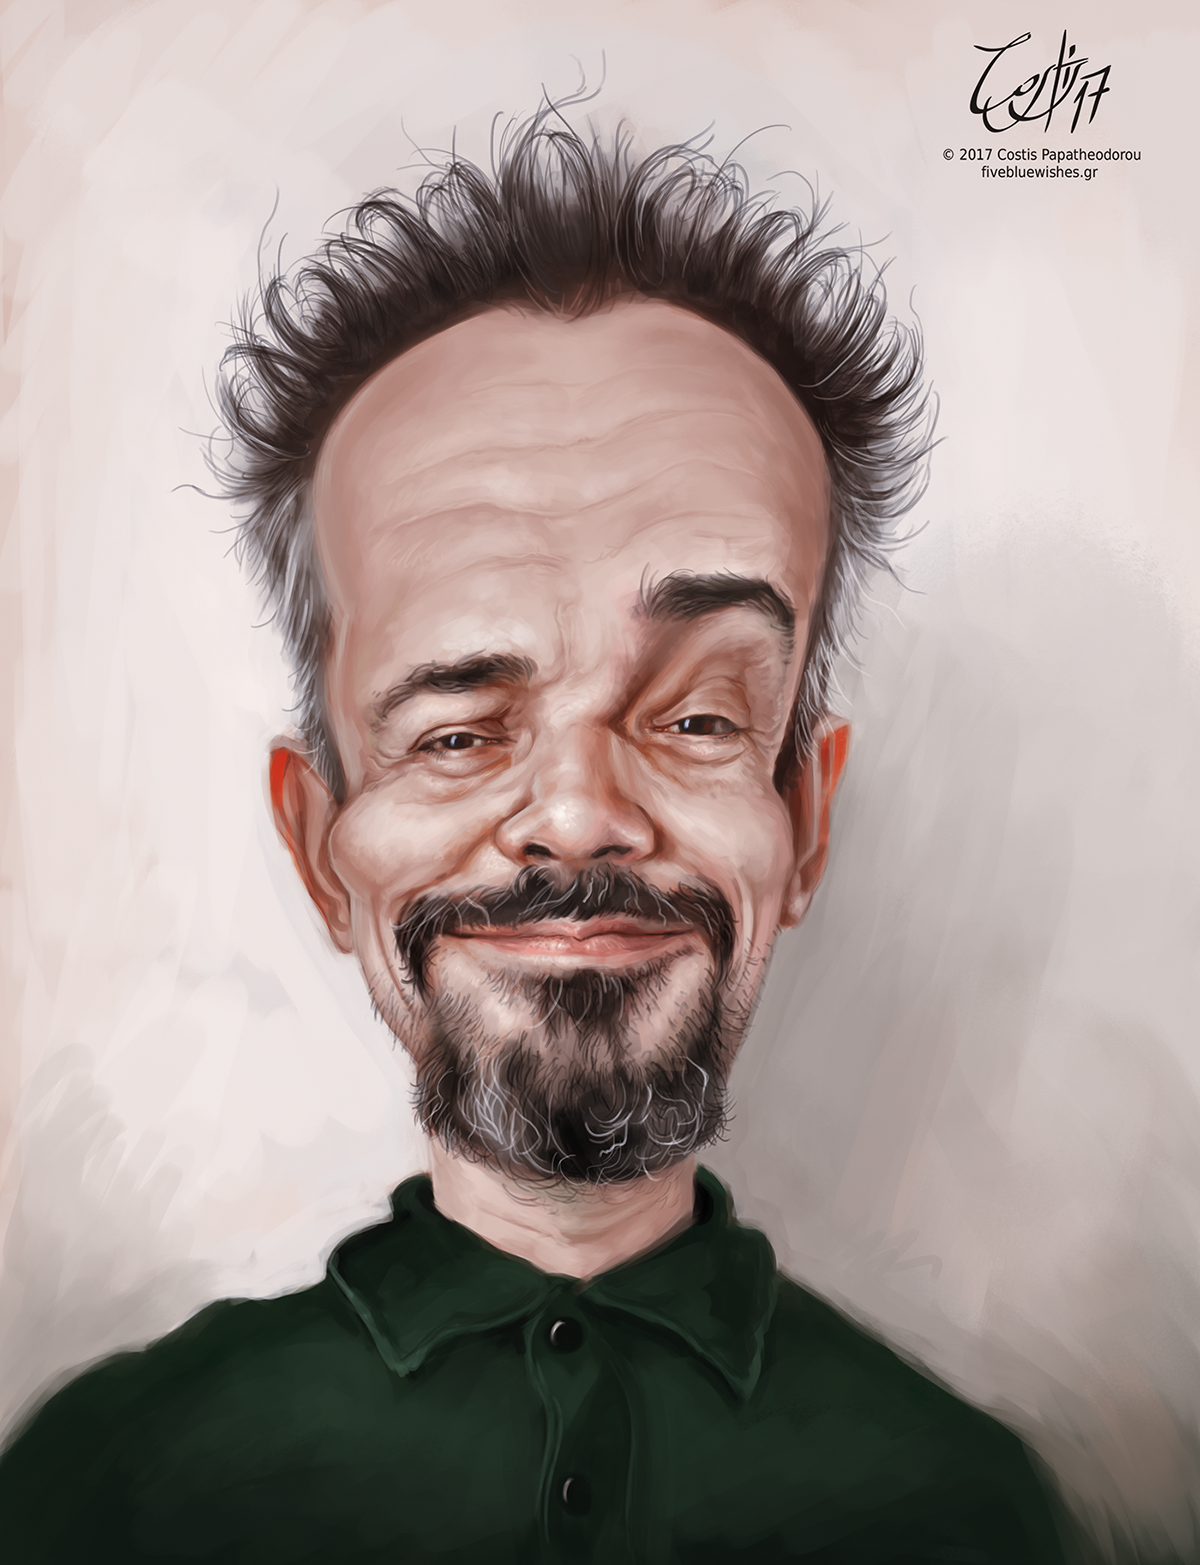
Costis Papatheodorou is a freelance illustrator with 11 years experience in commercial illustration. He often travels on his personal pumpkin for business and volcanic reasons. When the southern wind blows his nails turn to glass and his moustache becomes blue. He is into papercut and other mixed techniques like karate-waterpaint.
Born in 1981, he is married and father of 11 children, all of which have different fathers and mothers. His 3 cats call him Archibald for no apparent reason. When he is happy he dances with no arms. He died on 2014. Two years later he started doing portraits and caricatures.

I usually start drawing on a canvas that has a mid-tone colour (the base of my subject's skin). I never use a white canvas. I find it very painful for my eyes, especially if you have to work for many hours. Then I draw a basic sketch using a dark red or dark green colour and start blocking the shapes using mid-tones, that are not too bright. The bright and dark tones are to be placed along the process.
I often reposition some of the elements or change the values by painting in top of. Never use the Undo/ Redo. Sometimes (if I have a short deadline) I use the liquify tool or the lasso tool. I avoid picking colour from the reference photograph because I usually end up picking the colour from a specific pixel and not the colour that I had in mind. So I pick colours using the HSB slider. Working with custom brushes (opacity 60-80%) and using the pressure of the Wacom stylus.
The canvas size starts from 23x30cm at 300dpi (CMYK profile) and can be even 50x70cm. At this size it can be printed in bigger sizes. Almost every time I use layers. The psd files size is about 150-200 MB (the size depends on the number of layers and if they are full of colour). The whole process (from sketch to final render) is done on photoshop.

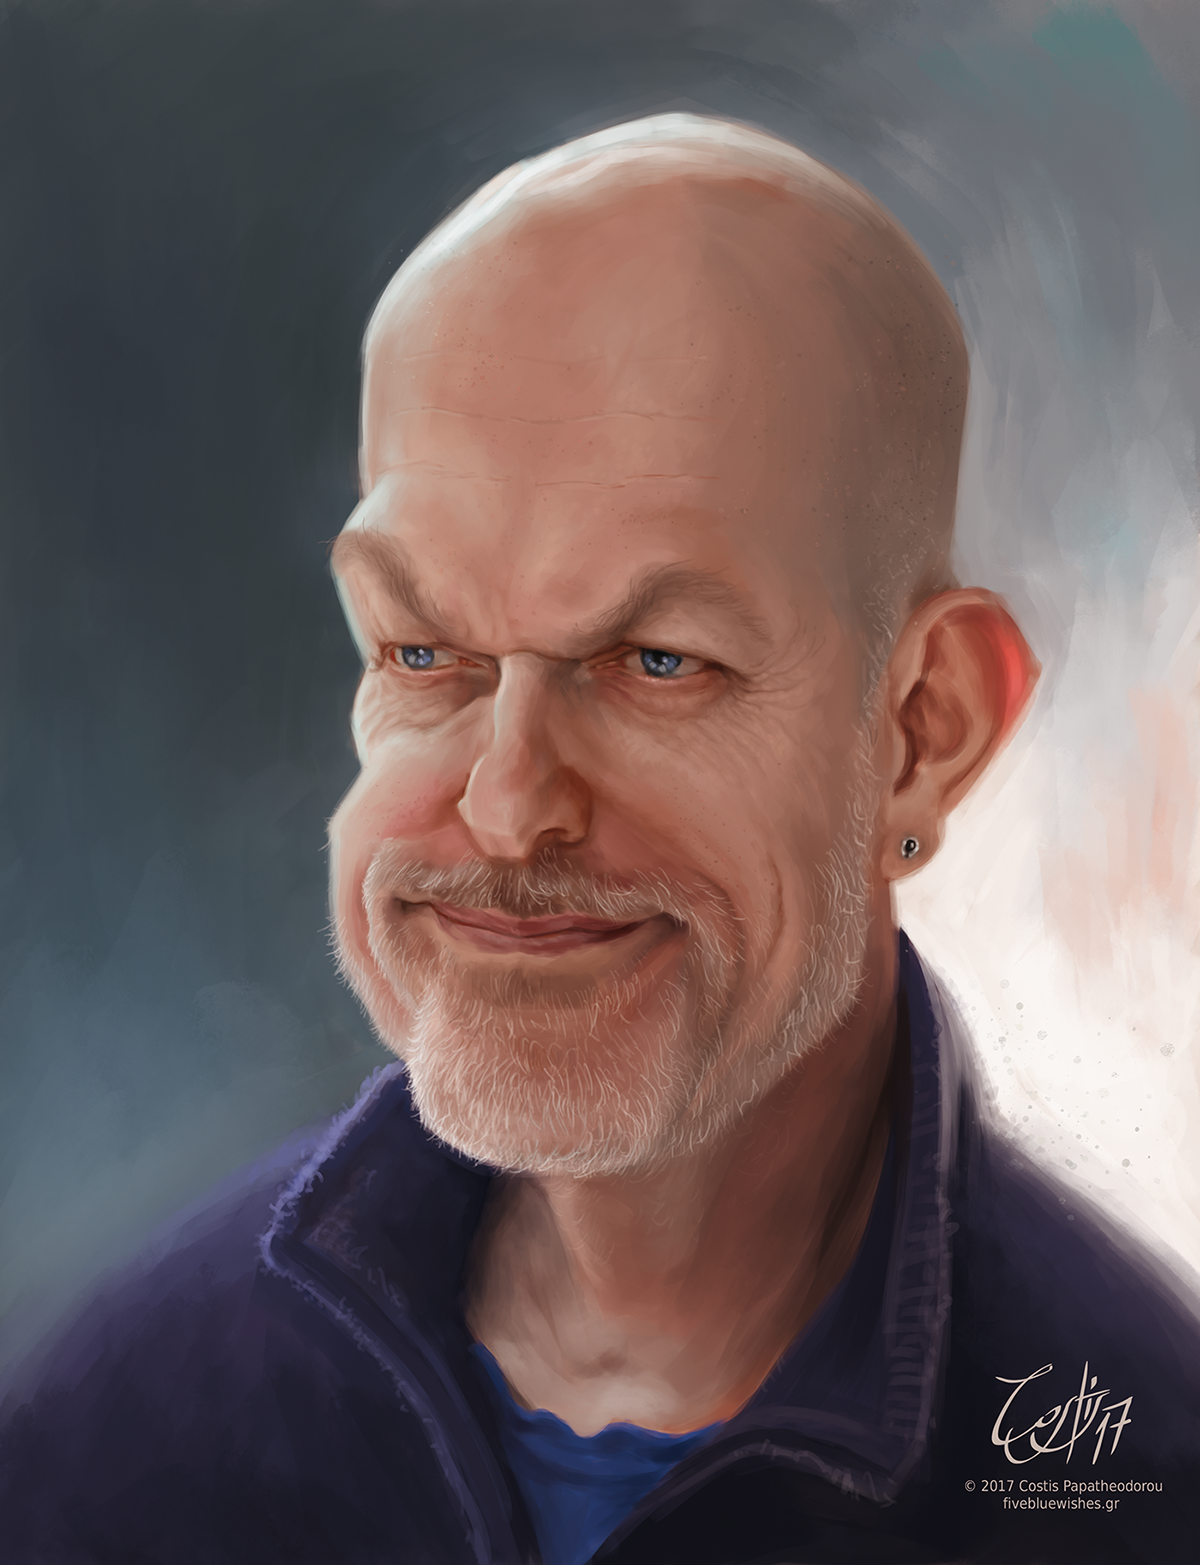
This is the stages of development all the artists took. From the photograph provided by each other they drew a pencil or digital sketch.


The image shows the brush I use for the rendering as well as the number of layers to complete!!

File size:119Mbs/904,9 Mbs (open)
Layers: 22 uncompressed
Dimensions: 2717x3543px @ 300dpi
Hours (Pencil): 12mins
Digital rendering: 6,5 hrs
Layers: 22 uncompressed
Dimensions: 2717x3543px @ 300dpi
Hours (Pencil): 12mins
Digital rendering: 6,5 hrs
Render Tool: Wacom Cintiq
copyright © Costis Papatheodorou 2017, all rights reserved • www.fivebluewishes.gr


I usually start drawing on a canvas that has a mid-tone colour (the base of my subject's skin). I never use a white canvas. I find it very painful for my eyes, especially if you have to work for many hours. Then I draw a basic sketch using a dark red or dark green colour and start blocking the shapes using mid-tones, that are not too bright. The bright and dark tones are to be placed along the process.
I often reposition some of the elements or change the values by painting in top of. Never use the Undo/ Redo. Sometimes (if I have a short deadline) I use the liquify tool or the lasso tool. I avoid picking colour from the reference photograph because I usually end up picking the colour from a specific pixel and not the colour that I had in mind. So I pick colours using the HSB slider. Working with custom brushes (opacity 60-80%) and using the pressure of the Wacom stylus.
The canvas size starts from 23x30cm at 300dpi (CMYK profile) and can be even 50x70cm. At this size it can be printed in bigger sizes. Almost every time I use layers. The psd files size is about 150-200 MB (the size depends on the number of layers and if they are full of colour). The whole process (from sketch to final render) is done on photoshop.

This is the stages of development all the artists took. From the photograph provided by each other they drew a pencil or digital sketch.

The image shows the brush I use for the rendering as well as the number of layers to complete!!

File size:128Mbs/923.7Mbs (open)
Layers: 25 uncompressed
Dimensions: 2717x3543px @ 300dpi
Hours (Pencil): 15mins
Digital rendering: 4hrs
Layers: 25 uncompressed
Dimensions: 2717x3543px @ 300dpi
Hours (Pencil): 15mins
Digital rendering: 4hrs
Render Tool: Wacom Cintiq
copyright © Costis Papatheodorou 2017, all rights reserved • www.fivebluewishes.gr


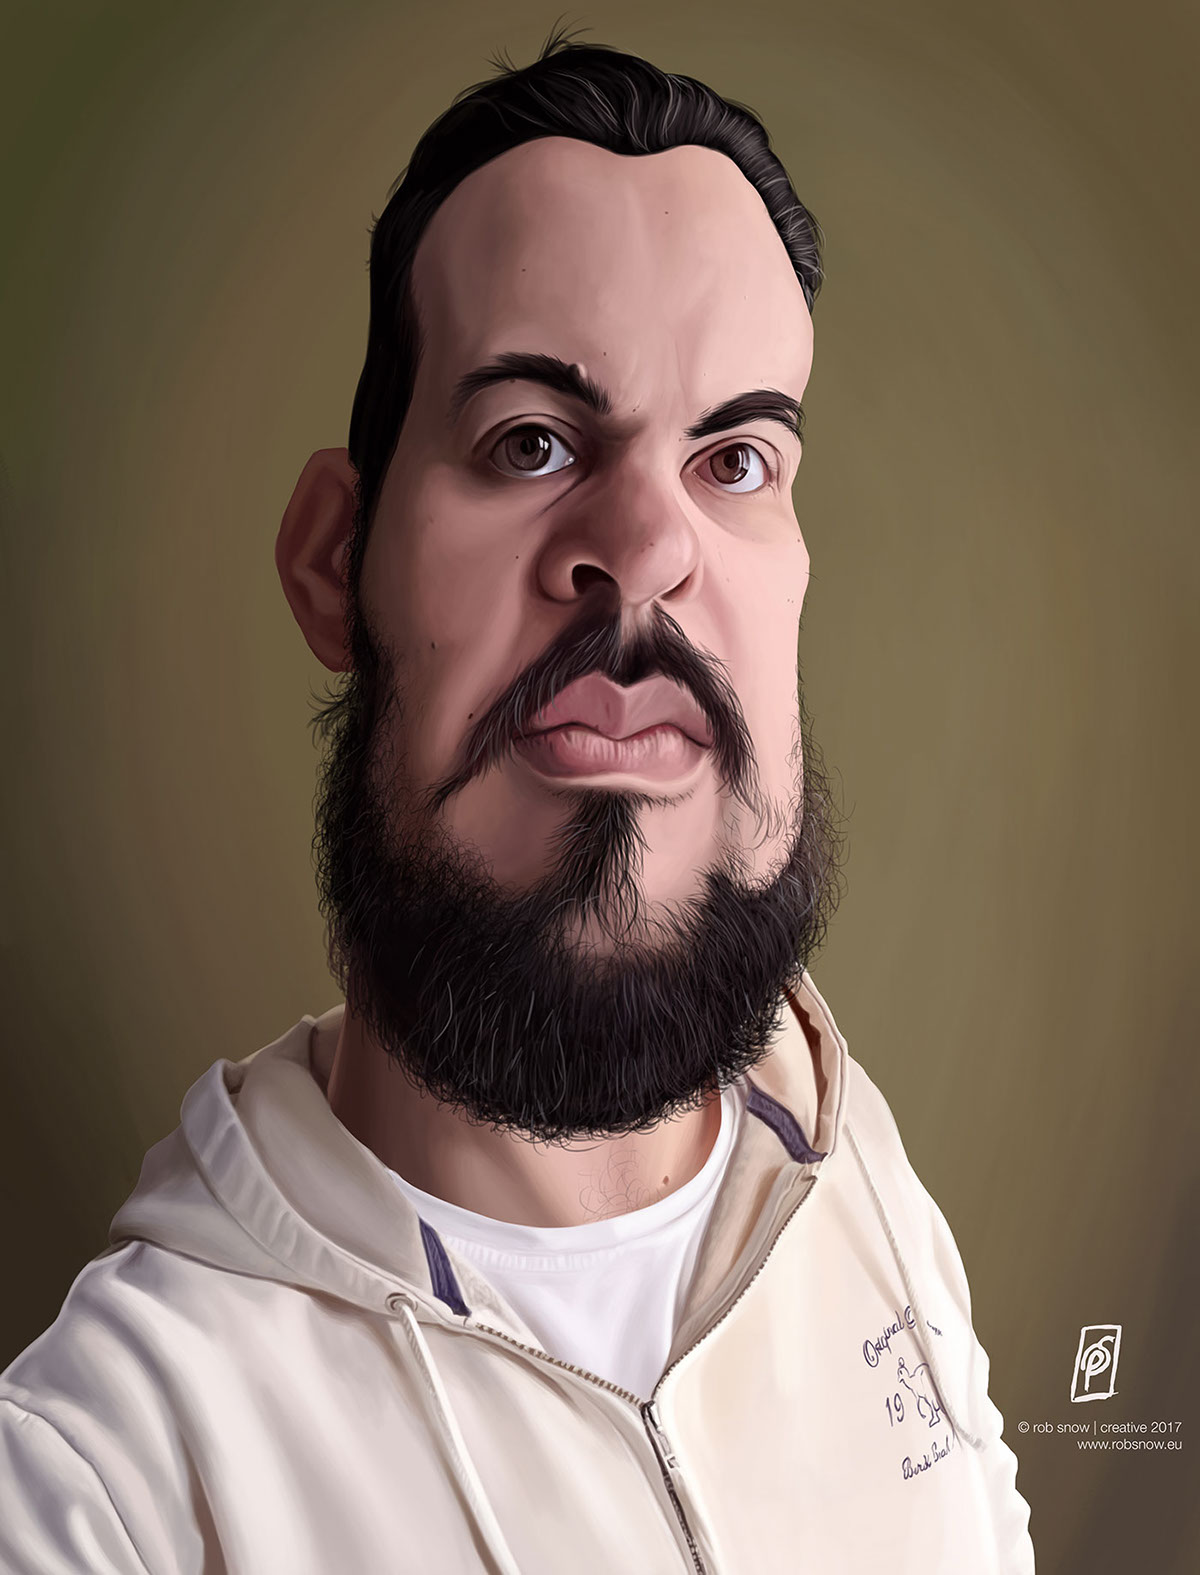
Rob is a creative illustrator and graphic designer who moved to Greece some 17 years ago, living and working in Thessaloniki, and has been working in the design industry over 20+ years now. Recently he has decided to focus solely on illustration, and has developed a unique style based on traditional sketch work and digital rendering at high resolution.

Surprisingly the two caricatures of Stavros and Costis both took roughly 6 hours to render out. They comprised of several layers that split the important areas of the work, as not to provoke redraws on an error. Also, as part of my new style, I have rendered the two images out at 600dpi and at a large 12,000+ px height. This allows the detailing that can be seen on the images to look finer when the images are reduced in size.
This was a really fun project all-round, and it was really the first time I have tried doing such expressive caricatures. The usual pose for me is from the front, so challenging myself to the angled look was a nice opportunity to experiment with my skills. Costis was the first up, and I chose the image seen below as it seemed most compositionally stable. Although at first the lighting seemed subdued, the end result came out well.

This is the stages of development all the artists took. From the photograph provided by each other they drew a pencil or digital sketch.

The image shows the brush I use for the rendering as well as the number of layers to complete!!

File size: 424.7Mbs/1.23Gbs (open)
Layers: 14 uncompressed
Dimensions: 9266x12166px @ 600dpi
Hours (Pencil): 30mins
Digital rendering: 6hrs
Layers: 14 uncompressed
Dimensions: 9266x12166px @ 600dpi
Hours (Pencil): 30mins
Digital rendering: 6hrs
Render Tool: Wacom Intuos Pen and Touch Medium
copyright © Rob Snow | creative 2017, all rights reserved • www.robsnow.eu


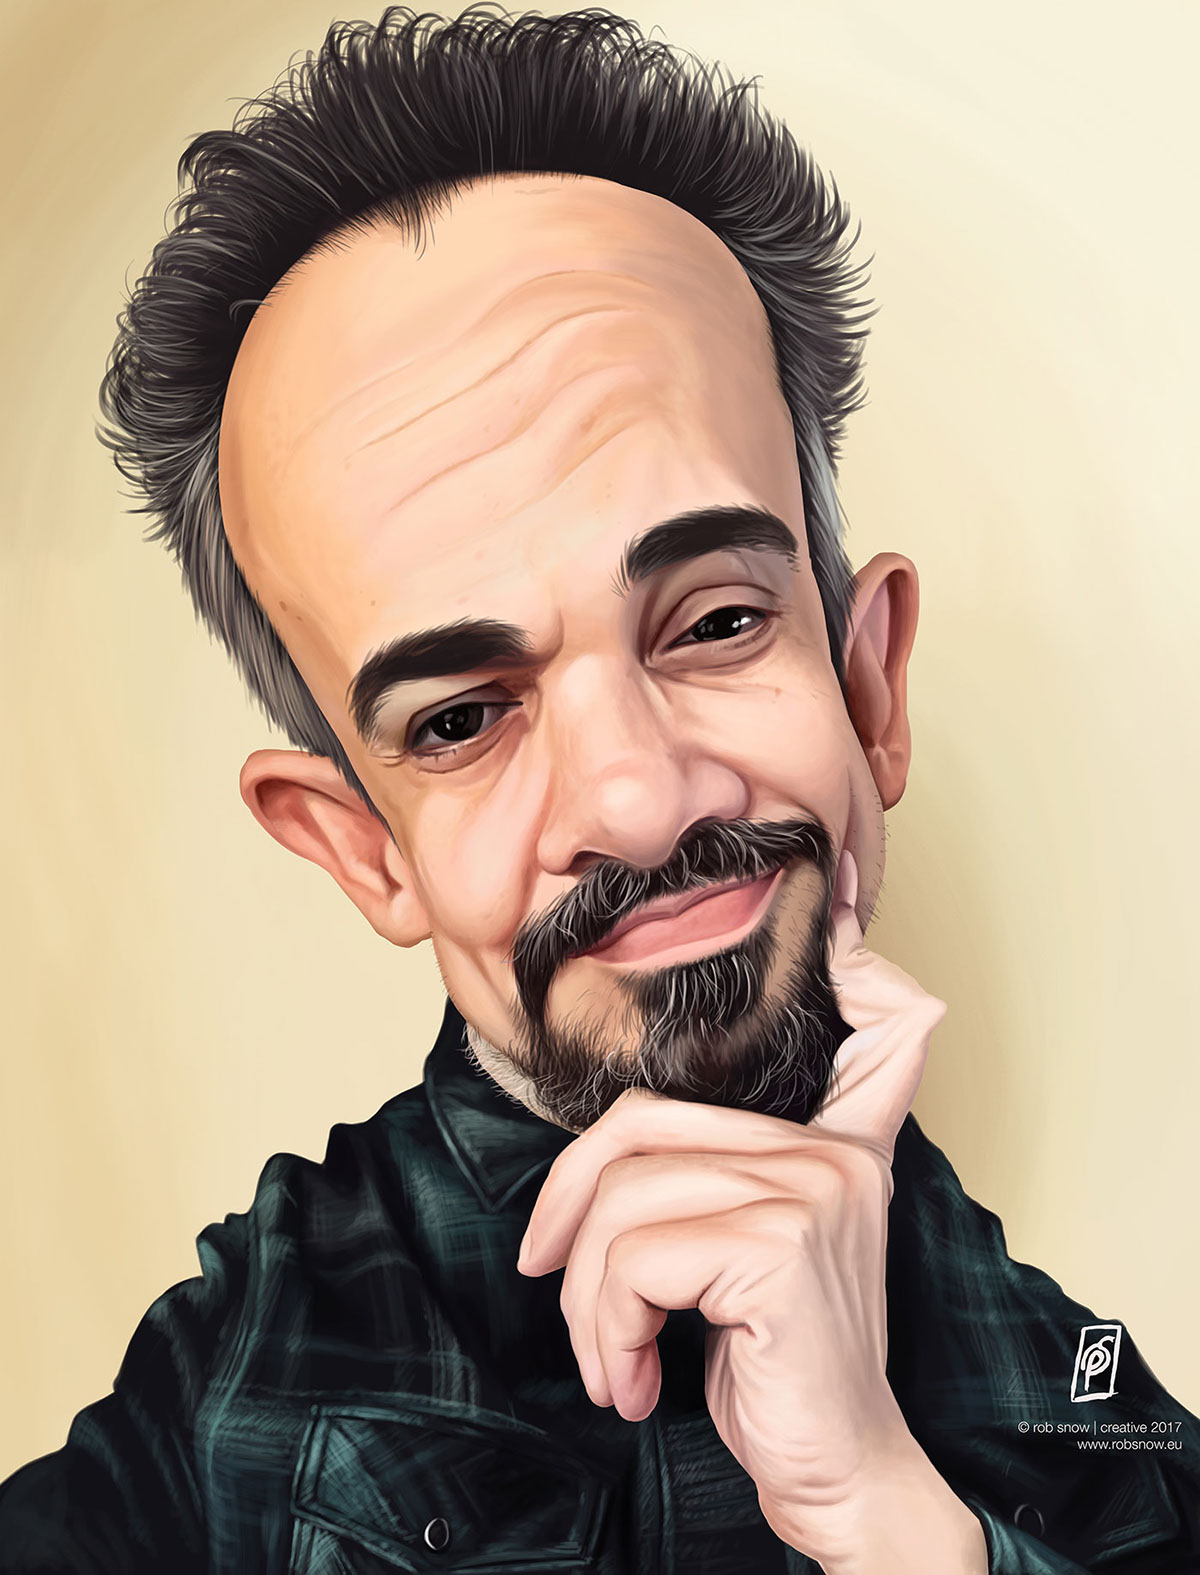
After the first render of Costis was complete, which in my mind was the easier of the two (due to the picture received), I looked to achieve Stavros in the same way. Luckily the pencil render only took some 30 minutes to achieve, and after the scan, I decided to ignore the grain effect on the photo and achieve the render in the same manner as Costis. The result was very good I felt, and strangely it took exactly the same amount of time as the first one.

This is the stages of development all the artists took. From the photograph provided by each other they drew a pencil or digital sketch.

The image shows the brush I use for the rendering as well as the number of layers to complete!!

File size: 470.4Mbs/1.79Gbs (open)
Layers: 15 uncompressed
Dimensions: 9266x12166px @ 600dpi
Hours (Pencil): 30mins
Digital rendering: 6hrs
Layers: 15 uncompressed
Dimensions: 9266x12166px @ 600dpi
Hours (Pencil): 30mins
Digital rendering: 6hrs
Render Tool: Wacom Intuos Pen and Touch Medium
copyright © Rob Snow | creative 2017, all rights reserved • www.robsnow.eu


