Software used: 3dsMax | FStormRender | Photoshop
Привет всем! Я подготовил небольшой разбор сцены, созданной мной в набирающем популярность GPU движке FSotrmRender. Большую благодарность хочу выразить Romuald Chaigneau и Daniel Reuterswäd's. Мой обзор, отчасти, является адаптацией их уроков, посмотреть которые можно по ссылкам выше. Поехали!
Для рендеринга я использовал бесплатную триал версию FStormRender, скачанную на официальном сайте. Ее возможностей вполне достаточно для того, чтобы оценить все прелести FStorm. За просчет картинки отвечает Nvidia GTX1070.
Hello everybody! I prepared a small scene analys, which I created in the begining to be popular GPU engine FSotrmRender. I want to express my gratitude to Romuald Chaigneau and Daniel Reuterswäd's. My review is partly the adaptation of their lessons, which you can see by folowing the links above. Lets start!
First of all, I want to apologize for possible mistakes in the text. If you have the opportunity to chek my translation or point out on mistakes, I will be grateful to you.
For rendering, I used a free trial version of FStormRender, downloaded on the official website. Its capabilities are quite enough to appreciate all the delights of FStorm. For rendering the picture I used Nvidia GTX1070.
Моделинг | Modeling
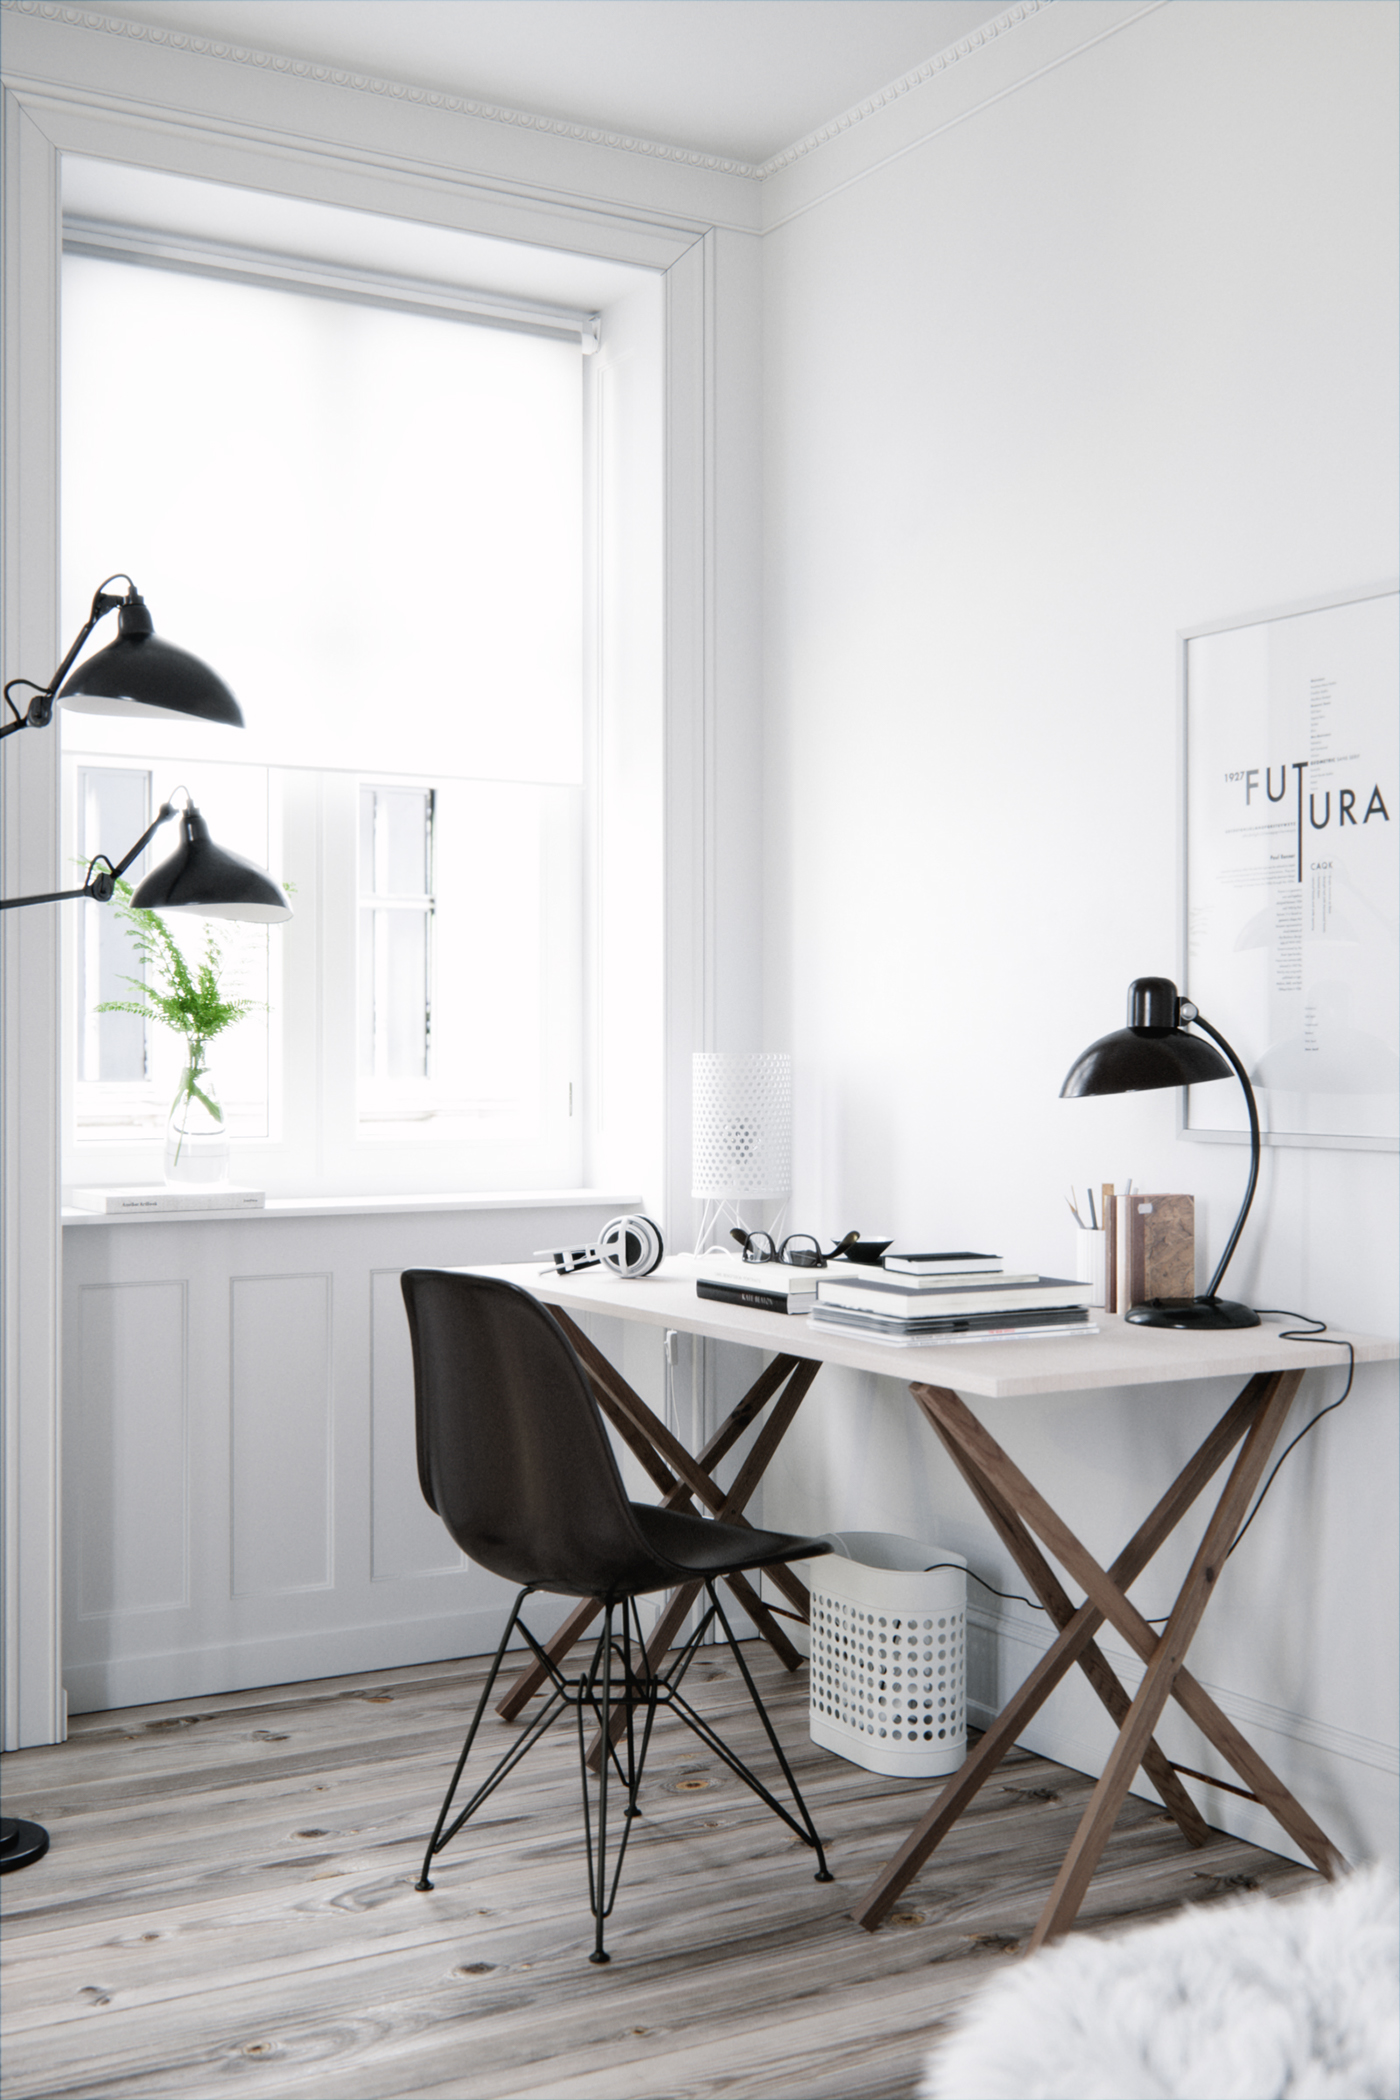
Основной целью работы была максимальная фотореалистичность картинки на выходе, поэтому было решено работать по фотореференсу. Мой выбор пал на светлый интерьер рабочего места в скандинавском стиле.
Для более точного позиционирования коробки комнаты, фотореференс был помещен во вьюпорт простой операцией перетаскивания (важно снять галочку с пункта "An enviroment map"). Как отправная точка была взята высота помещения 3000 мм, позже она была уменьшена до 2730 мм. Найден нужный угол камеры, выполнены проемы окна. Для удобства в свойствах объекта (правая кнопка мыши - "Object Properties") была включена прозрачность объектов.
Профили карнизов были вычерчены в DWG редакторе в пропорциях, а позже импортированы в 3d max и выдавлены. Часть предметов была взята из библиотек моделей, часть предметов была отмоделена под этот проект. Так, например, наушники являются бесплатной тестовой сценой Fstorm.
Для создания пола я использовал "Floor Generator" версии 2.0. Стоит обратить внимание на параметры "Max Rotation" и "Max Tilt" во вкладке "Variation Per Board" плагина "Floor Generator". Именно они отвечают за дифференциацию швов доски пола и расположение досок в разных уровнях по высоте, что добавляет реалистичности полу.
The main purpose of the work was maximum photorealism of the output image, so I was decided to work using photoreference. My choice fell on the bright interior of the workplace in Scandinavian style.
For more accurate positioning of the room box, the photoreference was placed in the viewport by a simple drag-and-drop operation (it is important to remove the mark from the "An enviroment map" item). As the starting point the height of the room was taken to 3000 mm, later it was reduced to 2730 mm. After this I found the required angle of the camera and made the window recess. For convenience, the transparency of objects was turned on in the properties of the object (the right mouse button - "Object Properties").
The cornices profiles were drawn in the DWG editor in proportions, and later imported into 3d max and extruded. Some of the objects were taken from the models libraries, some of the objects were modeled for this project. For example, headphones are a free Fstorm test scene.
To create a floor, I used "Floor Generator" version 2.0. It is worth to pay attention to the "Max Rotation" and "Max Tilt" parameters in the "Variation Per Board" tab of the "Floor Generator" plug-in. They are responsible for differentiating the seams of the floor board and the layout of the boards in different levels in height, which adds to the realism of the floor.

Освещение | Lightning
Я решил настроить освещение сразу после построения основных объемов; это позволило выстроить общий объем комнаты и произвести настройку шейдеров при освещении, которое мы будем использовать для просчета финальной картинки. Однако после настройки всех шейдеров освещение немного подгонялось под финальную картинку.
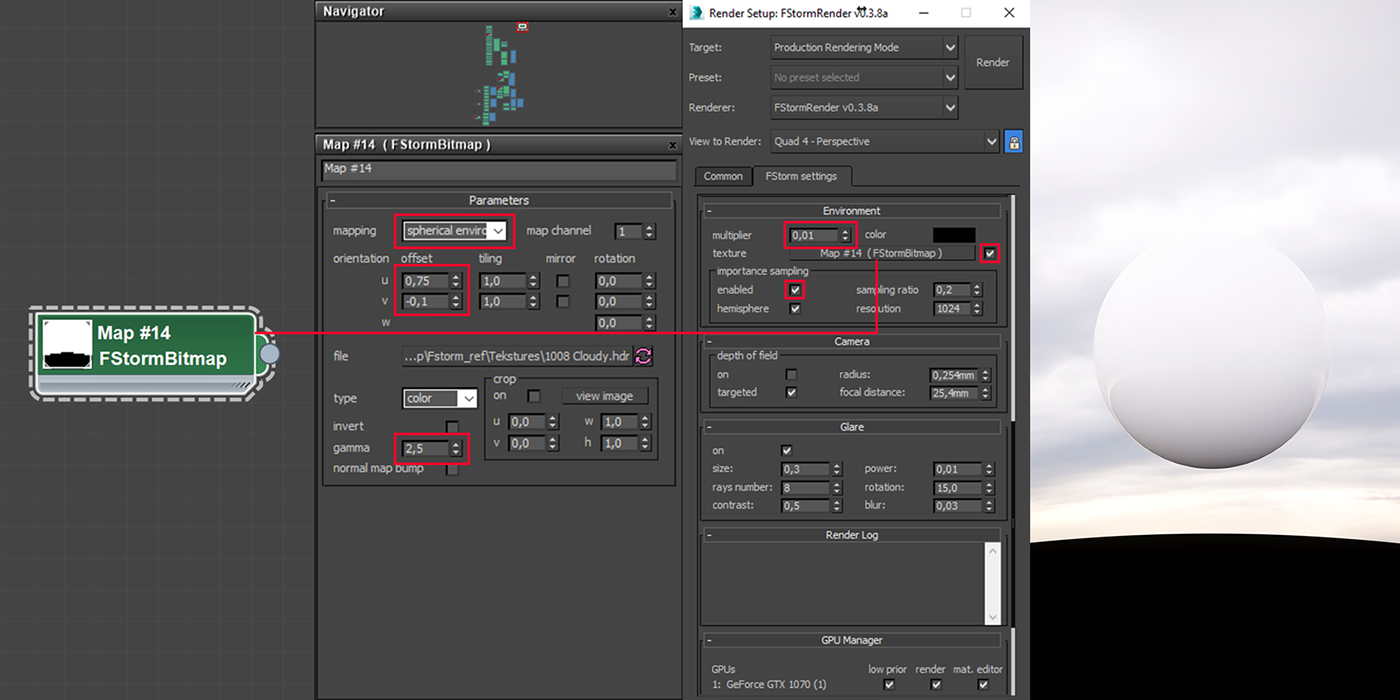
Для освещения я использовал HDRI карту Peter Guthrie со следующими настройками. Для начала в редакторе материалов была создана карта "FStormBitmap". Не забудьте выбрать во вкладке "Mapping" тип "Spherical enviroment" и поднять значение гаммы (рекомендуемое значение гаммы 2,2: я использовал гамму со значением 2,5). Параметры "Offset U" и "Offset V" во вкладке "Orientation" отвечают за вращение карты HDRI в горизонтальной и вертикальной плоскости соответственно. Значения варьируются от 0 до 1 и приравниваются 0 и 360 градусам соответственно. После этого карта из редактора материалов была перетащена в слот "Enviroment" в режиме "Instance", а параметр "Multipler" понижен до значения 0,01.
I decided to adjust the lighting immediately after building the main geometry; This operation allowed us to build the total geometry of the room and adjust the shaders with lighting, which we will use to render the final image. However, after adjusting all the shaders, the lighting settings were slightly changed to rich the final picture.
For lighting, I used the HDRI map of Peter Guthrie with the following settings. First, the "FStormBitmap" map was created in the material editor. Do not forget to select the type "Spherical enviroment" in the "Mapping" tab and raise the gamma value (the recommended value of gamma is 2.2: I used a gamma with a value of 2.5). The "Offset U" and "Offset V" parameters in the "Orientation" tab are responsible for rotating the HDRI map in the horizontal and vertical planes, respectively. Values range from 0 to 1 and are set to 0 and 360 degrees, respectively. After that, the map from the material editor has been moved to the "Enviroment" slot in the "Instance" mode, and the "Multipler" parameter has been lowered to the 0.01 value.
For lighting, I used the HDRI map of Peter Guthrie with the following settings. First, the "FStormBitmap" map was created in the material editor. Do not forget to select the type "Spherical enviroment" in the "Mapping" tab and raise the gamma value (the recommended value of gamma is 2.2: I used a gamma with a value of 2.5). The "Offset U" and "Offset V" parameters in the "Orientation" tab are responsible for rotating the HDRI map in the horizontal and vertical planes, respectively. Values range from 0 to 1 and are set to 0 and 360 degrees, respectively. After that, the map from the material editor has been moved to the "Enviroment" slot in the "Instance" mode, and the "Multipler" parameter has been lowered to the 0.01 value.
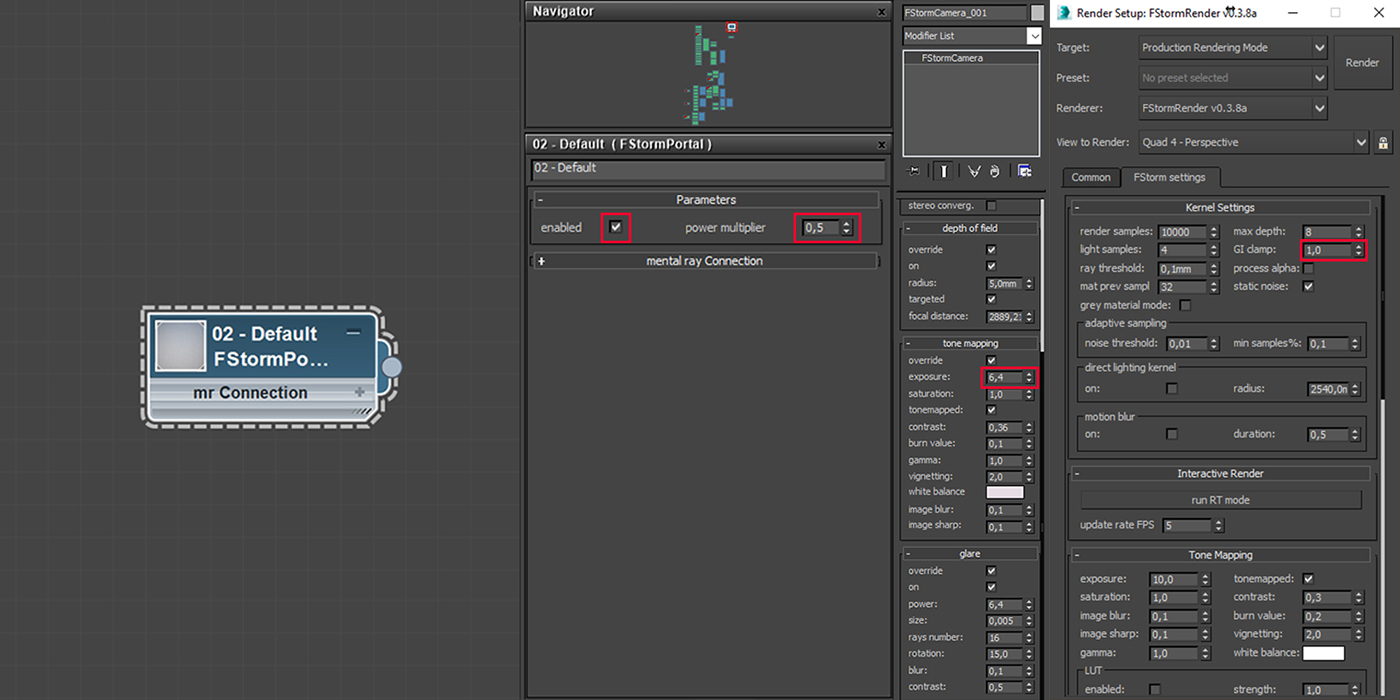
FStorm, как и другие рендер движки, использует порталы для организации света, поступающего в интерьер. Интересной особенностью материала "FStormPortal" является наличие регулировки мощности (я использовал материал "FStormPortal" со значением мощности 0,5) .
Так как рендер производился из камеры "FStormCamera", регулировка тона была произведена в настройках камеры (в таком случае настройки "Tone Maping" в меню "Render Setup" не учитываются). Там же были настроены параметры "Depth of Field", где параметр "Radius" отвечает за степень размытия, а "Focal Distance" за расстояние до точки фокусировки; и параметр "Glare", где за интенсивность и размер засвета отвечают параметры "Power" и "Size" соответственно.
Обращаю Ваше внимание на параметр "GI Clamp" в свитке "Kernel Settings" окна "Render Setup". Я оставил дефолтное значение в единицу, однако, согласно мануалу с официального сайта, лучшее значение находится из пропорции 1/exposure.
FStorm, like other render engines, uses portals to organize the light entering in the interior. An interesting feature of the "FStormPortal" material is the availability of power adjustment (I used the "FStormPortal" material with a power value of 0.5).
Since the render was made from the camera "FStormCamera", the tone adjustment was made in the camera settings (in this case, the "Tone Maping" settings in the "Render Setup" menu does not metter). The "Depth of Field" parameter were also set there, where the "Radius" parameter is responsible for the power of blur, and "Focal Distance" is the distance to the focus point; And the "Glare" parameter, where the "Power" and "Size" parameters correspond to the intensity and the size of the light, respectively.
I draw your attention to the "GI Clamp" parameter in the "Kernel Settings" menu in the "Render Setup" window. I left the default value in 1 unit, however, according to the manual from the official website, the best value is found by using 1 / exposure ratio.
Шейдеры | Shaders
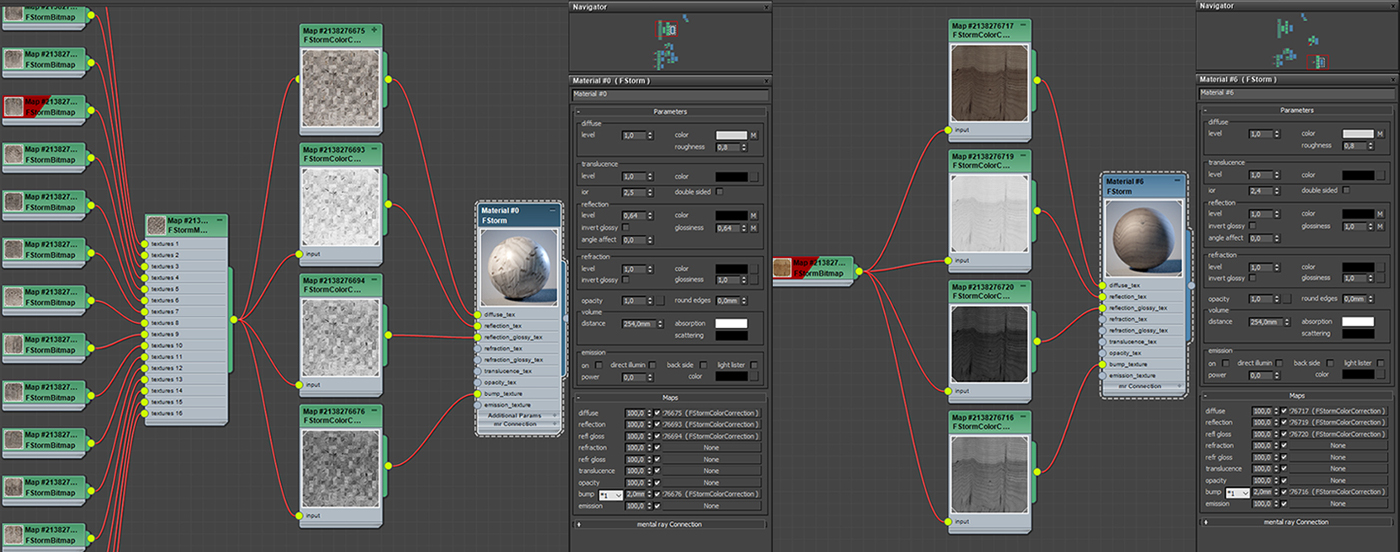
Ниже я дам примеры основных материалов, использованных в этой сцене. Принцип настройки материала дерева одинаков, за тем исключением, что я взял не одну, а 16 текстур досок для пола с целью избежать повторения текстуры на рендере. Я использовал карту "FStormColorCorrection" при помещении текстуры дерева в слоты "Difuse", "Reflection", "Reflection glossy" и "Bump". В случае с ножками стола я регулировал степень отражения и размытия блика только коррекцией текстуры, а в случае с полом я дополнительно понизил числовые значения параметров "Reflection" и "Reflection glossy".
Для материала стен я использовал две карты, одна из них была помещена в слот "Reflection" и "Reflection glossy", вторая в слот "Bump".
Так же ниже показаны простые шейдеры стекла и шторы.
Below I will give examples of the main materials, used in this scene. The principle of the tree shader setup is the same, except that I took not one, but 16 textures of the floor boards in order to avoid tiling of the texture on the render. I used the "FStormColorCorrection" map when placing the tree texture in the "Difuse", "Reflection", "Reflection glossy" and "Bump" slots. In case of table legs, I adjusted the value of reflection and blur of the highlight only by correcting the texture, and in case of the floor, I also lowered the numerical values of the "Reflection" and "Reflection glossy" parameters.
For wall shader, I used two maps, one of them was placed in the "Reflection" and "Reflection glossy" slots, the second in the "Bump" slot.
Also below are simple glass and curtains shaders.
For wall shader, I used two maps, one of them was placed in the "Reflection" and "Reflection glossy" slots, the second in the "Bump" slot.
Also below are simple glass and curtains shaders.

Постобработка | Post Processing
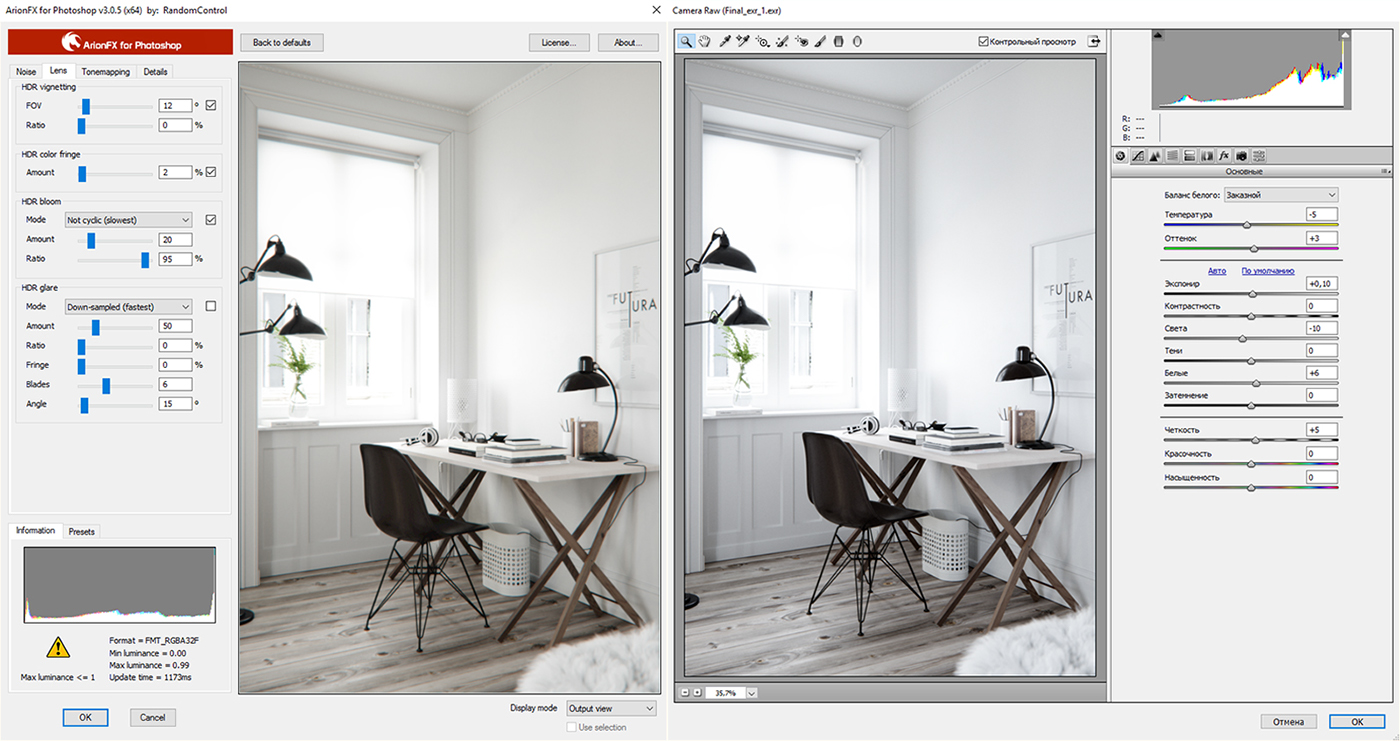
Я использовал минимальное количество постобработки для того, чтобы добиться требуемого результата. Рендер был сохранен в формате *exr (32-бита), что позволило немного усилить эффект "Glare" и добавить немного аббераций в плагине ArionFX. Позже картинка была переведена в формат 16-бит, в фильтре "CameraRAW" сделана небольшая цветокоррекция, а после этого добавлены LUT фильтра с невысоким значением прозрачности. Как итог, ниже Вы можете видеть коллаж из трех элементов: рендер, рендер с постобработкой и фотореференс. Надеюсь мой небольшой тутор был Вам полезен, и Вы с легкостью сможете попробовать себя в новом движке - движке FStorm Render!
I used a minimal amount of post-processing in order to achieve the desired result. The render was saved in * exr (32-bit) format, which allowed to slightly enhance the "Glare" effect and add a few aberration effects in the ArionFX plugin. Later, the picture was transferred to a 16-bit format, a small color correction was done in the "CameraRAW" filter, and then few LUT filters with a low transparency value were added. As a result, below you can see a collage of three elements: render, render with post-processing and photoreference. I hope my small tutorial will be useful to you, and you could easily try yourself in a new engine - the FStorm Render engine!

Спасибо за просмотр! | Thanks for watching!


