
Softwares used: 3dsMax, FstormRender, Photoshop
Fr.
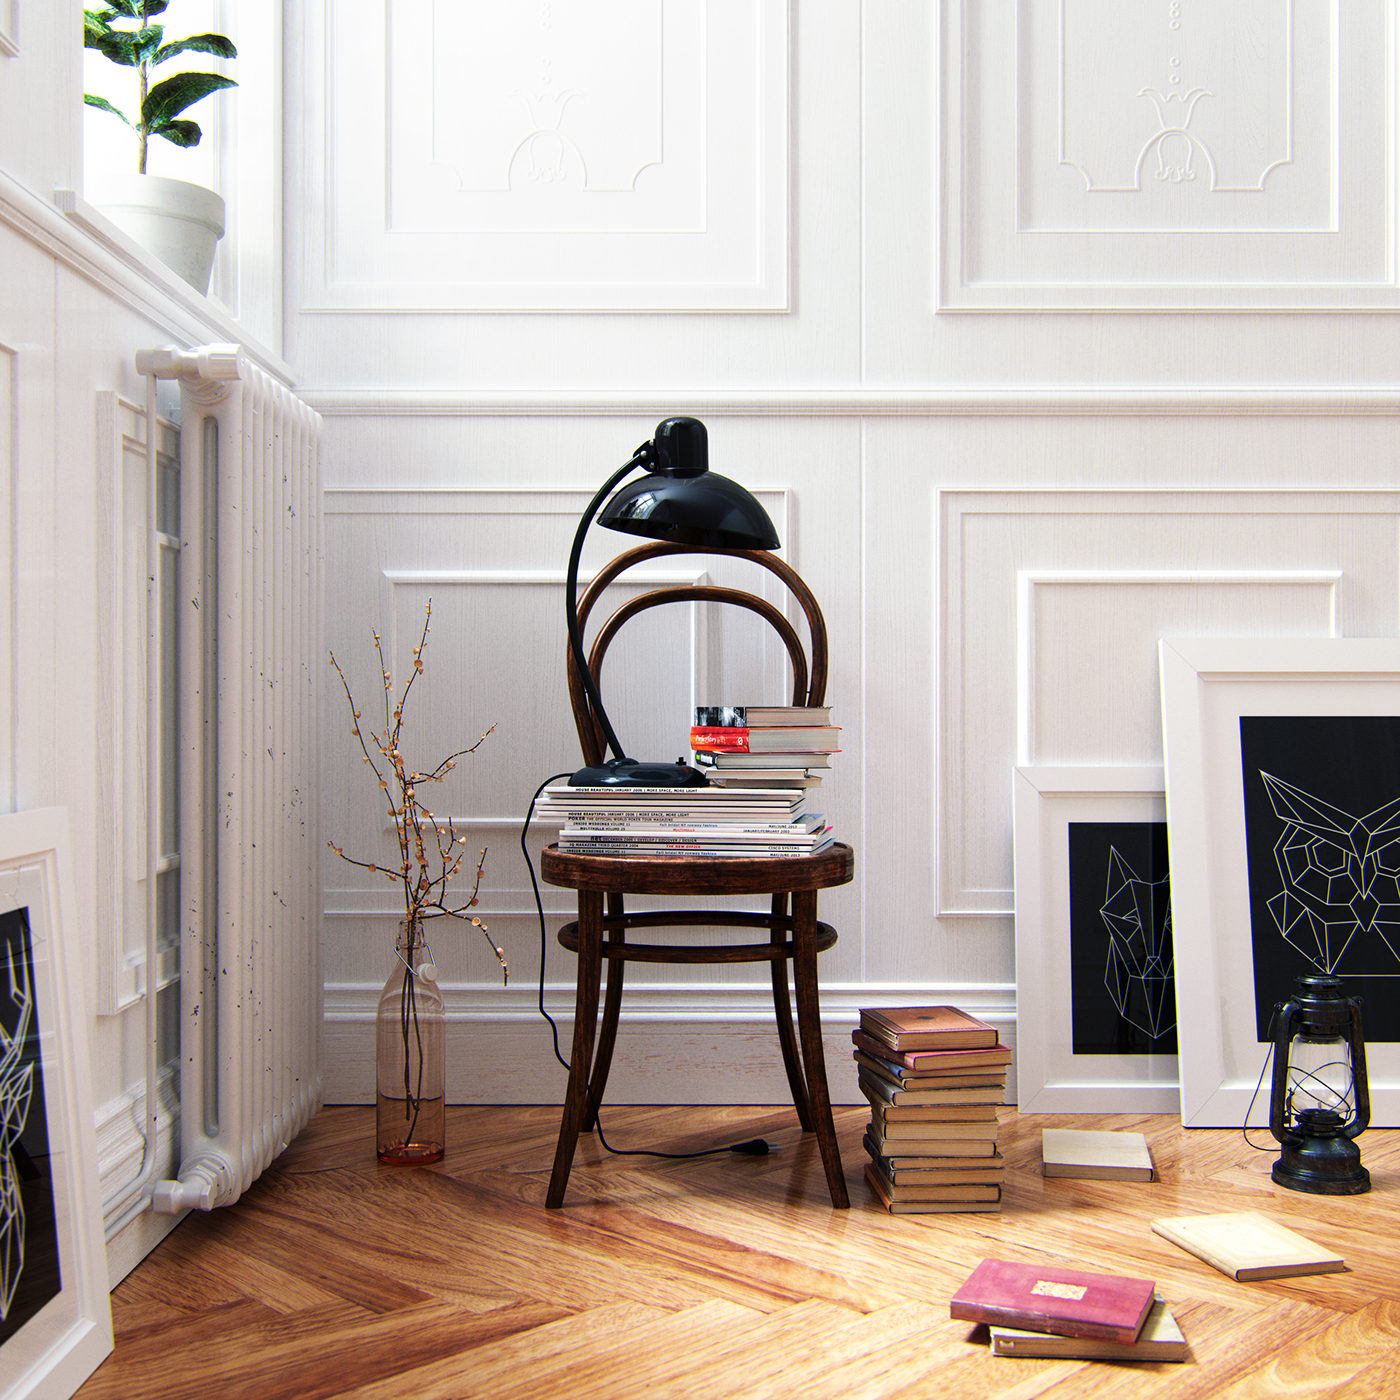
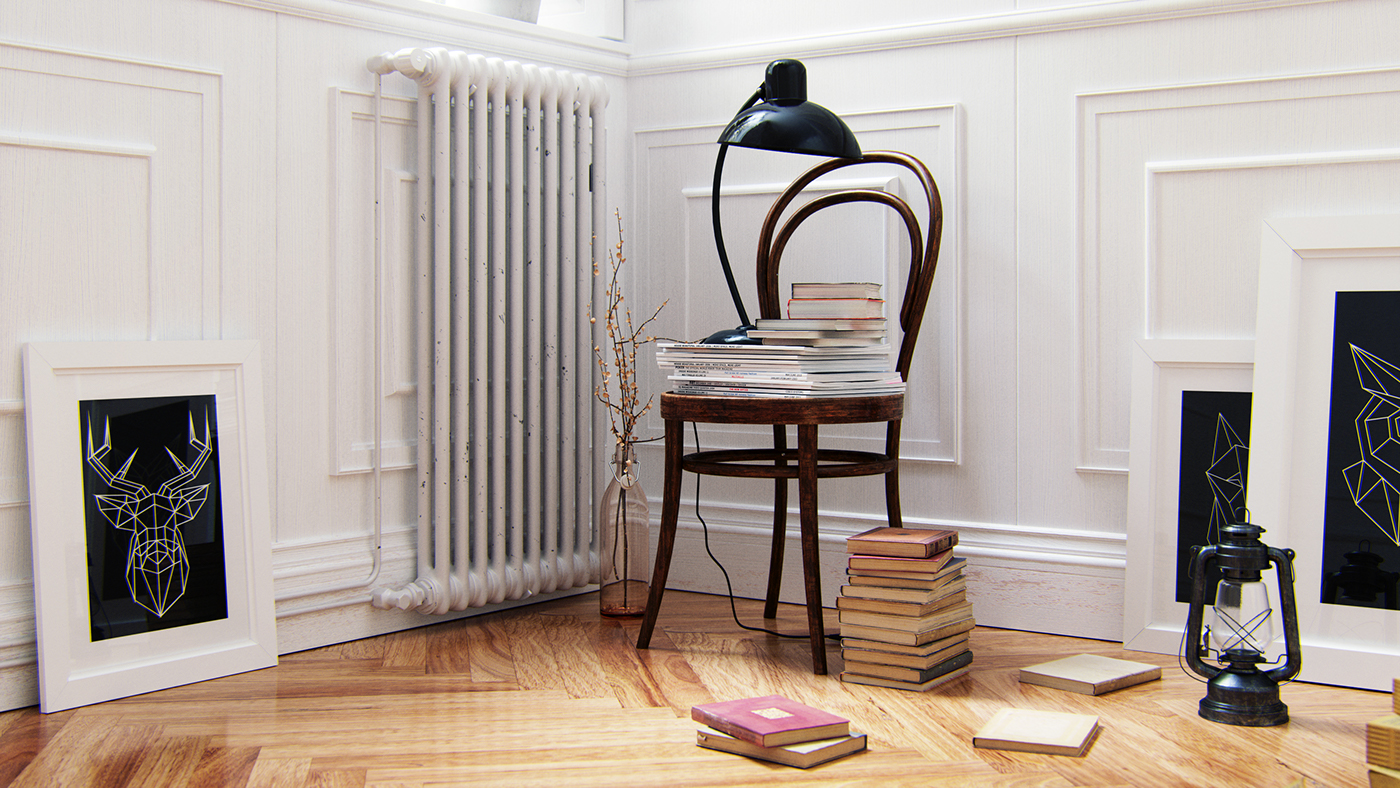
Bonjour à tous ! Je vous présente aujourd'hui mon dernier projet. Il s'agit d'un simple coin de lecture. Le but que je m'étais fixé ici était de réaliser une scène d’intérieur avec un éclairage le plus réaliste possible tout en utilisant le tout jeune moteur de rendu GPU FstormRender.
Étant conscient qu'il y ait peu de tutoriels à propos de ce moteur sur le web, j'ai rédigé ma façon de procéder sur cette scène à la suites des images ci-dessous, en espérant que cela aide certaines personnes.
Eng.
Étant conscient qu'il y ait peu de tutoriels à propos de ce moteur sur le web, j'ai rédigé ma façon de procéder sur cette scène à la suites des images ci-dessous, en espérant que cela aide certaines personnes.
Eng.
Hello everyone ! Today I present you my last project. It's a simple reading corner. The goal I set for myself was to create an interior scene with the more realistic lighting as possible while using the young GPU rendering engine FstormRender.
Being aware that there not many tutorials on the web about Fstorm, I wrote process on this project at down. Hopefully it helps some people.
Being aware that there not many tutorials on the web about Fstorm, I wrote process on this project at down. Hopefully it helps some people.


FstormRender Tutorial
Interior Lighting
Interior Lighting
1. Introduction
Fr.
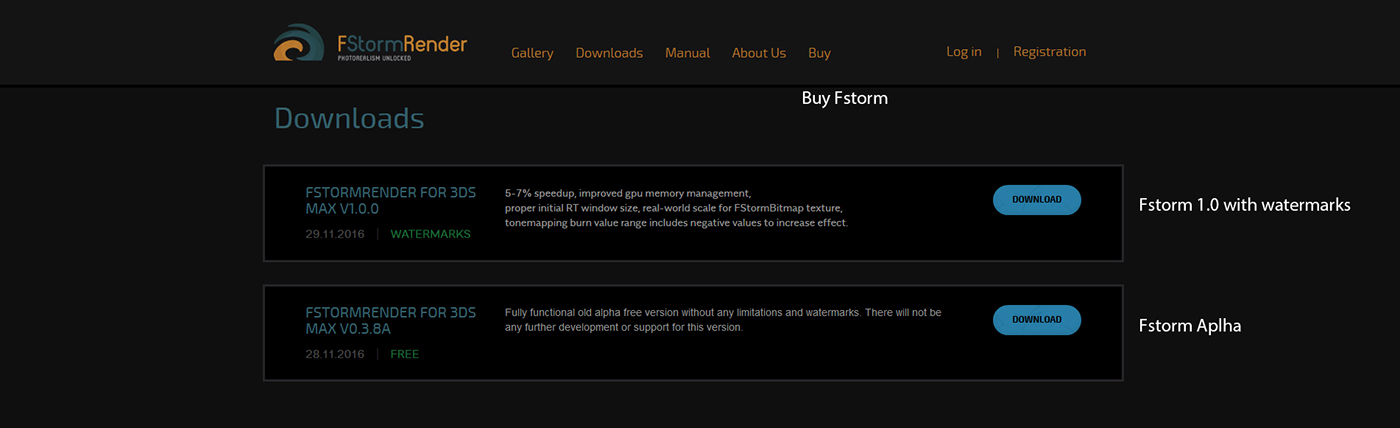
Comme je le disais, cette scène à était rendu avec le moteur FstormRender. Il s'agit d'un moteur de rendu GPU créé par Andrey Kozlov. Ce moteur n'est disponible actuellement que sur 3dsMax et il vous faudra une carte graphique supportant Cuda afin de l'utiliser. Pour plus d'informations et pour télécharger le moteur, rendez-vous sur le site officiel ici: https://fstormrender.ru/
Sachez qu'il existe une version payante venant juste de sortir (Décembre 2016), mais aussi une alpha gratuite.
J'ai utilisé l'alpha v0.3.8 ainsi qu'une MSI GTX 1070 sur ce projet.
J'ai utilisé l'alpha v0.3.8 ainsi qu'une MSI GTX 1070 sur ce projet.
Important !!
Prenez bien en compte que ce mini-tutorial ne représente que ma façon de procéder sur ce projet. Je ne sais pas si j'utilise "la" bonne méthode, et ce projet à été réalisé suite à de multiples tests. Je réalise mes images avec des connaissances acquises de façon auto-didacte (souvent à la MacGyver il faut le reconnaitre).
Ainsi, si vous avez des astuces, d'autres façon de faire, tout ce qui pourrait être utile à la progression, n'hésitez surtout pas à m'écrire en commentaire ou me laisser message.
Notez aussi qu'il y aura beaucoup de similitudes avec le tutoriel de Daniel Reuterswäd visible ici: http://tutorials.cgrecord.net/2016/08/how-to-start-to-work-with-fstorm-render.html
Le but étant de créer de nouveaux tutoriels Fstorm sur le web, afin d'aider et d'accroitre la communauté Fstorm.
Eng.
As I said, this scene was render with FstormRender Engine. It's a GPU rendering engine developed by Andrey Kozlov. This engine is actualy only currently on 3dsMax and you will need a graphic card supporting Cuda to use it. For more informations and to download this engine, go to the official website here: https://fstormrender.ru/
Know that there is a paid version 1.00 just released (December 2016) but there is also a free alpha version.
I used the alpha v0.3.8 and a MSI GTX 1070 for this project.
Important !!
Please notes that this mini_tutorial only represents my process of this project. I don't know if I use "the" right method and this project was realized after a lot of tests. I realize my images with knowledge acquired in self-taught way (often like MacGyver I recognized it).
So, if you have tricks, others ways of doings things, anything that could be useful for progression and the community, don't hesitate to write me in comment or leave me message.
Also noted that there will be many similarities with Daniel Reuterswäd's tutorial available here: http://tutorials.cgrecord.net/2016/08/how-to-start-to-work-with-fstorm-render.html
The main goal is to create news tutorials about Fstorm on the web, to help and grow up the community.
2. Installation - Setup
Fr.
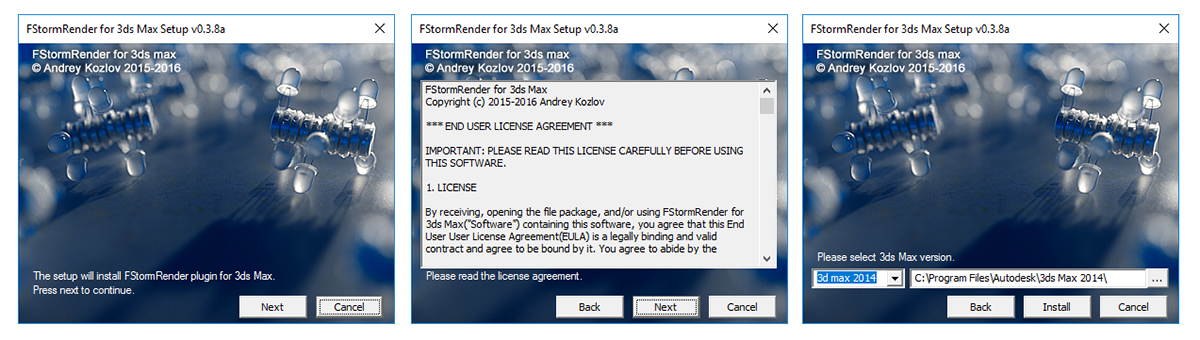
L'installation ce fait très simplement. Il s'agit d'un .exe (du moins pour l'alpha). A vous de sélectionner la version de votre 3dsMax, puis cliquer sur "Instal". Vous retrouverez ensuite Fstorm dans votre liste de moteur de rendu dans 3dsMax.
L'installation ce fait très simplement. Il s'agit d'un .exe (du moins pour l'alpha). A vous de sélectionner la version de votre 3dsMax, puis cliquer sur "Instal". Vous retrouverez ensuite Fstorm dans votre liste de moteur de rendu dans 3dsMax.
Eng.
Setup is easy. It's just a .exe file. It's up to you to select the version of your 3dsMax, then click to "instal". Then you will find Fstorm in your list of rendering engine in 3dsMax.
Setup is easy. It's just a .exe file. It's up to you to select the version of your 3dsMax, then click to "instal". Then you will find Fstorm in your list of rendering engine in 3dsMax.
3. Modélisation - Modeling
Fr.
Je ne passerais que très peu de temps sur la modélisation, puisque qu'il ne s'agit presque que d'objets venant d'Evermotion ou de 3Dsky et ce n'est pas la partie que je souhaite développer aujourd'hui.
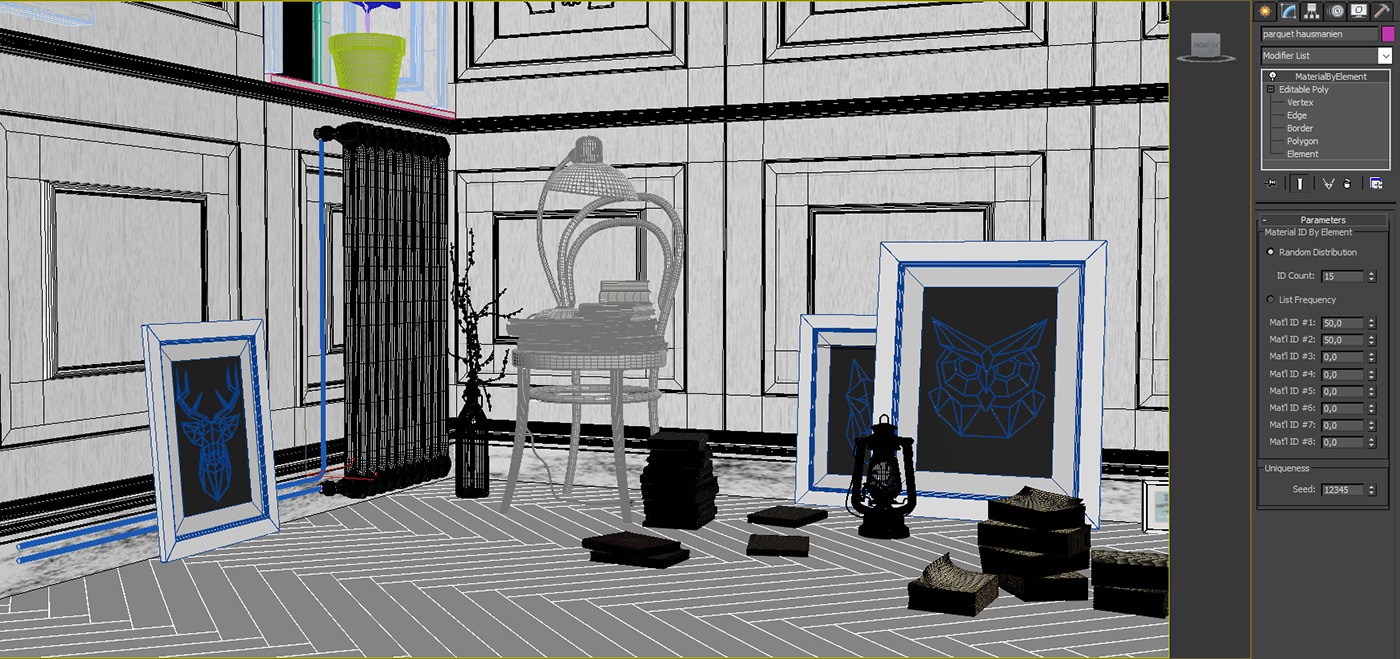
Notez juste que le parquet comporte un "MaterialByElement" qui me servira à créer des variantes de teintes et de map dans mon shader.
Eng.
I would spent very little time about modeling because these are in big part objects from Evermotion and 3dSky. And this not the subject that I wish to develop today.
Just note that the floor has a "MaterialByElement" which will be used to create different hues in my shader.
Je ne passerais que très peu de temps sur la modélisation, puisque qu'il ne s'agit presque que d'objets venant d'Evermotion ou de 3Dsky et ce n'est pas la partie que je souhaite développer aujourd'hui.
Notez juste que le parquet comporte un "MaterialByElement" qui me servira à créer des variantes de teintes et de map dans mon shader.
Eng.
I would spent very little time about modeling because these are in big part objects from Evermotion and 3dSky. And this not the subject that I wish to develop today.
Just note that the floor has a "MaterialByElement" which will be used to create different hues in my shader.
4. Materiaux - Shaders
Fr.
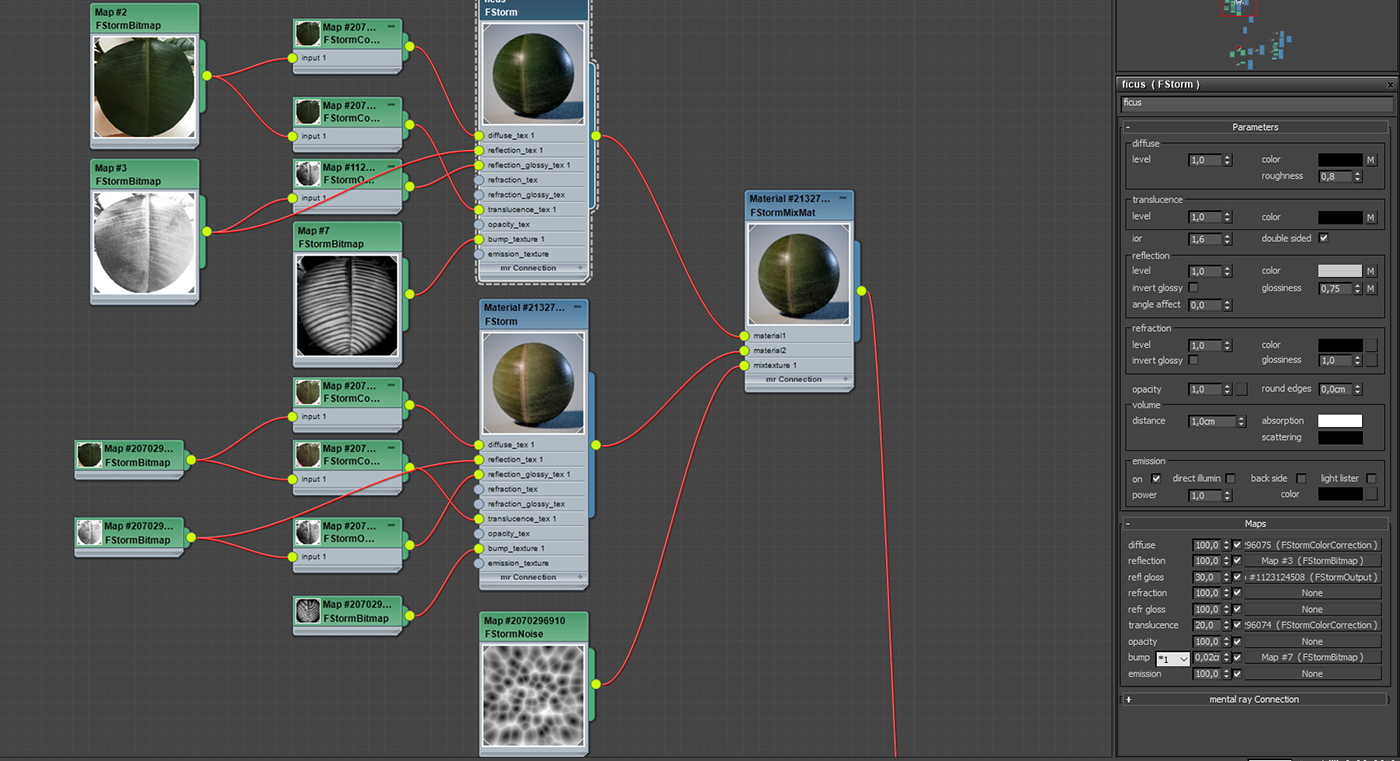
Mes matériaux restent très simples. En voici quelques uns.
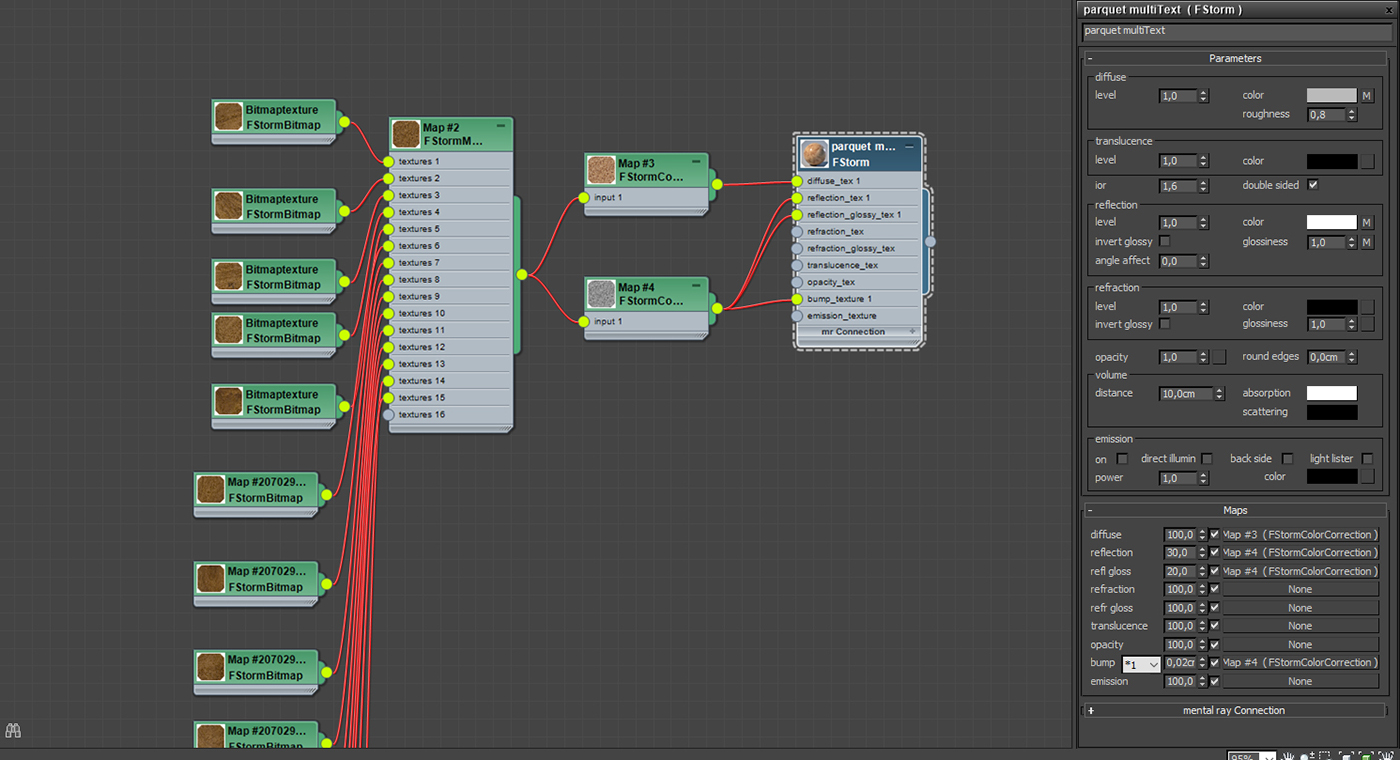
. Commençons par le parquet. Il s'agit de 15 maps de bois différentes répartie dans un "FstormMutliTex. Avec un 1er "FstormColorCorrection", je peux gérer la teinte global de mon parquet, que je glisse dans la diffuse d'un materiau Fstorm. Un 2nd "FstormColorCorrection" me permet de désaturer les maps afin de les glisser dans la reflection, glossy et bump.
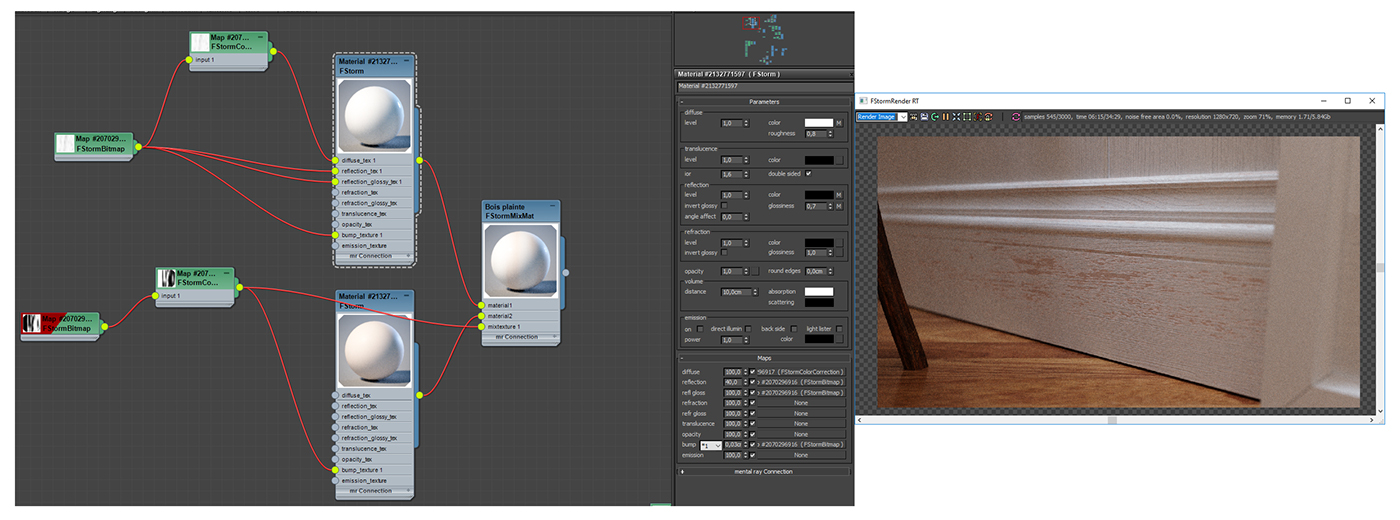
. Ensuite les plinthes en bois abimé. Il s'agit d'un "FstomMix" entre un bois blanc (le même que les murs) et un bois beige.
. Enfin les feuilles. I s'agit ici aussi d'un "FstormMix" entre un shader de feuille verte un un shader un petit peu plus orangé à l'aide d'une map "FstormNoise"
Eng.
My materials are very simple. Here are a few.
. Let's start with the wood floor. These are 15 differents wood maps distributed in a "FstormMultiTex". With a first "FstormColorCorrection", I can control the global hue of the floor, that I put in the slot "diffuse" of a Fstorm material. And a second "FstormColorCorrection" allows me to de-saturate maps in order to put it in the reflection, glossy and bump.
. Then damaged baseboards. It's a "FstormMix" between a white wood (the same on the walls) and a beige wood shader.
. Leaves. It's an other "FstormMix" between a green leaf material and an other a little more orange, with a "FstormNoise" map.
In reality, I create materials and lighting in the same time in order to test them. But here, I'll talk later about lighting, for the understanding of the tutorial.
5. Eclairage - Lighting with HDRI
Fr.
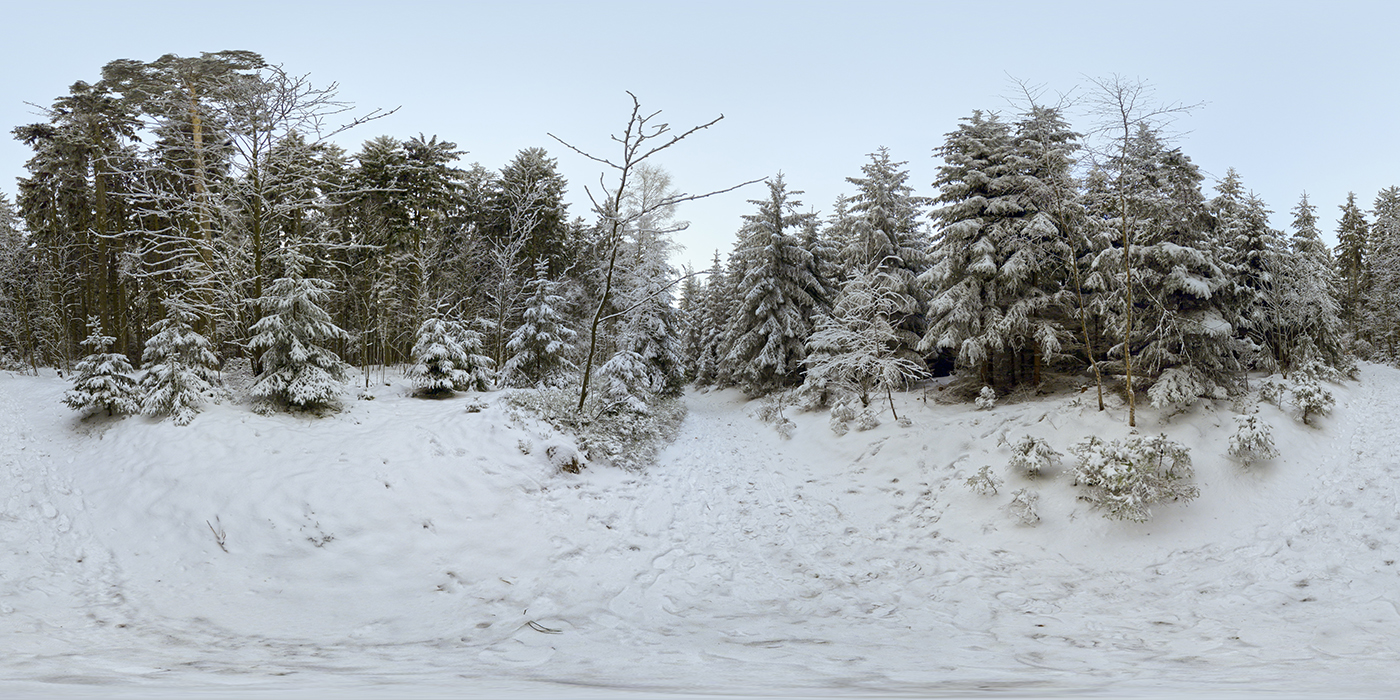
Souhaitant avant tout avoir un éclairage doux et naturel sans soleil, j'ai choisi d'éclairer ma scène à l'aide d'une Hdri seulement. Après plusieurs test et recherches, voici celle que j'ai choisi. L'Hdri s’appelle "Winter Forest" et vous pourrez la télécharger sur ce lien: http://hdrlabs.com/sibl/archive.html
Eng.
Wishing above all to have a soft and natural lighting without sun, I chose to enlighten my scene with only an HDRI. After few tests and searches, here is the one I chose. This Hdri is called "Winter Forest" and you download it here: http://hdrlabs.com/sibl/archive.html
Eng.
Wishing above all to have a soft and natural lighting without sun, I chose to enlighten my scene with only an HDRI. After few tests and searches, here is the one I chose. This Hdri is called "Winter Forest" and you download it here: http://hdrlabs.com/sibl/archive.html
Fr.
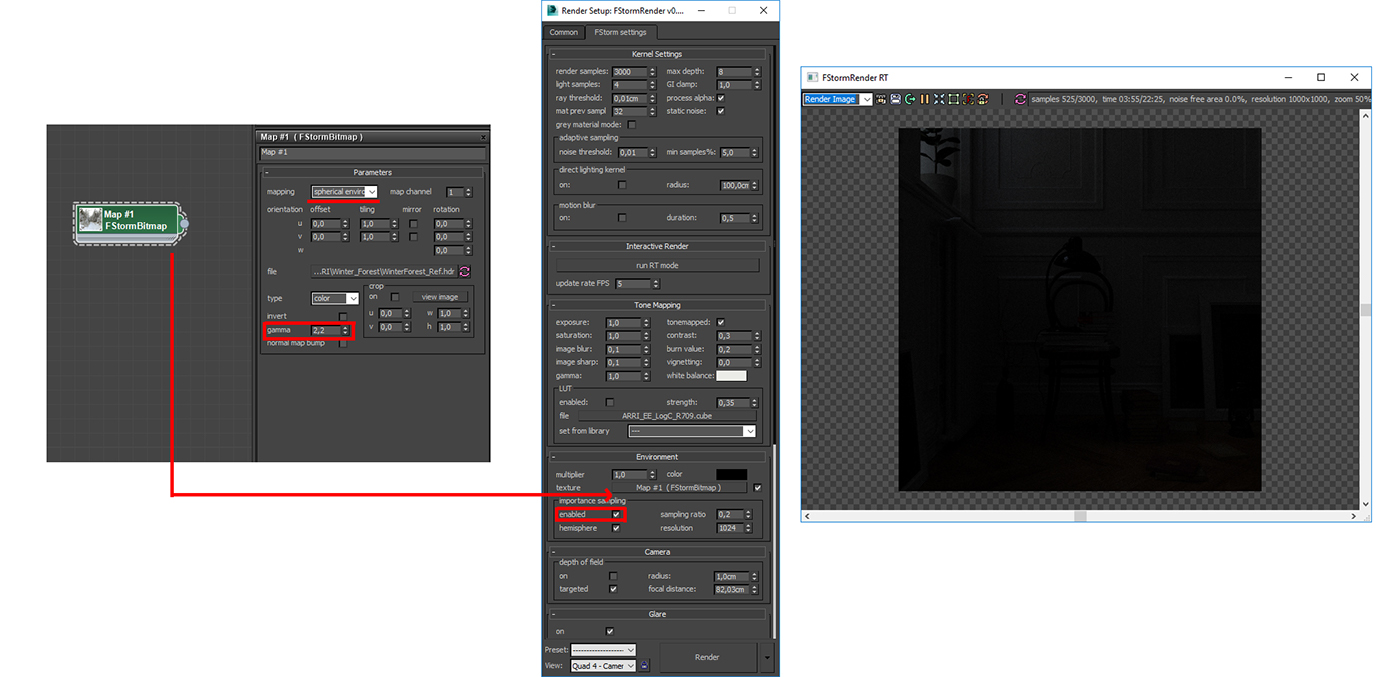
J'installe maintenant un système d'éclairage d'Hdri.
Pour cela dans votre éditeur de matériaux, créez un "Fstorm Bitmap". Faites attention à bien mettre le "mapping" sur "sperical" et le gamma en 2.2. Allez ensuite chercher votre fichier dans "file none".
Notez que si vous souhaitez tourner votre Hdri, il suffit de changer "l'offset U" allant de 0 à 1, ce qui correspond à 0 et 360 degrés.
Dans les parametres de rendu de Fstorm, glissez en instance votre bitmap dans la partie "texture" se trouvant dans "environment".
N'oubliez pas aussi de cocher "Importance sampling". Pour plus d'informations sur ce paramètre, je vous laisse regarder le manuel ici: https://fstormrender.ru/manual/environment/
Je lance ensuite un rendu test avec les paramètres de bases.
Eng.
Now I create an Hdri lighting system.
To do this, in your material editor, create a "FstormBitmap". Be careful to put "mapping" on "spherical" and the gamma in 2.2. Then go to select you file in " file none".
Note that if you want rotate your hdri, you must change the "offset U" ranging from 0 to 1, corresponding to 0 and 360 degrees.
In Fstorm settings, put in instance your bitmap in the "texture" slot located in "environment".
Don't forget to activate "importance sampling". For more informations about this setting, I let you look the manual here: https://fstormrender.ru/manual/environment/
Then I run a test render.
6. Paramètres d'éclairage - Settings - Portals
Settings
Fr.
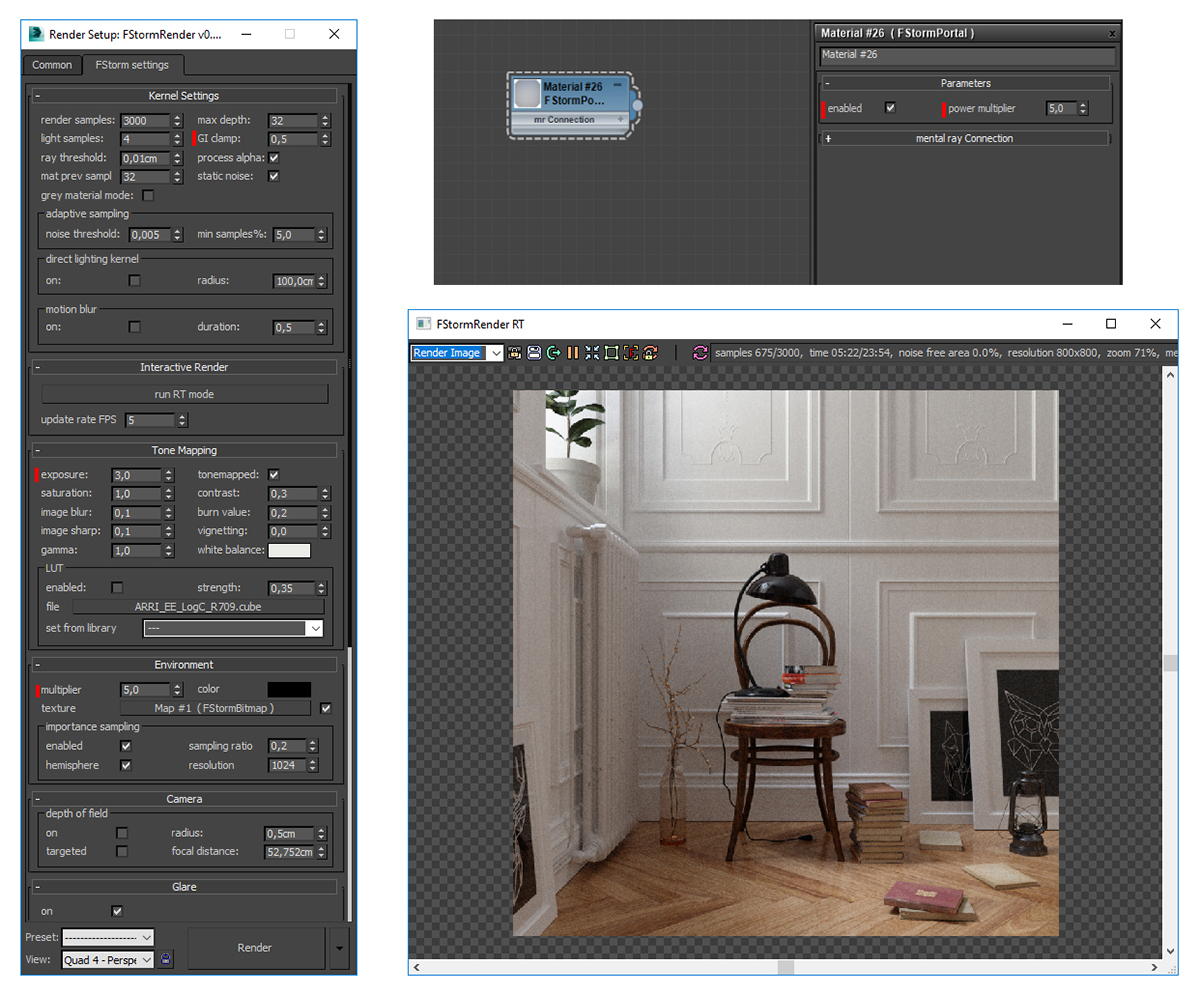
Voyez que le rendu est très sombre. La partie la plus complexe va maintenant commencer. Il s'agit maintenant d'ajuster la luminosité/contraste de l'image à l'aide de 4 paramètres:
. "GI Clamp" dans "Kernel settings"
. "Exposure" dans "Tone mapping"
. Le "multiplier" se trouvant dans "environment"
. Et la puissance de(s) matériaux portals. Nous verrons cela après.
Pour les 3 premiers paramètres, je vous invite vivement à lire le manuel qui vous expliquera précisément leurs utilisations.
Pour mon projet, voici les paramètres que j'ai appliqué. "GI Clamp: 0.5" "Exposure: 3" "Multiplier: 5"
Notez bien que chaque HDRI différentes demande de trouver le bon équilibre.
Pour mon projet, voici les paramètres que j'ai appliqué. "GI Clamp: 0.5" "Exposure: 3" "Multiplier: 5"
Notez bien que chaque HDRI différentes demande de trouver le bon équilibre.
Eng.
See that render is very dark. The most complex part will begin now. It's necessary to adjust the brightness/contrast of the scene with these 4 parameters:
. "GI Clamp" in "Kernel settings"
. "Exposure" in "Tone mapping"
. "Multiplier" of "environment"
. And the power of portals. We will see after.
For the first 3 settings, I invite you to read the manual that will explain you precisely their uses.
For my project, here are the settings that I applied: "Gi Clamp: 0.5" "Exposure: 3" "Multiplier: 5"
Note that each different HDRI requires finding the right balance.
Portals
Fr.
Comme Vray ou Corona, Fstorm intègre un système de portal. Il est très utilisé pour éclairer les intérieurs afin d'emmener beaucoup plus de photons.
Dans Fstorm, il suffit de créer un plane, snapé sur les bordures de votre mur au niveau de l'encadrement de vos fenêtres. Attention à bien orienter la normal de votre plane vers l’intérieur ! Ensuite, appliqué lui un materiau "FstormPortal". Vous pourrez alors gérer la puissance de votre portal à partir du matériau.
Pour mon projet, j'ai utilisé une portal, avec une puissance de 5.
Eng.
As Vray or Corona, Fstorm has a portal system. He is very used to illuminate interiors in order to collect many more photons.
In Fstorm, It just to create a plane, glued of the borders of your wall at the level of the framing of your windows.
Be careful to orient the normal of your plane pointed inside. Then apply a "FstormPortal" material. Then you can manage the power of your portal from the material.
For my project, I used a portal with 5 power.
Nouveau rendu test avec les nouveaux paramètres et la portal.
New test render with news settings and portal.
Please note that each HDRI is different. It's up to you to find the right settings for your lighting.
New test render with news settings and portal.
Please note that each HDRI is different. It's up to you to find the right settings for your lighting.
7. LUT
Fr.
Fstorm est capable de charger des LUT. Je ne connais pas trop le sujet donc je ne m'attarderais pas trop dessus. Cependant, d'un point de vue artistique, il est possible de grandement améliorer votre image. A vous de les tester.
Une liste de fichier .cube sont déjà intégré dans Fstorm. Mais vous pouvez aussi importer vos propres fichiers.
Eng.
Fstorm is able to load LUT files. I don't know very much the subject so I don't want spent a lot of time on it. However, from an artistic point of view, it's possible to greatly improve your image. It's up to you to test them.
A list of .cube files are already available on Fstorm. But you can import your own files.
A list of .cube files are already available on Fstorm. But you can import your own files.

8. Flou d'objectif - Depth of Field
Fr.
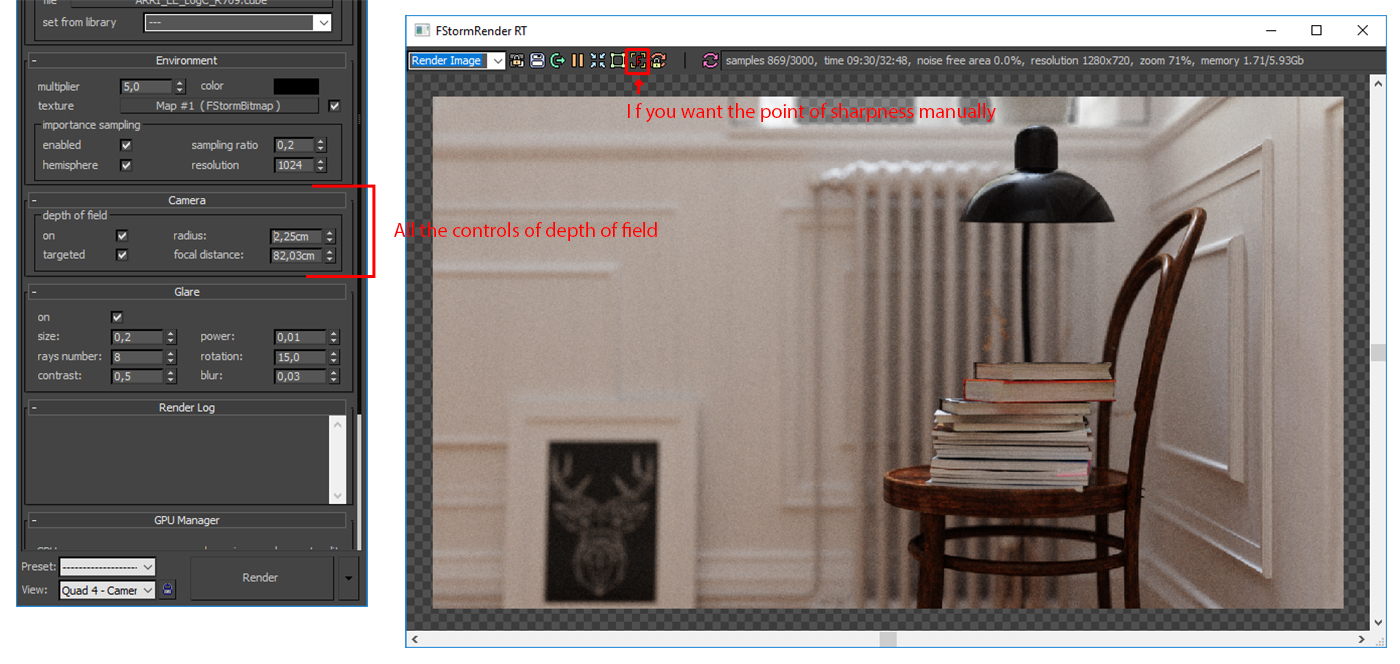
Il est possible de réaliser un flou d'objectif 3D directement au rendu. Pour cela, allez dans "Camera" dans les paramètres de rendu, et cochez "depth of Field" sur "on". Vous pourrez ensuite gérer la puissance avec "radius".
Pour gérer la distance focal, vous avez 3 façons.
. Soit régler directement le "focal distance" dans les paramètres de rendu.
. Soit cocher "targeted" et la distance focal sera alors la distance focal de votre caméra.
. Soit sélectionner directement votre point de netteté dans le rendu interactif de Fstorm à l'aide de cette icone.
Eng.
It's possible to create a depth of field directly in 3D. For that, go to "Camera" in render setting et check "depth of field" on "on". Then you can manage the power of blur with "radius".
To manage the focal distance, you have 3 solutions.
. Set the focal distance directly in render settings
. Tick "targeted" and the focal distance will be the focal of your camera.
. Or select the point of sharpness directly in the buffer with icon.
9. Post Production - Post Processing
Fr.
La post-production n'est pas le sujet ici. Voyez ici qu'il s'agit de simple ajustement de lumières et contraste.
Eng.
Post-process is not the subject here. Just see that it's a simple ajustment of brightness and contrast.

10. Conclusion
Fr.
Ayant très peu de tutoriels à propos Fstorm sur le net dû à son jeune âge, j'espere que celui-ci vous aura été utile. Il s'agit d'un processus simple afin de commencer avec ce moteur gpu. Le but ici était de vous donner quelques bases et de vous donner envie d'utiliser Fstorm.
Si vous avez des questions ou des astuces à me donner, n'hésitez pas à me laisser un message sur behance ou facebook.
Eng.
Having very few tutoroals about Fstorm on the web because of his young age, I hope this one will have been useful to you. It's a simple process to start with this gpu engine. The goal here was to give you some basics and give you the urge to use it.
If you are any questions or tricks to give me, please let me a comment on behance or contact me on facebook.
Cheers.

