A project by Kevin George, Nestor Prado and Ross Macaluso
Introduction
Pre-production
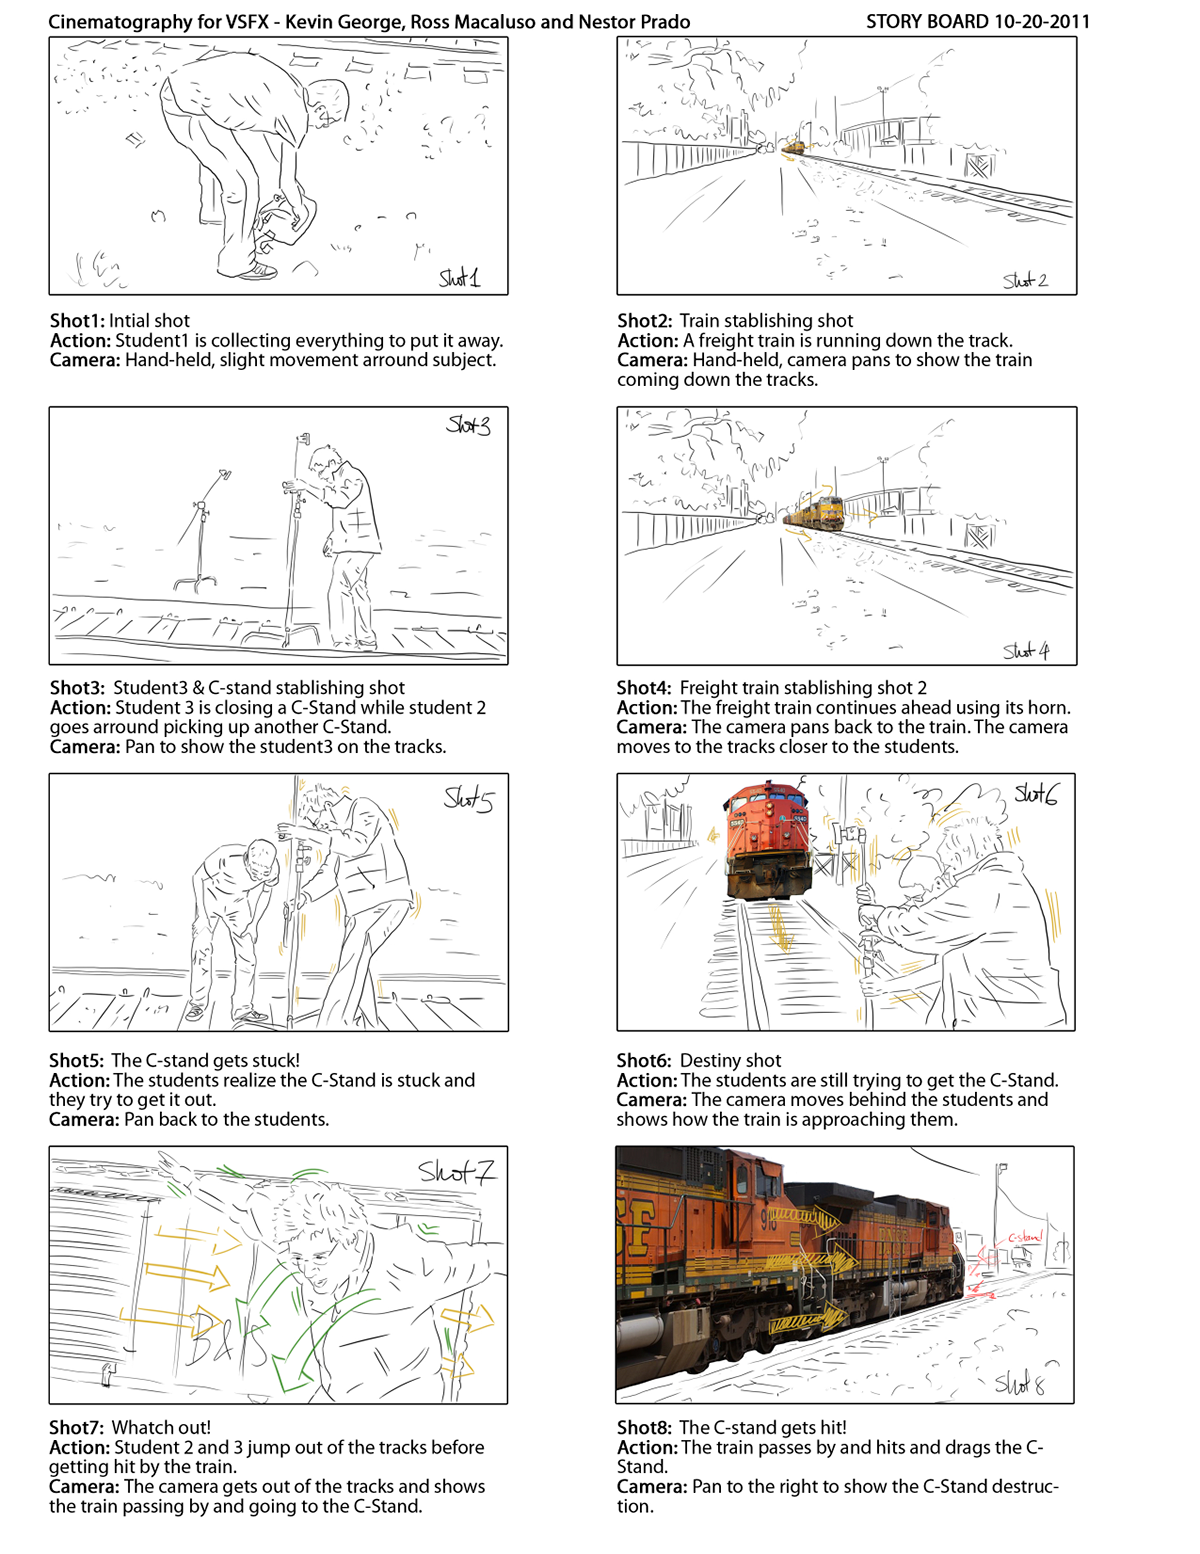
Story Board created by Nestor Prado
Modeling & Texturing Part I: Tank Cars, Box Car and Woodchip Car
The modeling started in parallel with the texturing until the boxcar, woodchip car and tank cars were all finished and ready to texture. The whole set of models were correctly UVed to create more detailed and photorealistic textures.
The modeling started in parallel with the texturing until the boxcar, woodchip car and tank cars were all finished and ready to texture. The whole set of models were correctly UVed to create more detailed and photorealistic textures.
The Shoot

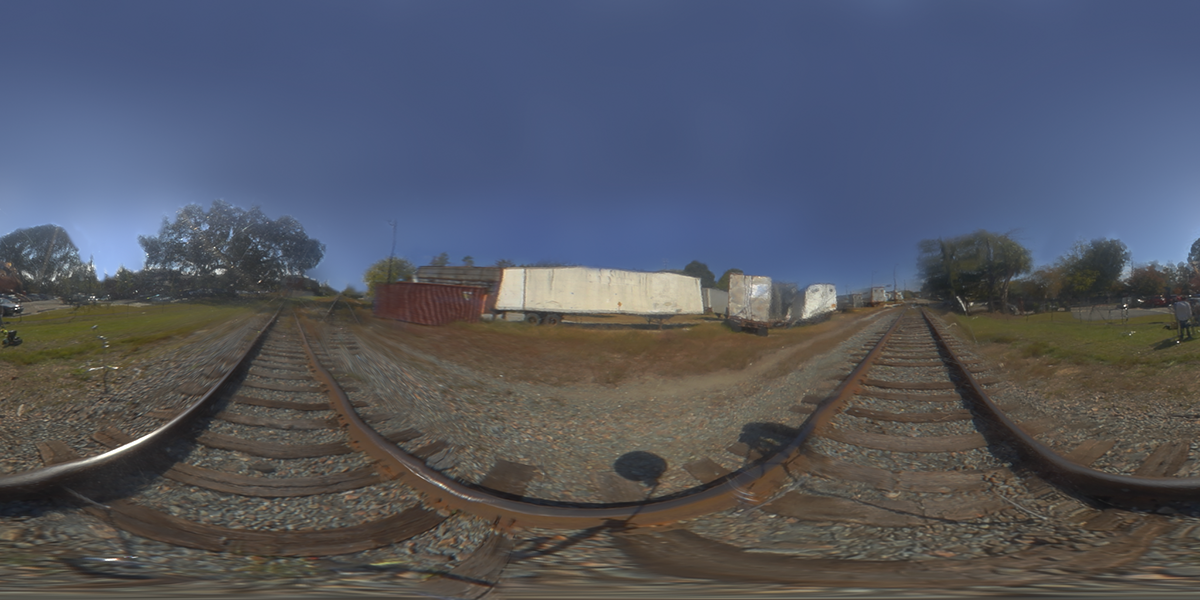
Set survey data recorded by Nika Nikitina
Tracking stage
After the shoot we decided on the take that worked best and tracking begun with that take. In the beginning we used PFTrack to begin tracking the shot as our tracker was more familiarized with this tool. The first out of the box approach of trying to use auto-tracking to solve any portion of the shot proved to be unsuccessful due to the amount of motion blur that occurred by the fact that the whole shot was shot handheld without any stabilization equipment.
After the shoot we decided on the take that worked best and tracking begun with that take. In the beginning we used PFTrack to begin tracking the shot as our tracker was more familiarized with this tool. The first out of the box approach of trying to use auto-tracking to solve any portion of the shot proved to be unsuccessful due to the amount of motion blur that occurred by the fact that the whole shot was shot handheld without any stabilization equipment.
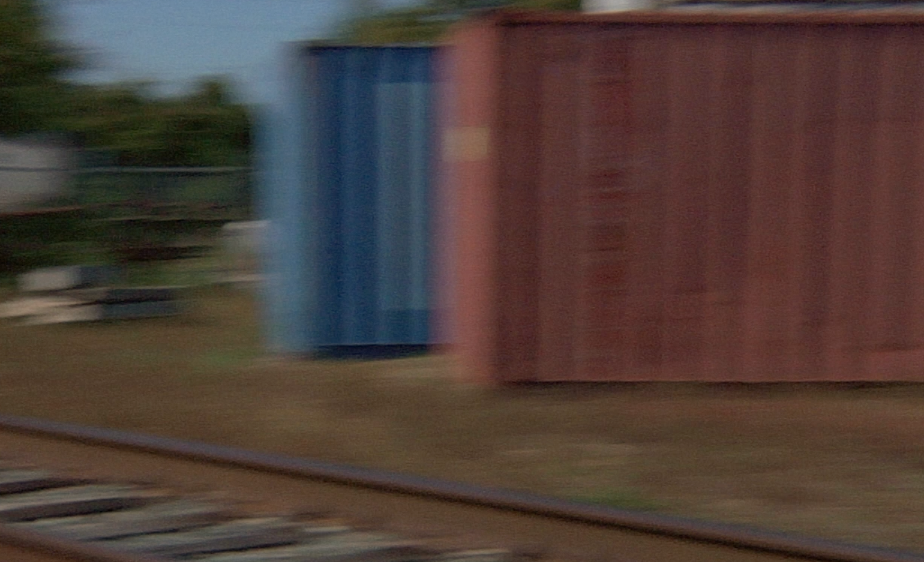
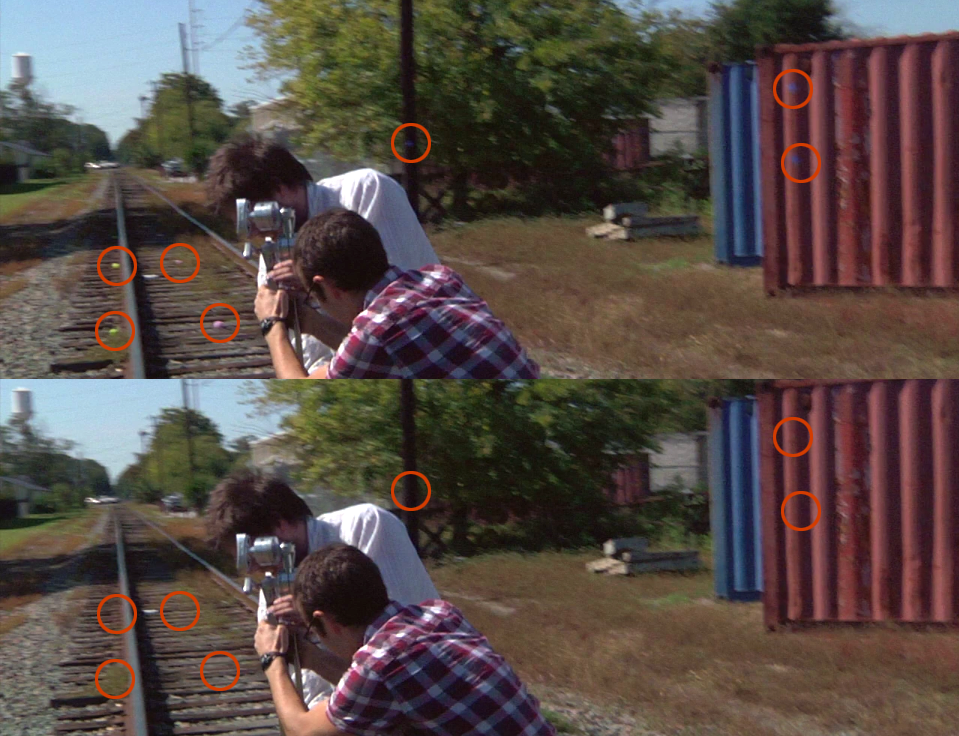
Example of the amount of motion blur in some parts of the shot.
It was clear then that a hand tracking approach should be used to get a workable solve for this entire shot. Using this method, although it was infinitely tedious, gave us some promising results on the first portion of the sequence. Our first intention was to track the different parts of the sequence as three different shots and then have the solves combined into one master solve. But in order to make the clean plate process of erasing the tracking markers and the C-stand easier, we finally agreed to get a track for the entire continuous sequence. That meant a solve for 2200 frames of a continuous hand-held shot. Using the hand tracking approach we started to have all the parts of the shot tracked. When trying to solve with PFTrack we encountered some solving problems that seemed to confirm that getting an entire solve for the whole 2200 frames was nearly impossible.
At that point of the tracking process, we decided to try a different tracking software. Syntheyes was our final choice. In order to transfer all our 2D-hand-tracking data created in PFTrack we used a MEL script called (Survey Solver 2D Import & Export Converter V1.1) that transcripts 2D tracks from one tracking software to another.
At that point of the tracking process, we decided to try a different tracking software. Syntheyes was our final choice. In order to transfer all our 2D-hand-tracking data created in PFTrack we used a MEL script called (Survey Solver 2D Import & Export Converter V1.1) that transcripts 2D tracks from one tracking software to another.
The first solve obtained from Syntheyes was promising - the track seemed to hold up for most of the track. This time in Syntheyes we continued to refine the 3D solution of the camera by adding more hand-tracked 2D features that gave the program more information about the parallax in all the parts of the shot. When we had a solve that was solid enough we exported it to Maya and created a series of playblasts to confirm how the track was holding through the sequence.
Clean plate stage
Original BG Plate (top) vs. Clean plate (bottom) Comparison
HDR creation and lighting approach
Match graded HDR from set used to generate a blurred version for indirect illumination contribution and this one was used for the environment reflections

Gray Card references for direct and indirect illumination on location
The next step was to create a CG light to act as the sun. We determined the correct position and orientation of the sun and then used the gray card footage from a sunny part of the plate to try and recreate the color direction and intensity of the CG light. Once we were happy with the results we had effectively created a lighting environment that recreated fairly accurate the real lighting conditions that the plate was shot in. This became our main light rig that we use to render our final images with.
Modeling and Texturing Part II: The Engine
Look development
The look development stage was ongoing to the end of the pipeline continuously to be able to refine the look and feel of the CG element in context with the shot and the different camera angles it was viewed.
Using the lighting rig created in the match lighting stage, we were able to have a sandbox to further develop the shader and textures on the engine and boxcars until the very end of the production.
Significant challenges were encountered in this stage pertaining to the use of Prman with Maya. A great deal of time was invested in learning the quirks of Prman’s operation to get results comparable to something we could accomplish with a traditional raytracing renderer like mental ray.
Shader creation
For this project we used Pixar’s Prman to render all the elements on the shot. Furthermore we explored the possibilities of Slim to create the shaders for the models. It was an entire self-learning experience for all the team in trying to recreate all the shaders in Slim and make them look as photo-real as possible.
There were quite a few bumps along the way with Slim misbehaving and losing all connections between the nodes. To deal with this issue, we opted to develop a universal layered shader that we could compile out of Slim and use within Hypershade as a traditional shader. The shader was based on Prman’s All-Purpose Shader in Slim and consisted of 5 layers (metal, rust, paint, grime, dust) and various map inputs internally perturbed by procedural effects. All the relevant parameters were made visible to the compiled shader and the one shader was used for all the shading of all the cars.
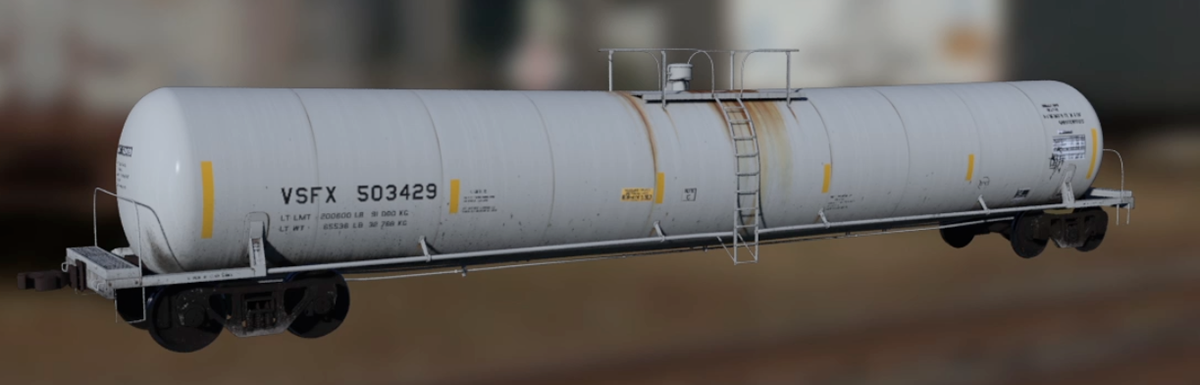
Example of the finished tank car shader. Created by Kevin George
Compositing
The first step in the compositing process was building a clean plate. By having such a solid track and tracking markers on geometrically simple objects, it was very simple to remove the tracking markers with Nuke’s 3d system and correctly placed cards and camera projections.
Next up, the train was roughed in to allow only the minimum required amount of rotoscoping to be performed (just enough to cover the interaction with the train, shadows or any clean plate patches that may cover the actors). The roto was quite challenging due to all of the motion blur but the handheld camerawork was also fairly forgiving and the roto could be fairly loose in some places.
With the rendering pipeline and required passes worked out well in advance, the actual composite of the train was fairly straightforward. We did however end up using a fresnel pass to darken down the diffuse contribution, since our pass structure out of Prman did not appear to be energy conserving and was causing distracting overbright effects at glancing angles on the lighter colored cars. Motion vectors were generated for the wheels and other elements separately and combined with mattes to avoid problems with occlusions and the different directions of motion, and saved a great deal of time compared with rendering the motion blur in-camera.
Some rough rotoscoping and matte passes were used to make the wheels appear to ride on top of the train track. Train transforms were brought into Nuke with the camera for placement of the train engineers and other elements like headlight flares and engine smoke/heat haze. The final step of the initial composite was to match the plate grain, sharpening, and bloom effects in each channel to really sit the train into the backplate.
For the youtube viral-video effect, Nuke expressions were written to retrieve the delta magnitude of the camera’s rotation and drive a skew effect to quickly and cheaply simulate rolling shutter effects. Also, Nuke’s Curve tool was used to find the average intensity of a cropped region of the whole shot for later use in driving an exposure tool to simulate a cheap cell phone’s auto-exposure effect. Initial tests were very distracting, so the effect was reduced for the final export.
Breakdown of the shot
Credits
Please be kind enough to hit the appreciate button down below if you've enjoyed this breakdown. Thanks!