
Resource Management
04: Instances
Version 1.0, Updated March 2023 using Octane 2022.1 and C4D 2023.1.3
About This Guide
This is part of an ongoing series on the exciting world of resource management!
The goal of this series is to explore what C4D and Octane are doing under the hood, and how to tune our system resources and habits to make our workflow as zen and frustration-free as possible. Part 01 is an overview of how the whole system works. Part 02 is a rollup of all the findings of the rest of the series. This guide is a deep dive into a particular area of interest - namely instances.
Guides in this series
· 01: Overview
· 02: Findings Summary
· 03: Polygons
· 04: Instances <--This one
· 05: Textures
PDF
This guide is also available in 📄PDF format here.
I. Intro
We already looked into what happens when we have a ton of polygons in a scene, but what happens when we have a lot of individual objects - even low poly ones? Both C4D itself and Octane have methods of generating a ton of objects - we’re going to explore the Cloner and Octane Scatter in this guide and see how many instances we can make before we melt our laptop.
Similar to the polygons guide, part II of this guide goes over the different systems we’re looking at in detail, and part III is about testing each of these to find the limits on this particular computer. All of the important findings are rolled up into the Findings guide in this series.
Testing system
We’ll be using a 2021 Razer Blade 15 for these guides. Specs: i9-11900H CPU/64GB RAM/RTX3080 Laptop GPU/16GB VRAM/4K 60Hz OLED. OS: Win 11 Home 22H2. Cinema 4D 2023.1/Octane Render 2022.1
Test scenes are 1280x1280, 30FPS. All unnecessary apps and processes have been shut down.
The Gold Standard

II. What’s an instance?
Instances are procedural copies of an object. In C4D, they’re usually known as “clones”, because most of the time we use them in Cloner object, but the concept of an instance is available elsewhere, and it’s pretty common in the 3D world.
Let’s take a sec to go over how C4D handles copies, clones, and instances.

Geometry Object
If we click the cube icon in the C4D interface, it creates a cube (seriously, try it.)
This is a procedural cube, or a primitive. As we learned in the last guide, ‘procedural’ means it’s a small bit of code that lives in the file that generates geometry as needed that gets stored in RAM. This generator, by default, creates eight points that are connected by twelve edges to form six polygons (quads). Since it’s procedural, we can modify some of its properties at any time (# of segments, fillet, etc), and it’ll run the updated code again, redraw the geometry, and store it in RAM again. If we copy this cube and paste it, we get a second procedural cube that is a completely separate object that uses its own RAM and VRAM and has its own impact on viewport performance. Nothing we do to this copy affects the original and vice versa.
Basic stuff, right? Cool, cool, cool.
Geometry Object Resources
FPS: While we can have a single object with a couple million polygons and still get a high framerate, we can really only feasibly have a few thousand individual objects (even single polygon objects) in our scene before the FPS drops and the viewport starts bogging down too much. It would take a while to build a few thousand objects one at a time, but this is something to be aware of if we bring in a CAD model with 4,000 different parts as separate objects (even low poly) and are wondering why it’s going so slow.
Pre-processing time: Thousands of individual objects start to create their own pre-processing hit, regardless of the polygon makeup of the objects. We’ll see this in action in Part II of this guide.
RAM and VRAM aren’t a concern with a few thousand individual nulls or single poly objects. Where this does become an issue is when each of those objects have a few thousand polygons or more, but that’s more of a polygons problem which we’ve covered in the Polygons guide in this series. The code that defines an object itself takes up very little RAM or VRAM.
Cloner and Instance Object
Both the Cloner object and Instance object create procedural copies of a source geometry object. There are three different Instance modes (in the Object tab) for these objects, but for this guide we’re only going to be concerned with Instance mode and Multi-instance mode. Render Instance isn’t super useful for Octane, so we’ll to ignore it.

Instance Mode
Creating an Instance Object set to Instance mode is very similar to just making a copy of the object like we saw in the last section, but it has the added benefit of being able to modify or swap the source geometry once and having all the linked Instances update to match. It’s great for creating, manually placing, and deforming a few variations of an object in a scene. We can’t adjust the parameters (fillet, segments, size) of the instance, but we can directly adjust anything in the Coordinates tab (position/scale/rotation).
The Cloner in Instance mode is also similar to making several copies of an object, but in addition to not being able to adjust parameters, we also can’t adjust the coordinates or color of each instance directly - we have to use the Cloner’s built-in matrix for position, scale and rotation, and effectors and fields to modify all the copies at once. This is great for medium-sized systems with a several hundred, or possibly a few thousand copies. We can still deform particular clones and offset the keyframed animation in them. There are tricks to adjusting parameters using the Cloner’s Blend mode (out of scope for this guide, but good to know).
FPS: A Cloner (or series of Instances) in Instance mode has about the same impact on the viewport as just having that many objects. Our limits here are still a few thousand clones before we go below real time (less for more complex geometry). If we don’t care about viewport feedback and hide the cloner from the viewport, we can have tens of thousands of instances before it gets too cumbersome.
RAM: In Instance mode, each instance takes up as much RAM as the original. This can stack up quickly with hundreds of medium to high poly objects.
VRAM: Instance mode produces real geometry for each copy, so each instance gets baked down into actual polygons and sent to VRAM prior to render. The complexity of the source object affects how much VRAM will be needed, but since we have a quarter the VRAM as RAM, this will fill up pretty quickly.
Pre-processing time: If our Cloner is visible in the viewport, we’ll run into other issues before pre-processing is a big concern. If it’s hidden from the viewport, 30k low poly objects starts to get us over a minute of pre-processing before a render, and it just gets exponentially worse from there.

Multi-instance Mode
A multi-instance is a type of instance that has massive performance and efficiency gains at the cost of versatility.
We’ve now seen that C4D isn’t great at managing a whole lot of single objects. The Instance mode of the Cloner really highlights this limitation when we go over a few thousand instances. Multi-instance removes this issue by treating the entire system as one single object. Suddenly a few hundred thousand, or even a million clones is no big thing. Since the source geometry only gets loaded into RAM and VRAM once (instead of for each clone like in Instance mode), this means we can potentially have billions or even trillions of polygons in our renders.
What’s the catch? The entire system is treated as one single object.
Practically, this means a lot of things that work in Instance mode won’t work in Multi-instance mode. Most notably, we can no longer deform clones individually, and we can no longer offset individual keyframe animations. Textures also become a lot harder to work across a whole system with because the UVs get all squirrely. The trick with using a Blend mode in the cloner to adjust parameters like a fillet doesn’t work in this mode either, and what can and can’t be cloned becomes less obvious (lights and nulls, for example, don’t work in Multi-instance mode).
With a huge amount of instances, the built-in grid (Matrix) itself starts to eat resources, and it actually becomes a little more efficient to use Object mode and scatter the instances across a low-poly piece of geo instead.
FPS: Because this is now treated as one object, and the source geometry is only loaded in once, we’re seeing pretty massive gains here. We can have thousands of objects in the viewport and still get real time performance (depending on the complexity of the source geometry), and there are different Viewport Modes that can allow for even more, which we’ll investigate later.
RAM: In this mode, the total amount of RAM is determined by the source object. If the source object takes 1 MB and there are 10 multi-instances, the system only uses 1 MB. If there are a million multi-instances, the system still only uses 1 MB.
VRAM: The cloner structure itself takes up VRAM, but it’s not until we get into the millions of instances that this becomes an issue. The source geometry is only loaded once into VRAM during a render which allows for a lot of very complex instances.
Pre-processing: When we get up into millions of instances, it can start to take a long time (minutes even) for a Cloner to build itself once it’s turned on, or any parameters are changed. This affects not only the editing phase, but the pre-processing time before a render as well. The Cloner also tends to rebuild itself fairly often compared to a Scatter, especially when trying to time animations.
Octane Scatter
The last thing we’ll look at before we start testing is Octane’s native Scatter system. The Octane Scatter object is found in the Objects menu of the Live Viewer. It’s similar to the Cloner, but with some key differences.

Scatter Surface
Scatter doesn’t have a built-in grid system like the Cloner - it needs some sort of base object (called a ‘surface’, located in the Scatter’s Distribution Tab) to control where the clones are initially spawned. This can be a piece of geometry, particles, or a Matrix object.
The most efficient possible surface for a Scatter is a single polygon, though any piece of geometry with even a few thousand polygons won’t add any noticeable impact. This uses virtually no resources by itself, and Scatter can randomly place millions of instances across the face of that object when the Distribution Type is set to Surface. This means we’re only limited by how many instances our card can handle and how long the Scatter itself takes to build or copy into VRAM - we don’t also have to wait for a large Matrix to build itself and calculate during a render. The downside is that we don’t get a nice neat grid this way.
If the Type is set to Vertex (default), only one instance will appear on each point of our surface object, regardless of what the count is set to. If we want more instances in a regular pattern, we can up the number of segments to produce more points. While this is pretty efficient from a RAM standpoint, it starts to get unstable with high polygon meshes (hundreds of thousands of segments). If a large grid is needed as a starting point, the Matrix object is a much better solution.
A Matrix object is pretty lean, but every 10,000 matrices uses ~1 MB of RAM. This means we’re looking at 100 MB for a million matrices, and this is before we even add any geometry into the scene. The Matrix object also has an impact on the viewport performance. Most of the time it’s best to hide it from the viewport to speed things up. The other issue with the Matrix is that when it gets into the millions of instances, it requires some pre-processing time to rebuild itself after a change in its parameters.

Display Mode
Scatter’s resource usage depends on which Display Mode it’s is set to.
When Line (default), Circle, Box, or Sphere is chosen, Scatter loads the source geometry into RAM and VRAM only once like the cloner in Multi-instance mode. This means the source object can have millions of polygons and not cause problems. The maximum number of visible instances in Line mode on this computer before we drop below 30 FPS is about 200k. Box, Circle, and Sphere modes become increasingly heavier on the viewport, and fewer of these can be shown.
If the viewport starts bogging down, we can reduce the Display Rate which only displays a percentage of the markers. If we do some quick calcs and reduce the rate so we don’t have more than 200,000 lines or 100,000 boxes visible (even though millions of instances will still render), we can get our FPS back up to real time again. The tradeoff, of course, is that we can’t see the position of each and every one, so we’ll need to make some decisions as to what’s more important.
When Object mode is chosen, the viewport works like the Cloner in Instance mode. Real geometry is produced for each instance, which means each instance uses as much RAM as the source. The interesting thing here is that Scatter still only loads one instance’s worth of geometry into VRAM, making the render quite a bit more efficient. The downside is that like Instance mode, the viewport also starts to tank below real time at only a few thousand instances, and less if the model that’s being scattered is more complex. This makes the Cloner in multi-instance mode better if we need to see the exact geometry for tens of thousands of instances.
Build Time
Scatter takes a little bit longer to build than a Cloner in Multi-instance mode with the same number of clones if both are hidden from the viewport, but both can be pretty substantial as we get over 5 million instances.
The build time depends a lot on Scatter’s Display Mode and Display Rate. The fastest it’ll go is when it’s hidden from the viewport. Line mode with a low Display Rate is the fastest if we want to see any kind of viewport feedback. The higher the rate and the more detailed the mode, the slower the build.
When using a Matrix or a very dense procedural object (say a 1000x1000 segment plane in a SubD) as a surface, the Scatter also has to wait until that surface object builds (or rebuilds) itself before it can put instances on it. This isn’t a big deal under maybe a million points or matrices or so on this machine, but over that, and that time can really add up in both the viewport and render pre-processing time.
Part II: Testing
Let's fire up the system, close down anything competing for resources, and get to work!

Test 1: Number of Objects vs. Number of Polygons
1 object, 20k connected polygons: First off, let’s take a look at how Cinema 4D handles individual objects vs polygons. If we make a sphere, set it to Icosohedron mode so it produces triangles, change the segments to 160, and hit Ctl-I, we’ll see that it produces 20,480 triangles and uses 1.2 MB of RAM. It doesn’t matter if we make this editable or leave it procedural - it’s uses the same amount. Our FPS is well over 100, and it takes no time to render. Based on the polygons guide, this is no surprise.
1 object, 20k disconnected polygons: Now let’s nest a PolyFX deformer under the sphere, head to its Transform tab and set Position.Z to 40 cm. This procedurally disconnects and pushes apart all the polygons. The PolyFX itself is using some RAM, so to get a fair comparison, let’s select both the sphere and the PolyFX in the Object Manager and choose “Connect Objects and Delete”.
We’re just left with one single geometry object that contains 20,480 disconnected polygons. If we hit Ctl-I now, we’ll see that it’s using 2.4 MB of RAM - twice as much as our original sphere that had the polygons all connected. Each disconnected polygon has three points and three edges, where with the original sphere, neighboring polygons could share points and edges. All these extra points and edges use up more RAM. This is still one object though, and it doesn’t impact our viewport or render times.
20k objects, 1 polygon apiece: To separate out the polygons into individual objects, we’ll need to nest our disconnected sphere object in a Fracture, and set the mode in the Object tab to Explode Segments and Connect. This takes a bit to process. To keep the test fair, we’re going to make this editable as well by selecting the Fracture object and hitting C. This takes a bit more time to process, but eventually we’re left with 20,480 separate objects, each with one polygon. If we hit Ctl-I now, we’ll see that we’re using 2.48 MB of RAM - just about the same as our single object with the same amount of disconnected polygons.
Here’s the kicker though - if we try to orbit around in the scene or hit play, we’ll see we’re getting ~5 FPS! This is a fraction of the framerate we were seeing when it was a single object with the same number of polygons and using roughly the same amount of RAM. To add insult to injury, we’re now also seeing about 15-20 seconds of pre-processing time before we can render this in Octane.
This illustrates that one of the big bottlenecks in C4D is actually the number of individual objects in the scene.

Test 2: Cloner in Instance Mode
Let’s get a better idea of how many objects - both polygon and non-polygon we can have in Instance Mode.
We already saw that 20,000 single polygon objects tanks the viewport, so let’s see what our limitations are. Let’s drop in a C4D Polygon Object (the blue triangle looking thing, not the “empty polygon” with points on it). We want this to size this to 1x1 and tick the Triangle checkbox so our polycount in Octane lines up with the number of instances. As expected, this takes up almost nothing in the way of resources and has no impact on the viewport.
Now let’s drop that into a Cloner and set the size to 1x1x1. The Cloner defaults to a 3x1x3 grid, so we have nine polygons now which still operates at full speed all around.
We need to make sure to deselect the cloner in the object manager to get the best performance in the viewport. Yes, even having something selected takes a toll when we’re talking about this many objects.
3,000 clones (10x30x10) seems to be about where we start dropping below real time on this computer. With 3,000 clones we can have up to about 3,000 polygons (the built-in Figure object has about 3k) in our source object and still operate at real time. Pre-processing is at about 2 seconds with one poly, and about 15 seconds with 3k. This is already using nearly 1 GB of RAM and ~ 4GB of VRAM, so we can imagine how quickly it’ll ramp up.
10,000 clones puts us right on the cusp of dropping into single digit FPS numbers with one polygon - it’s a lot worse with our 3,000 poly figure. This also adds considerably more pre-processing time to the render. RAM and VRAM start to become a real issue here if the polycount isn’t kept super low.
20,000 nulls can still be shown in the viewport in Instance mode in real-time. What’s the point of this? If we absolutely needed Instance mode because of some limitation with Multi-instance or Scatter that we couldn’t work around, and only needed to visualize the position of each clone, we could set up and time our animations using the nulls, and then swap them out for our real geometry prior to render.
We can also just hide the cloner from the viewport if we don’t need visual feedback for our cloner.
30,000 clones (polygon or null) in a hidden cloner is about our limit of real time performance. We need to be careful about how many polygons are in our source object because it can kill the RAM or VRAM if we get too high. Just having this many single polygon objects adds about 40 seconds of pre-processing time to the render, and it’s far worse with more.
100,000 clones in a hidden cloner reduces us to single digit framerates in the viewport. It also adds 6 MINUTES to the pre-prep before a render (and that’s just for a single polygon). The odds of this running ourselves out of RAM are pretty high at this point if we have anything more than super basic geo. We should seriously be considering Multi-instance or Scatter.
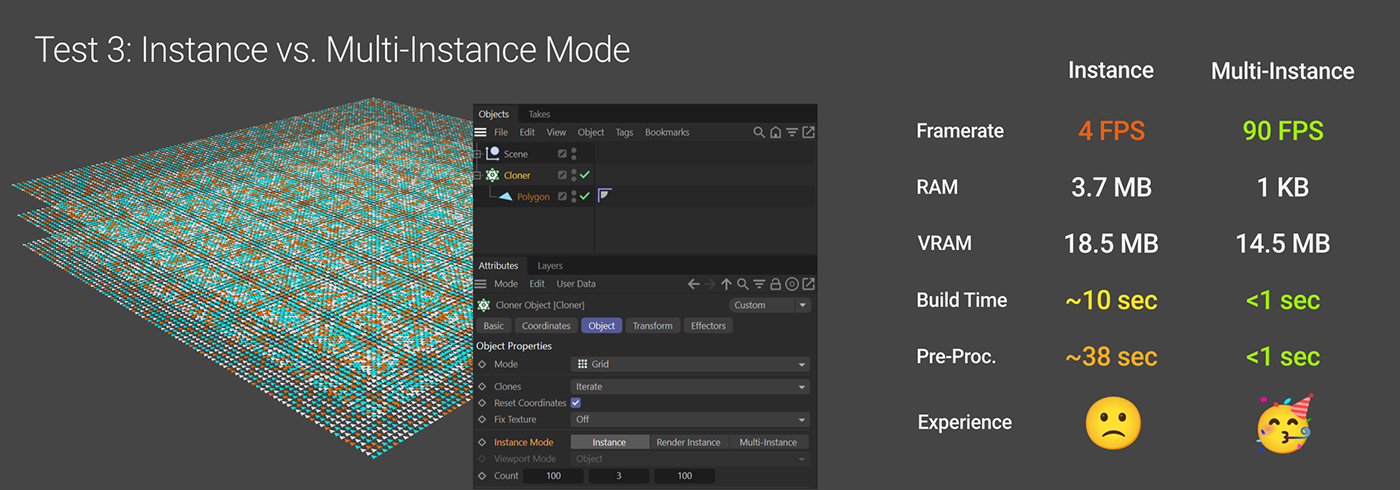
Test 3: Cloner in Multi-Instance Mode
30K Instances -> 30K Multi-Instances
Let’s take our 100x3x100 (30,000 instance) cloner with a 1 polygon source object from the previous test, head over to the Object tab and set it to Multi-Instance.
It takes a few seconds to process that change, but wow, the FPS jumped from single digits to over 90 in the viewport! A render also takes virtually no time to get going. Now we’re talking.
A few interesting things are happening here. First off, in Instance mode, the Tri readout in Octane is what we were expecting: 30,000. When we moved to multi-instance though, the Tri readout dropped to one single triangle. Octane is able to do true instancing for multi-instance cloners. It only needs to store the base geometry (our polygon) once and then it can render clones on the GPU. This is a big part of the massive speed increase.
Because of this it uses less VRAM, although still quite a bit more than just rendering only one polygon. The Geometry readout in Octane was 18.5 MB when we had it in Instance mode, but now it’s 14.5 MB. The instance structure itself, regardless of type, uses VRAM, and we’ll see this ramp up pretty severely in later tests.
C4D itself uses far less RAM for a multi-instance cloner than a regular instance one. If we Ctl-I again. Instead of 3.7 megabytes, C4D is only reporting that we’re using 1 kilobyte of RAM! C4D is treating all the Multi-Instances as virtual copies and not real geometry, so this whole thing with all 30k instances is only taking up as much RAM as our single source object.
Animation stutter issue
At 30,000 multi-instances, even though the FPS is at 90+, when we hit play on the timeline, it stutters and hitches a bit when it loops back around to frame 0. The FPS drops for a few frames, but then ramps back up to full speed. RAM isn’t the issue here, as it’s still not using more than 1 KB. VRAM is still at 1.5 GB for C4D, so again, no impact. What’s going on then?
When the playhead loops back around to zero, C4D tells the cloner to redraw everything in it. These calculations do actually take time. With only a few thousand instances, it’s so fast we don’t notice it, but as it gets up over a 30,000 multi-instances, that redraw process does start to affect performance. It needs to finish redrawing before everything is set in RAM and it can play back at full speed.
If we don’t care about the first few frames of the animation, we can get as high as about 80,000 multi-instances with a very lightweight piece of geometry as our source before we get below real time performance in the viewport (after the cloner is built).

Test 4: Multi-instance Stress Test
What if we don’t need to see the actual objects though? Let’s set the Display mode to Points. Heyo - we’re back up over 100 FPS at 80,000 multi-instances! The loop hitching thing starts to happen for the first few frames in the 170,000 mark.
Somewhere in the 400,000 multi-instances neighborhood drops us below real time if we’re in points mode. Rendering in Octane is still nearly instant and uses virtually no resources.
Now let’s say we don’t care about timing animation. If we crank the count up to 1 million (100x100x100), our FPS starts to get close to single digits. Your mileage and tolerances may vary a bit, but probably somewhere between 2-5 million instances is where navigation becomes tedious in Points mode on this particular computer.
So what if we don’t care about seeing the objects at all? We can set the Viewport mode to Off, and look at that, our FPS is back up over 100. The stuttering at the loop point will continue to plague us, but we can’t see anything anyway since we turned the viewport feedback off, so ¯\_ (ツ)_/¯
1,000,000 clones takes about 2 seconds for C4D to redraw and renders nearly instantly. It uses ~390 MB of VRAM. Peak RAM usage is around 6.7 GB, and the FPS is slow, but not unreasonable.
2,000,000-5,000,000 clones is about where we’d want to turn off any viewport feedback.
10,000,000 clones takes about 15 seconds to redraw, boosts our pre-processing render time to 20 seconds, and uses about 3.5 GB of VRAM. Peak RAM usage is about 35 GB
15,000,000 clones takes about 40 seconds to redraw and 30 seconds of pre-processing. It uses 5.3 GB of VRAM, and RAM peaks at about 56 GB, so that’s getting close to the max before things start to really slow down.
25,000,000 clones takes a full minute to redraw, and adds a minute of pre-processing time to Octane for a total of about 1:10. VRAM usage is at 8.8 GB. RAM continues to max out.
30,000,000 clones takes 1:30 to redraw and runs us out of VRAM, so we can’t actually render it, even with 20GB of OOC memory allocated.
40,000,000 clones runs C4D itself out of memory and crashes, not that it would matter anyway since we haven’t been able to render since 25,000,000.
Octane Scatter
Let’s set up a Scatter system. The Octane Scatter object is under the Objects menu in the Live Viewer. If we create a Polygon object set to 1x1cm, and the Triangle checkbox checked, and nest it under the Scatter, nothing will happen in the viewport. Remember, Scatter still needs something to clone on. Scatter calls this the Surface object. Since we want a nice grid, we can create a Matrix object, and set the size to 1x1x1. In the viewport, this turns the Matrix into a big grayish cube. Now if we select the Octane Scatter, and drop the Matrix into the Surface field in the Distribution tab, we’ll still see a big grayish cube (which is really 10,000 matrix boxes smooshed together into one big shape because they’re so close together). The Scatter system doesn’t hide the Surface from the viewport, so we’ll have to manually set the top traffic light for the Matrix to red (not the checkmark - turning that off will disable the Matrix completely).

Viewport shenanigans
So... now with the Matrix hidden, there’s still only one polygon visible in the viewport. If we rendered this, it would show what we expected, but the viewport doesn’t match. This is due to two things.
1. Scatter does not hide the source geometry from the viewport. It does hide it from the render, though. If we zoom in and look closely at that original polygon, we’ll see that while it’s currently the only thing showing in the viewport, it’s not there in the render. Since we’re in Lines mode, we can just click the top traffic light on our Polygon to hide it from the viewport and it doesn’t affect anything. There, now we see nothing at all.
2. This is more complicated. By default, Octane Scatter represents each instance as a vertical line. This line shows half the height of the instance. Right now, what we’re cloning is a plane that’s in the +Y orientation (also known as XZ). It’s a single polygon, so while it’s 1cm wide (x) and 1cm deep (z), its height (y) is zero. So the scatter is showing its vertical lines at 0 cm each, or as we like to think of it... nothing.
So how do we see anything? In the Scatter’s display tab, we can set the Display Type to something else, like Circle. Now we can see 10,000 flat circles that represent the bounding box of our 1x1 polygon. We could also set this back to Line, and in the Polygon’s Object Tab in the Attributes Manager, set the Orientation to +Z. Now the Triangles are all standing up, and they have a width (x) of 1, a depth (z) of zero, and a height (y) of 1cm. As a result, we can now see 10,000 1cm tall white lines in the viewport. If we make the object’s height 10cm, for example, we now see the lines are 10cm tall. Let’s set it back to 1. Awesome.
One other way we could approach it is to set up the polygon on +Z or +X, Swap the X or Z with the Y count in the Matrix, and then rotate the entire Matrix 90 degrees so the lines go flat across the top.
Crash Resistance
If we’re using the Matrix object as our base, we need to be careful as we get up over 5 million instances. Things can get unstable, so we need to follow these steps in this order:
1. Stop the Octane Live Viewer
2. Hit the green check next to the Scatter to disable it.
3. Hit the green check next to the Matrix to disable it.
4. Adjust the Matrix count or size, or whatever.
5. If any significant number of matrices were added, consider lowering the Display Rate in the Scatter
6. Re-enable the Matrix.
7. Re-enable the Scatter.
Test 5: Scatter Stress Test
Under 5,000,000 instances isn’t much to worry about on this machine with Scatter as long as we manage our Viewport Mode and Rate properly. If we exceed the number of actual instances to get good performance, we can start dropping the rate until we get 30 FPS again.
3,000 Scatter Instances is about the max for real time performance when the Display Mode is set to Object.
20,000 Scatter Instances is about the max for 30 FPS using Display Mode: Sphere
25,000 is the max visible instances for 30 FPS using Display Mode: Circle
100,000 is the max visible instances for 30 FPS using Display Mode: Box
200,000 is the max visible instances for 30 FPS using Display Mode: Line
At 5,000,000 Scatter instances using a Matrix as a base, it takes about 17 seconds to rebuild the Scatter if we change any of its attributes. Remember though, this is a one-time build - it doesn’t have to refresh it every time the timeline loops, so we can still play back in the viewport just fine once it’s done building. We can still get real-time viewport feedback if we set our Display Rate to 2.5% or so (yes, we can do decimals here). Render Pre-processing is at about 13 seconds. VRAM is at 2.9 GB, with 1.8 GB of that being the geometry. RAM peaks around 15 GB.
At 10,000,000 instances, it takes about one minute to rebuild the Scatter. We can still get real time feedback if we lower the Display Rate to 0.7% or so. Pre-processing time is about 30 seconds. VRAM usage is at 4.46 GB now. RAM peaks at 21 GB.
At 15,000,000 instances, it now takes about 2:30 to rebuild the Scatter. RAM still peaks at about 25 GB. Real time performance is still even possible now at 0.25% Display rate. Render pre-processing is at 40 seconds. VRAM is at about 5.6 GB.
At 25,000,000 instances, we’re at 3:10 to build the scatter. Pre-processing is a t 50 seconds, and VRAM usage is up to 9.9 GB. RAM peaks at 48 GB which is better than the Multi-instance cloner. Amazingly real-time feedback is still possible at 0.1% Display Rate, but just barely.
At 30,000,000 instances, it takes 5:15 to buid the scatter and won’t render on our machine. Looks like ~25M is still the upper limit.
Test 6: Maxing Out All The Resources

So at 25 Million instances with either the Cloner or Scatter, we’ve hit the limit of the number of instances Octane is willing to render. We still have some VRAM to burn though. After a bit of trial and error, it turns out that about 6.75 million quads (13.5 million tris) is about the most we can use as our source object before we crash. Let’s make sure we set it up in a way that limits the chances of us wrecking C4D.
If we’re using a Cloner, we want to:
1. Create a Cloner
2. Set the Instance mode to Multi-Instance, Viewport Mode to Off, Count to 1000x25x1000, Size to 10x10x10cm, and then Disable the cloner (green checkbox).
3. Make a Subdivision Surface object, set it to Level 2.
4. Make a Plane, set the segments to 650x650. Hide it from the viewport (but not the render).
5. Nest the Plane in the SubD, nest the SubD in the Cloner, then turn on the Cloner.
6. Wait until it’s done building (1 minute or so), then render.
For Scatter, we want to:
1. Create a Matrix with a count of 1000x25x1000, size is 1x1x1cm, hide it from the viewport.
2. Create an Octane Scatter, immediately turn it off (green check -> red x), set the Display rate to 0.1%
3. Drag the Matrix into the Scatter’s Surface field on the Distribution tab.
4. Create a Plane, make it 1x1cm, Orientation +Z, 650x650 segments, hide it from the viewport.
5. Create a Subdivision Surface object (defaults to Level 2, which is what we want), hide it from the viewport AND disable it (green check -> red x)
6. Nest the Plane in the Subdivision Surface, nest the Subdivision Surface in the Scatter.
7. Enable (but do not unhide) the Subdivision Surface, wait a few seconds for it to rebuild.
8. Enable the Scatter, wait 3 minutes and change for it to build, then render.
Results
This exercise really calls out how the two systems compare. In both cases, 338 trillion triangles render in Octane, which is probably more than we’ll need for most scenes. Both systems max out the RAM during the render (we were expecting that), and use about the same amount of VRAM (~12.5 GB or so). They both also add about the same amount of time to the render pre-prep: ~1 minute, which seriously isn’t bad compared to the polygon stress tests.
The difference lies in the build time and feedback. Scatter takes about 3x as long to build as the Cloner (3:10 as opposed to 1:10). The Cloner still suffers from having to redraw more often than Scatter, especially if we’re looping the animation. Scatter also allows us to have some amount viewport feedback, where the Cloner chokes if we try to even enable points.
Wrap Up
This guide hopefully gave you a very good understanding of how instances work in Cinema 4D, and the pros and cons of each system.
Author Notes
OG31 Resource Management: Instances, version 1.0, Last modified March 2023.
This guide originally appeared on https://be.net/scottbenson and https://help.otoy.com/hc/en-us/articles/212549326-OctaneRender-for-CINEMA-4D-Cheatsheet
All rights reserved.
The written guide may be distributed freely and can be used for personal or professional training, but not modified or sold. The assets distributed within this guide are either generated specifically for this guide and released as cc0, or sourced from cc0 sites, so they may be used for any reason, personal or commercial. The emoji font used here is Noto Color Emoji.


