


"Spot You" was the final project I completed for my BSc Product Design degree at Bournemouth University.
It is a safety aid for weight lifters who want ensure a level of safety whilst training alone, or for those who are training in the company of others (i.e., with a "spotter"), who want an extra level of safety to mitigate the risk of severe injury whilst exercising.
This was a self-led design brief. While i'm certainly no "body builder", I have an interest in fitness and used to be a very regular gym goer whilst I studied. The main issue I was addressing was the danger posed to weight lifters when performing bench press exercises. The user will typically lie on a horizontal or incline bench, with the weighted barbell above their chest. For some athletes, the mass on this barbell could be well in excess of their own body weight.
Some exercise routines require the user to exercise until almost absolute exhaustion, for best results. The risk however, is that the user may become so fatigued, that they reach a point where the weight is above their chest/ neck, and they do not have the strength to push the weights away and move the barbell back into it's rack. This is where the user may become trapped underneath the barbell, causing possibly fatal injuries or asphyxiation if the barbell rests on the user's neck.
The image below came from a video on YouTube, where an athlete is exercising alone, and documenting his performance on camera. He becomes fatigued, and lets the bar fall onto his neck. While he had been cautious to use a set of safety bars, a failure in the design had allowed the barbell to fall below one of the safety bars. The video captures his terrifying and desperate struggle to get himself out from underneath an extreme amount of weight. In this case, the athlete was extremely lucky to get away unharmed. Sadly there have been cases recored where people in similar circumstances have not been so fortunate.

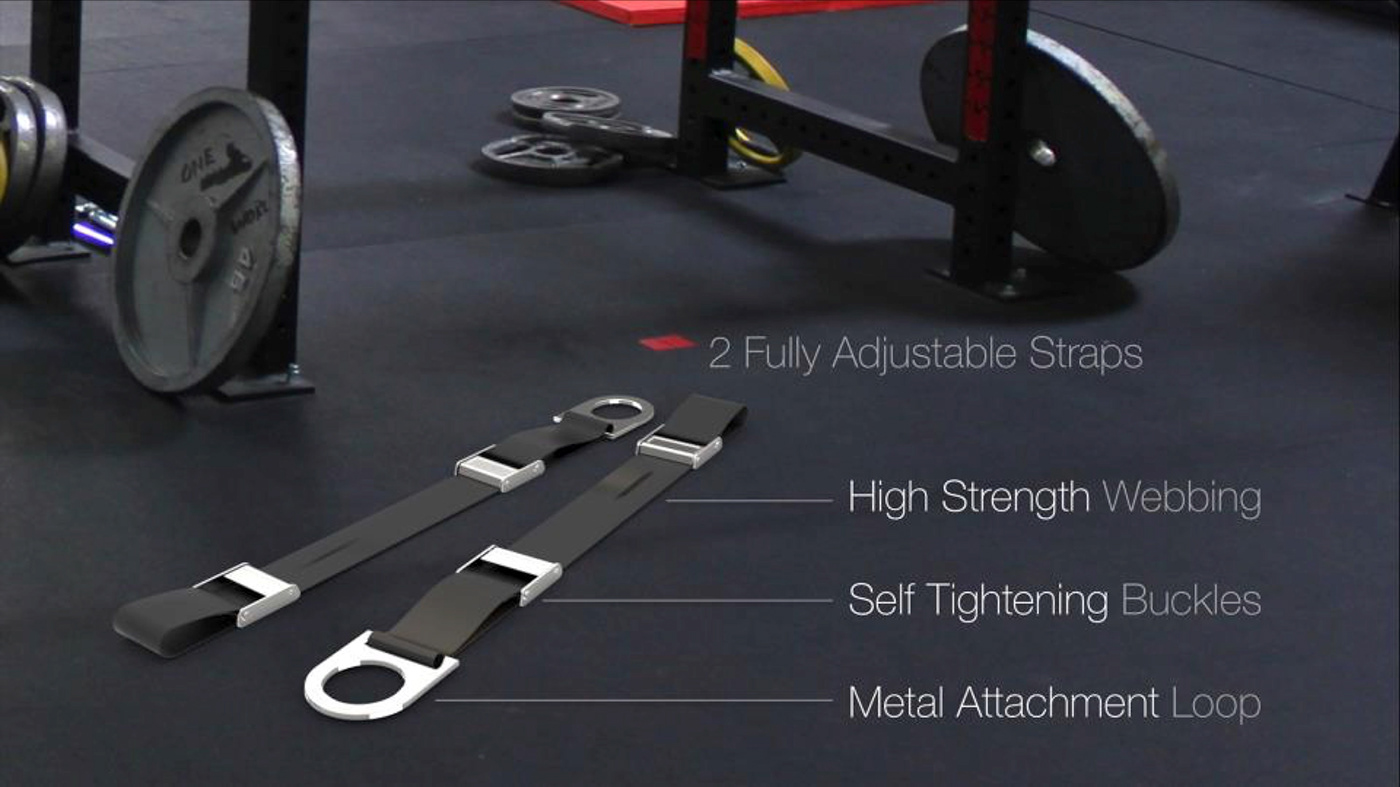
After investigating solutions in a variety of complexity levels and research into materials, the concept I pursued was a simple design using high strength straps, in order to tether the barbell to the bench press frame.

An important aspect of the design was that it needed to be universal, to be compatible with all conventional weight lifting equipment. Following consumer market research, in the form of interviews with fitness professionals and questionnaires to amateur weight lifters, I found that the vast majority of users do not own their own weight lifting equipment, but instead visit a commercial gym. I visited and emailed many different gyms, to understand what types of equipment and which brands were in use. Fortunately, all commercial gyms use "olympic" standard barbells, which have a uniform length, weight and diameter.
The weight lifting bench, however, comes in various shapes and sizes, so a flexible, universal design was required to adapt to different equipment styles.

The product needed to have an easy to use, adjustable mechanism- but it was critical that this mechanism must be self tightening, so that the straps would not change length accidentally during use.

Every component in the design had to withstand 10000N force in extension. While this may sound extremely high, it was calculated to be necessary to ensure that the product would have sufficient strength in the absolute worst case scenario - where a user with the 95th %ile longest arms held a barbell weighing 150KG with their arms fully outstretched, and let go of the barbell. The product needed to be strong enough, that just one of the straps could withstand the entire dynamic load (assuming that the barbell does not fall perfectly horizontally, but falls at a slight angle so that one strap fully extends first).
Each component was tested in isolation - the metal (steel) components were all designed theoretically for sufficient ultimate tensile strength (UTS), before being prototyped in a suitable grade of steel before being tested in a tensile testing machine.
As for the flexible strap itself, many different materials were investigated and tested on a tensile machine to better understand their performance and limits. Most material samples were different weaves of Polyester or Nylon webbing, but some more exotic materials, such as Aramid, were also tested. While Aramid offered the greatest strength and slightly higher young's modulus than polymer alternatives, it was deemed overengineered for the requirements of the product. In the end, Automotive grade polyester webbing (of the same specification used to make seat belts) became the material of choice, since it satisfied the performance criteria but came with added advantages in choice of colour (something Aramid lacks, in that it cannot be coloured), as well as the wide use of the material in the automotive industry meaning the material is already readily available in large quantity, cheap and quick to source.
Given that I had little experience with sewing previously, and the university offered no support with this, I had some research to do with regards to the stitching! I bought some example products - an old car seat belt from a breakers yard, and an airline seatbelt extension found on eBay, and looked at the way they had been sewn. With these products you will invariably see a large square patch of stitching, and I learnt that there is very good reason for this.
By itself, a thread has its own tensile strength. Say, for example, a single polyester thread breaks at 5N. That would effectively mean that if I put a single stitch through two pieces of fabric, at would take 5N to tear them apart (unless of course the fabric is weaker, in which case it will tear before the stitch breaks).
But when you make multiple stitches, the strength of the thread is multiplied by the number of stitches. 100 stitches of thread with a 5N breaking point would be like making a rope with 100 threads and breaking them all together. You end up with 100x the strength. In this example, 500N breaking force. But the stitches have to be reasonably well spaced out from each other. Otherwise, you run the risk of damaging the fabric due to the number of needle penetrations in a single place. Spreading the stitches over a large area distributes the stress in a loading situation, creating a lesser "stress concentration", figuratively speaking.
I took 6 samples of seat belt webbing, sewn together with two different types of thread with 3 different quantities of stitches. I then pulled each one to destruction in a tensile test machine. This enabled me to put this theory to the test, and extrapolate the results in a graph to predict the minimum number of stitches I would need to achieve 10000N. This then informed the final design - Which was to have a minimum of 260 stitches of heavy duty polyester thread.


I get a huge amount of satisfaction from taking a concept and turning it into reality, and that's exactly what I did when I constructed a final prototype (I should mention, that there were some 30+ prototypes built before the final version. Good design rarely falls into your lap, but perseverance and reiteration allows the design to be optimised).
The final prototype was a combination of many hours spent on a milling machine and a lathe, to machine the steel components, before powder coating these (I was a running joke in the workshop, where I must have made about 20 different samples of varying shades of red before I was happy with the "candy" red option seen below).
Following this were several hours on a sewing machine. Part due to my lack of sewing experience (although I was getting quite good near the end!), and part due to my ~30 year old Husqvarna sewing machine that I bought 2nd hand struggling to cope with sewing through 3 layers of seat belt webbing. Despite many broken needles, the machine served me well. All credit to Husqvarna sewing machines, I can vouch that they are built like tanks.
At some point in the development process, I was considering branding, and what I might name the product, whilst drawing concepts, and a few pieces fell into place. I realised that by removing some material from the largest steel component, turning the "O" shape into a "D" shape, I was able to save a few unnecessary grams of weight whilst turning the shape into what looked like the letters "SU" stacked vertically. So came the name, "Spot You" and the SU logo.


With finishing touches from embroidered labels that I designed and commissioned before sewing into place to tidy up the ends of the straps, as well as flexible rubber-like bands to neaten up any loose strap material, branded with the SU logo. These prototypes were vacuum cast in house with our university prototyping facilities.
I then went one step further, just because I could, and created a mock up of an illustrated instruction manual and even a SU branded bag to store the whole product in.

Of course, I also produced one other prototype- nearly identical, but without the decorative touches, to check that I had met the strength target. The complete prototype was put in the tensile test machine, and I braced myself from far away as I watched the machine ramp up to 10000N. Low and behold, it worked!
Despite calling this the "final prototype", I'd still say there was limitless room for improvement on this design, to further improve its usability. It's a product that solves a problem in a different way to anything else on the market, and I believe it could have market potential with the right investment and further development.
